| Part 1 — Backup to a cloud provider with Veeam Agent for Microsoft Windows Part 2 — Restore from a cloud provider with Veeam Agent for Microsoft Windows |
One of the best things about Veeam Agent for Microsoft Windows is the ability to back up to and restore from one of the many Veeam Cloud Service Providers. This functionality opens up a new use case for Veeam Agent for Microsoft Windows, the business traveler.
Bridging the Availability Gap for “road warriors”
Anyone who has travelled extensively for work knows the hardships involved in ensuring your local data is secure and recoverable. Laptops, after all, are fragile and susceptible to fatal damage from short falls and bumps. To ensure the highest Availability of local data, a traveler would generally have to utilize two methods of backup: File-level backups to a provider, and volume-level backups to a USB drive. In this case, should data be accidentally deleted or over-written, it would be easy enough to pull down a previous copy using the file-level backup, and in the event of a hardware failure, the volume can be restored to a different hard drive or workstation from the USB drive. While this strategy did work, there are a number of short-falls that lead to an Availability Gap. For starters, travelers may not always have access to the internet, or may choose to disable file-level backups while on metered connections, preventing local backups from running. As for volume backups, USB drives can be cumbersome, require the user to remember to plug them in for backups to run, and not to mention that they are susceptible to being lost or damaged alongside the workstation, rendering the backup useless.
In order to address the issues that plague travelers, Veeam has introduced the following features into Veeam Agent for Microsoft Windows:
- Backup directly to a cloud provider – This functionality provides the backbone of protecting traveler’s workstations. The user or administrator can now perform backups of the entire computer, individual volumes, or file-level backups, directly to a cloud provider from anywhere in the world with an internet connection.
- Local backup caching – Having full knowledge that travelers may occasionally find themselves without reliable internet access, Veeam has introduced the ability to create a backup cache on local storage for use during these times. During times of unreliable internet access, Veeam Agent for Microsoft Windows will utilize this local storage to house any new incremental backups. Once unmetered internet access is available, it will immediately push these backups up to the cloud to ensure they are stored safely off-site.
- Bare metal recovery from a cloud provider – In the event of hardware failure of a local machine, the traveler is able to utilize the Veeam bootable recovery media to connect to their cloud provider from new or replaced hardware, and initialize a full volume restore. You are able to import drivers into the bootable recovery media for easy recover to dissimilar hardware, and as long as there is adequate free space, you can restore to a smaller or larger disk.
- Cloud provider sub–tenants – Previously, a cloud provider would generally create a single tenant for a customer with one large quota for all of their backups. To allow for ease of management and user isolation, Veeam has introduced the ability to create sub-tenants. Administrators can now assign individual quotas to each sub-tenant to ensure backup-happy users do not over-utilize all of the available cloud storage, while at the same time ensuring no tenants have access to each other’s backups.
- Scheduled backups and backup events – For most traveling users, scheduled backups may not always be ideal. Who knows if at 10 PM will be the optimal time to backup, and what happens if the workstation is off at that time? With backup events, Veeam is able to schedule backups automatically if you either lock, or log off of the workstation. You can also force backups to complete if the workstation is powered off during the scheduled backup time, and Veeam will even shut the computer down for you once the backup has finished.
Configuring backups to a cloud provider
Now that we’ve covered all of the great things Veeam Agent for Microsoft Windows has to offer to “road warriors,” let’s go over some best practices for configuring these jobs. If you run into any hiccups, you can always review the Veeam Agent for Microsoft Windows User Guide.
Creating a recovery media
After installing Veeam Agent for Microsoft Windows, you are asked to provide some form of removable media to act as a backup target. Since we’ll be backing up directly to a cloud provider, this is un-necessary and can be skipped. You’ll then be asked to configure your bootable recovery media. In the event of any sort of hardware failure, this media will be used to restore the workstation from any available backups to either similar or dissimilar hardware. Should your organization have standardized hardware, you’ll likely want to choose to create an .iso of the bootable media, however, you may also choose to burn the image directly to an inserted USB key or CD-ROM/DVD. It is critical that this media is distributed to any traveling user. Not only is it vital in performing volume-level restores, but it also includes numerous utilities that will prove useful for system recovery. For our example, we’ll be creating an .iso of the recovery media which can later be burned to external media.
Should you have skipped the initial recovery media creation step, you can also navigate to the “Tools” folder under the Veeam program files entry to start the wizard. The first screen (Figure 1) shows the available options for creating the bootable media. In our example, we see we have a 1GB USB drive, along with the option for creating an .iso image, which we’ve selected. We also have a number of options for this recovery media. I’ve chosen to not include decryption keys in the recovery media for security reasons, and I’ve also chosen to include the network connection settings and hardware drivers for this computer to allow for a seamless restore for my users. You may notice that we can also choose to include additional drivers for storage and network, should we be creating an image for other physical hardware, we can utilize this feature to automatically inject drivers into the recovery media. Don’t fret if you’ve skipped this step as you’ll be able to inject drivers into the bootable recovery media after booting as well.
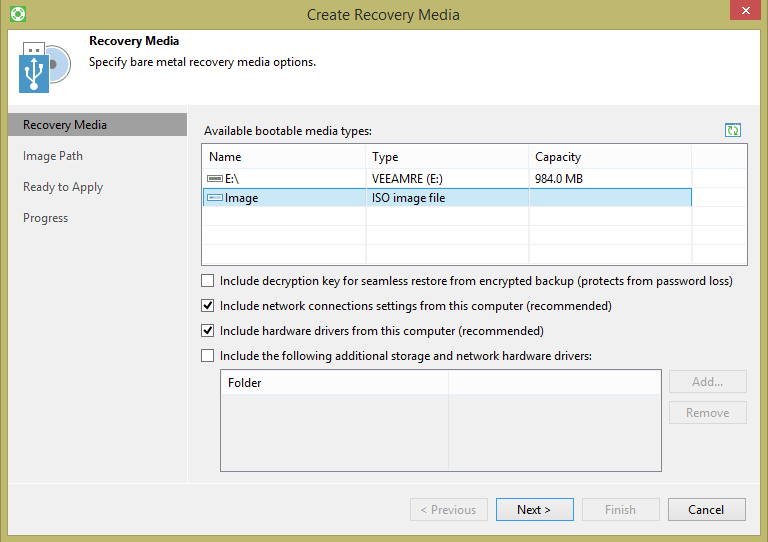
Figure 1. Bootable media creation
After configuring our recovery media, we’re prompted to save the .iso. You can either save it locally or choose a CIFS share and enter the credentials needed to connect if necessary.
Click “Next” and you’ll be asked to verify the configuration, and then the .iso file will be created. Just a reminder that it is critical this image be burned to either a CD/DVD or USB and included in all traveling equipment.
Backup configuration
Now that we have the product installed, we’ll be asked to perform an initial backup job configuration. You’ll be prompted for what backup mode you’d prefer. For our purposes, we’ll be choosing an entire computer backup to ensure all of our volumes and files are backed up to the cloud. We’ll also want to choose the “Veeam Cloud Connect Repository” option (Figure 2).
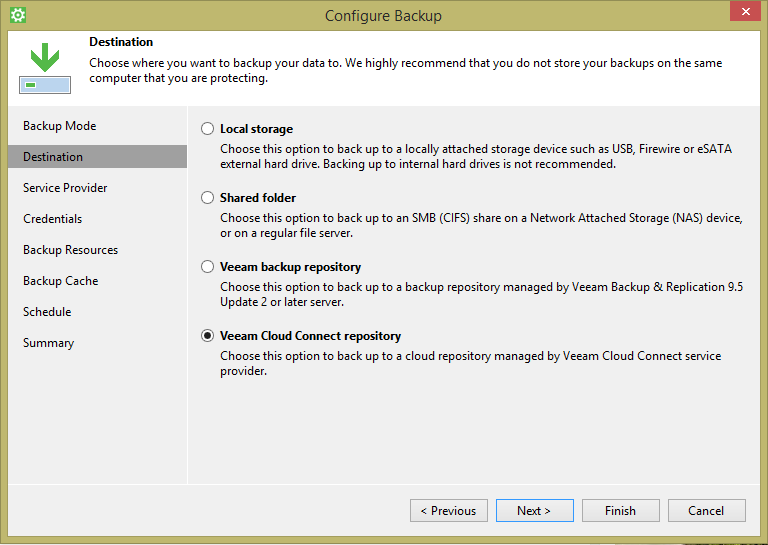
Figure 2. Backup destination
Under the Service Provider tab, you’ll enter the DNS name or IP address of your preferred service provider, which should be supplied to you upon signing up. You’ll also be asked to supply a port. For our purposes the port will remain the default of 6180, but this may be different depending on the service provider you choose. On the next screen you’ll be asked to enter the credentials for connecting to the service provider. These should also be supplied to you by your chosen Veeam Cloud Connect service provider. In this case, we have a subtenant “bjervis” of the fake company “Jervis Holdings LLC.” Note that subtenant usernames are entered similarly to an Active Directory domain and user account. In this case, the main tenant account is “Jervis Holdings LLC” and the username is “bjervis,” separated by a “\” (Figure 3).

Figure 3. Credentials
Next, we’ll see the allocated backup resources to our sub-tenant. Note that we will only see the resources allocated to the subtenant, and not the full resource allocation of the primary tenant. We can also configure retention period for this backup, which is different than a standard Veeam backup in that it keeps backups based on “how long since the machine has been running.” In this case, if the machine has not checked into the cloud service provider for a lengthy amount of time, backups will not be removed, even if they surpass the retention period (Figure 4). We also have the option to configure advanced settings. Here we can configure synthetic/active full backup settings, along with compression, deduplication, and encryption settings. Encryption should be used to secure your data while sending it across the internet, and avoid raw access to your backups for the service provider, however, the administrator should ensure the password is saved in a reliable, secure location. It is never fun having to tell a customer that their backup data is almost useless because they lost their encryption password.

Figure 4. Backup configuration
Next, we’ll configure our backup cache settings. As mentioned previously, backup cache is a local storage that will be used to store backups in the event a cloud provider is unavailable. In my example, I have a 1 TB spinning hard disk assigned to the D: letter that is separate from the SSD running my OS on C:. Since I’m already low on space on my D: drive, I’ve assigned it a total maximum size of 10 GBs which should be sufficient for the small incremental backups I generate while on the road and unable to connect to an un-metered internet connection. However, if you have the space, it’s wise to keep more space reserved for a cache (Figure 5).

Figure 5. Backup cache
Finally, we reach the schedule configuration. Here we can see I have configured my workstation to backup daily at 12:30 AM. Since I rarely turn my workstation off, even while traveling, this will be sufficient for my needs. However, we can also configure the backups to kick off following a Lock, or Log Off. With our backup configured, we can kick off the initial full backup to the cloud. It is recommended this be performed over an un-metered, fast connection, as once it’s complete we’ll only need to send incremental to the cloud, unless active fulls have been configured to run (not recommended for cloud backup jobs).
Next comes restore from our configured and created cloud backups, don’t miss it!
