I firstly wanted to highlight a series that is being written by Jorge on Microsoft Azure and Veeam. He touches on connectivity, deployment, configuration and then restore options. This is where I want to jump in with the topic of my at least two-part series. I will be touching on a feature within Veeam Backup & Replication called Veeam Restore to Microsoft Azure. Though before it was baked into Veeam Backup & Replication, it was a standalone free product available in the Microsoft Azure marketplace. Veeam Backup & Replication 9.5, with this included feature, was launched at the back end of 2016, but the standalone has been around since around April 2016.
There are lots of resources out there running through the process and lots of demo videos on YouTube, but I wanted to show some more options that we can use this feature for.
A PowerShell script use case
The reason I wanted to put this concept out there was to highlight some of the additional functionality you could bring to your environment using this feature. The real use case that stands out today is the ability to migrate your workloads to Azure away from the on-premises configuration. This is achievable, but this is a one-way conversion. Very much like the physical to virtual (P2V) process we all know and went through a few years back. Another use case would be around leveraging Azure for an isolated test and development environment. Again, completely doable, but the issue within the interface is that you must be reactive to when you want to set this lab up and the wait time to transfer the image to Azure is the biggest piece to contend with.
What this PowerShell script concept will allow you to do is create a scheduled task to run proactively and give you the test bed without having to manually configure and wait for this to be set up. By using PowerShell script we can completely automate this process and have this run before you arrive in the office.
Pre-requisites and Azure requirements
There are a few things you need to have in place for us to start using this script that I will cover later on.
- Microsoft Azure Account — preferably the Azure Resource Manager and not Classic Mode
- A Veeam Backup & Replication server with the Veeam PowerShell SnapIn (This instance can be running anywhere including Azure)
- A Veeam backup chain, as with the Veeam Backup & Replication server this can be stored anywhere. If it was stored in Azure, it would save that conversion time
- Ability to add your Azure account to Veeam Backup & Replication via either interface or PowerShell. For the purposes of this blog post I will not cover this step
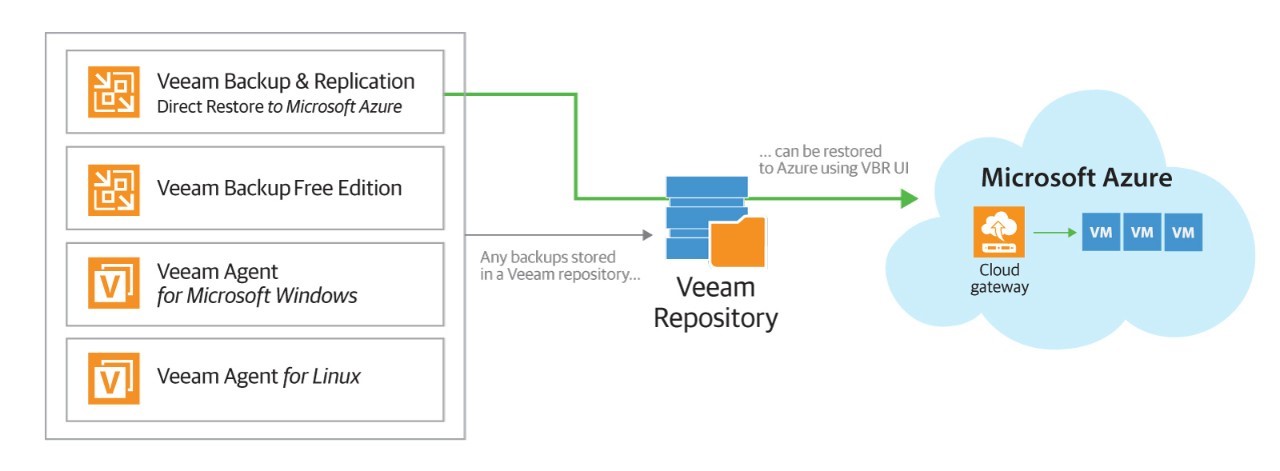
The other posts have already covered the process that Veeam Restore to Microsoft Azure takes, but the process involves the conversion of the VM’s backup file to a VM running in Microsoft Azure. By having the backup chain already in Microsoft Azure, you can expect that transfer time or the conversion time to be much faster than sending them from an on-premises location.
The Variables
“A variable is a value that can change, depending on conditions or on information passed to the program. Typically, a program consists of instructions that tell the computer what to do and data that the program uses when it is running.”
I will place the actual script to discover the variables that we require. There is one variable here that will determine the Veeam Backup restore point. In the script example you are able to determine the latest restore point of a VM in the backup. All this additional information will become clear with the second part of the series:
- Backup job name, virtual machine name(s)
- Azure Subscription
- Azure Storage Account
- Azure VM configuration
- Azure Virtual Network
- Azure Resource Group
More resources can be found within the Veeam user guide.
Variable Script
$restorepoint = Get-VBRBackup -Name "TPM04-SQL-02" | Get-VBRRestorePoint -Name "TPM04-SQL-02" | Sort-Object $_.creationtime -Descending | Select -First 1

$account = Get-VBRAzureAccount -Type ResourceManager -Name "username@domain.com"

$subscription = Get-VBRAzureSubscription -Account $account -name "SubscriptionName"

$storageaccount = Get-VBRAzureStorageAccount -Subscription $subscription -Name "vdr2ma"

$location = Get-VBRAzureLocation -Subscription $subscription -Name "eastus"

$vmsize = Get-VBRAzureVMSize -Subscription $subscription -Location $location -Name Standard_A1

$network = Get-VBRAzureVirtualNetwork -Subscription $subscription -Name "vdr2ma"

$subnet = Get-VBRAzureVirtualNetworkSubnet -Network $network -Name "default"

$resourcegroup = Get-VBRAzureResourceGroup -Subscription $subscription -Name "vdr2ma"
Running the script
Now for the fun part, lets run the job to start sending our latest restore point up into our pre-defined Azure environment.
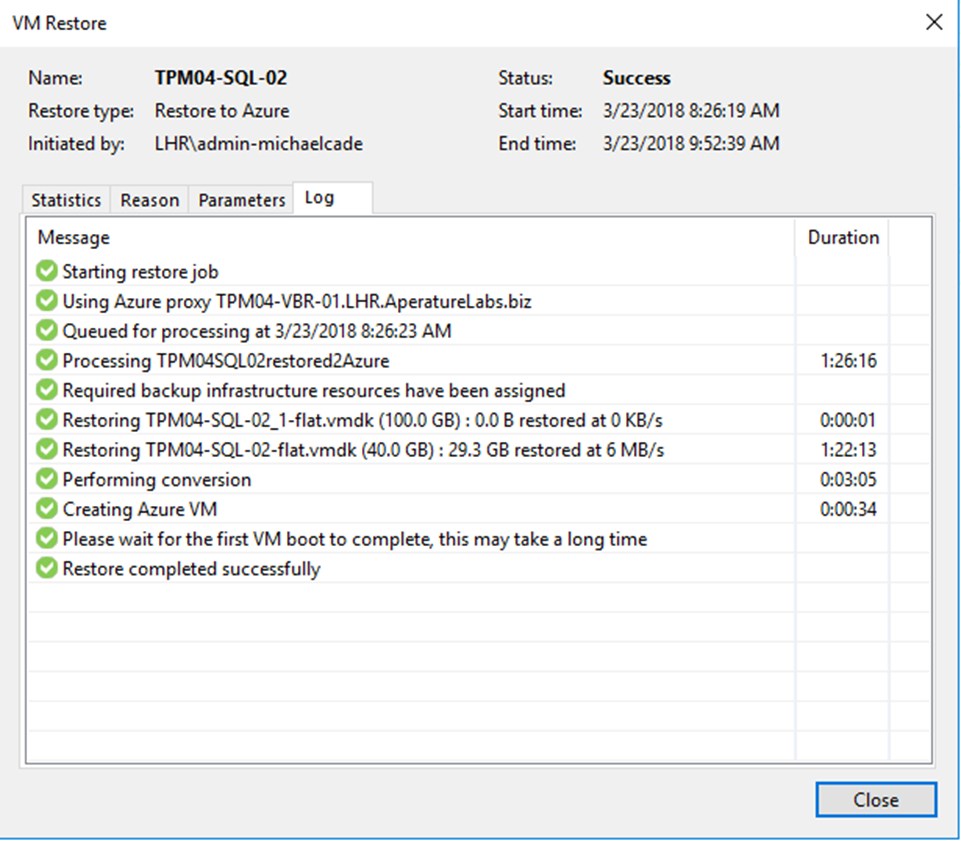
Start-VBRVMRestoreToAzure -RestorePoint $restorepoint -Subscription $subscription -StorageAccount $storageaccount -VmSize $vmsize -VirtualNetwork $network -VirtualSubnet $subnet -ResourceGroup $resourcegroup -VmName TPM04SQL02restored2Azure -Reason "Test and Development"
Clean-up script
We also want to be able to stop this job or to clean up the Azure VMs we have provisioned. For this purpose, which is for a test and development use case, we want to completely remove the machine from our Azure environment.
Login-AzureRmAccount

Select-AzureSubscription -SubscriptionName $subscription -Current

Get-AzureRmVM -Name "TPM04SQL02restored2Azure" -ResourceGroupName $resourcegroup>

Stop-AzureRmVM -Name "TPM04SQL02restored2Azure" -ResourceGroupName $resourcegroup -force

Remove-AzureRmVM -ResourceGroupName $resourcegroup -Name "TPM04SQL02restored2Azure" -force
Now, let’s take the PowerShell script and show how it can be backed into your day-to-day Veeam Backup & Replication jobs. This would allow us to take the most recent backup and convert it straight into an Azure Virtual Machine after the backup job is done. This means we can schedule the backup job to start within a certain window and get this machine (or a group of machines) converted before your test/development team is even in the building.
The use case
This specific use case I keep mentioning is around test and development. There are no hard rules on this, anything that could take advantage of cloud computing within Azure is a valid use case. For example, taking advantage of an isolated environment to perform modern analytics against the most current backup data or for training and development to certain areas of the business. The possibilities are endless.
You saw in the last post the creation of the raw PowerShell script, by taking that script and adding that to a backup job as pre- and post-job scripts which give us the ability to schedule a conversion task. The time it takes to convert to that Azure VM or that group of Azure VMs depends on the backup file placement.
Adding the script to the job
We want to firstly run through creating a new backup job or using an existing backup job. On the “Storage” step of the settings you have an “Advanced” button, by selecting it and going to the “Scripts” tab, you can specify your pre- and post-job scripts. Another interesting concept here is an ability to pick either a number of times you want to run these scripts or certain days to run them on.

Pre-job script
The concept of the pre-script is the clean-up script mentioned in the first post. The idea here is that we may not want to duplicate multiple instances within our Azure environment. If we do then maybe we just remove this script completely. What this script is going to do is power down and remove any of our provisioned resources from the last run of the job. If this is the first run and there are no provisioned resources, then you will receive an exit code 1 meaning there is nothing to be removed.
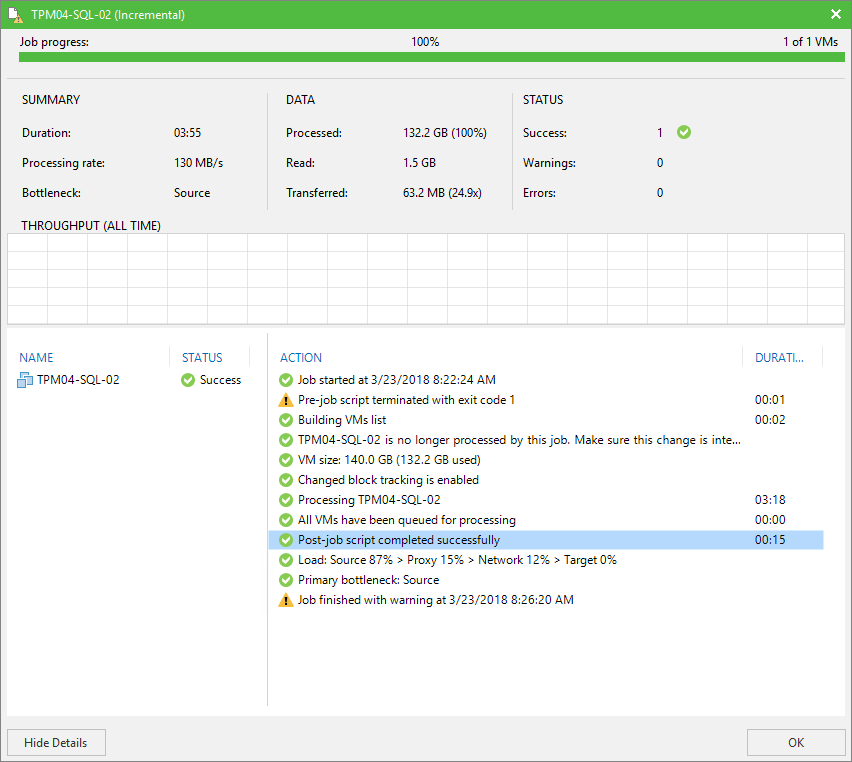
Post-job script
This script is going to take place after the backup operation has completed. In our case, the job will take the most recent restore point and send it for conversion in our test and development environment in Azure. Once the backup job is complete, you will see a new job for conversion start within the Veeam Backup & Replication tasks.
