Have you ever been in a position where you needed a quick and simple website, but didn’t know how to serve it to your users? Maybe it was a page for a small business or a promotional site for a new app your team was launching? But you needed to deploy it as reliably as possible with as little overhead as you could manage. In situations like these, you may want to consider using a static website created from an Azure Storage.
Static websites are web pages made up of only HTML, CSS, and Javascript files that don’t rely on a server back-end. They are relatively simple to set up, and can be incredibly versatile considering that they can also invoke server-less functions by calling the corresponding REST endpoints.
Way back in the dark ages of IT, the pages themselves would be just as easy to create and set up, but required a lot of the same server infrastructure. Now in the age of cloud computing, you can host a site, deliver it globally and monitor it with just a few button clicks.
Prerequisites for static website in Azure
In this article, you’re going to learn how to set up a static website in Azure. To follow along, be sure you have a few of these prerequisites in place beforehand.
Creating an Azure Storage Account
To start your static website, you’ll need to create an Azure storage account. You’ll want a General Purpose v1 or v2 account, but the recommendation is to go with v2 if you’re creating this from scratch as v2 has the latest security patches and can be slightly cheaper.
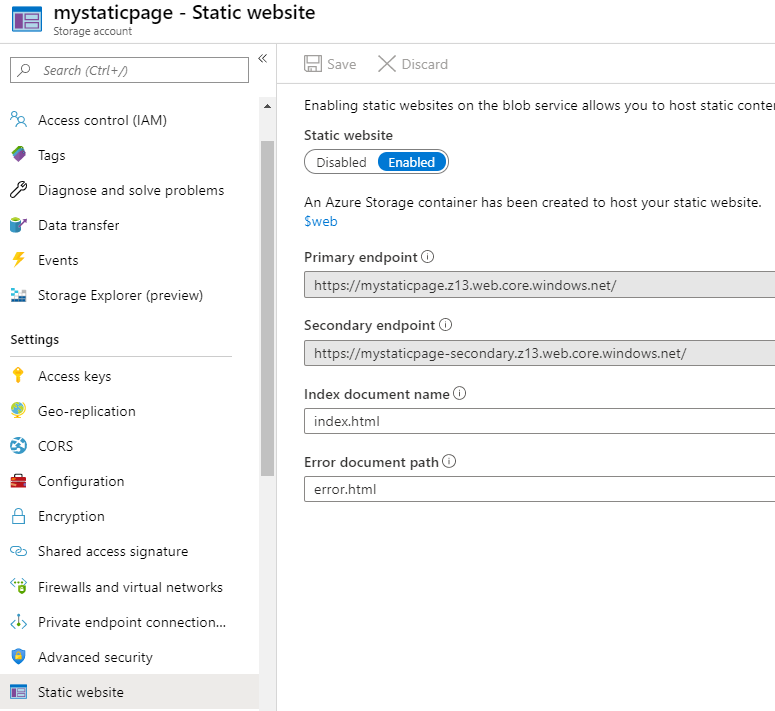
- While viewing the storage account in the Azure portal, you’ll see a page under Settings called Static website as shown below. Select Enabled.
- Under index document name enter index.html and under error document name enter error.html. Don’t worry about what these are yet, that will be explained later.
- After you click on Save, you’ll be given a primary and secondary endpoint. Save these for later as this is how you will go to your page once it’s running.
- Once this is all done, you’ll notice that you have a new Blob Storage Container called $web. If you’re familiar with other cloud platforms, this is the Azure equivalent of S3 or a Storage Bucket.
If this is your first time working with cloud services, Blob Storage Containers are a service that allows you to store virtually any amount of unstructured data for very little cost. At the time of writing, the highest tier of blob storage costs just fifteen cents per gigabyte for a month. That’s a half a cent per day!
Uploading Your Web Assets with Visual Studio Code
For this demo, you don’t even need a full gigabyte, only two small text files. These should be in a separate folder or workspace on your device. You’ll be uploading two files called index.html and error.html. The files and their contents in their entirety are written out below.
<!-- index.html -->
 <h1>Hello World!</h1>

 <!-- error.html -->
 <h1>404 Page not found</h1>
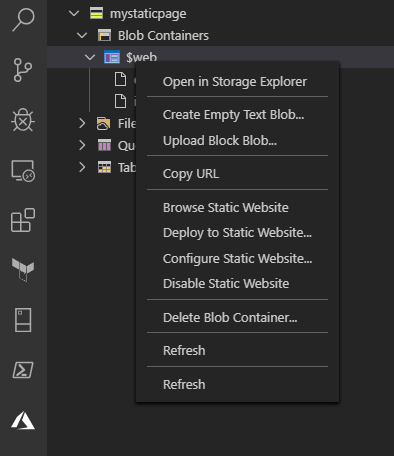
There are a number of ways to get these files uploaded to the blob, but by far the easiest is with the Azure Storage extension of Visual Studio Code mentioned in the requirements above. Once you’ve installed it, there will be a new button on the side of your Visual Studio Code toolbar that looks like the Azure logo.
- Click on the Azure logo where you will be asked to log in.
- Once you have authenticated to Azure with the extension, right-click on the $web storage container under —> –> Blob Containers as you can see below. You’ll then see an option to Deploy to Static Website.
- Click on Deploy to Static Website and choose the folder containing the two files mentioned earlier. Visual Studio Code will then deploy those files as your static page and return a success message to you.
Inspecting the Static Website
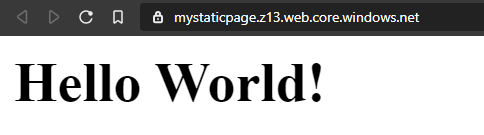
Once the files have been uploaded, now navigate to the primary endpoint you received earlier and you will be shown a familiar message. This is the index.html page you uploaded earlier.
You can also see below that the error.html page will be shown if you navigate to any page that doesn’t exist.

Next steps in a static website setup in Azure
Now that your static site is up and running in Azure, you can add a custom domain to this site by using Azure DNS to redirect users to the endpoint on the $web bucket perhaps. You could also use the Azure metrics dashboard to track users that visit your new website by using Azure’s built-in GetWebContent API, which will track any requests sent to this page.
There are many potential users of an Azure static website. The world is your oyster. Happy developing!
