- Veeam Support Knowledge Base
- How to test manually mounting the Veeam vPower NFS Datastore
How to test manually mounting the Veeam vPower NFS Datastore
Cheers for trusting us with the spot in your mailbox!
Now you’re less likely to miss what’s been brewing in our knowledge base with this weekly digest
Challenge
This article documents manually mounting the vPower NFS Datastore using the vSphere Web Client.
The steps of this article are only intended as a troubleshooting step to help in investigating and isolating an issue with vPower NFS-based restores failing.
Solution
Stage 1: Information Collection
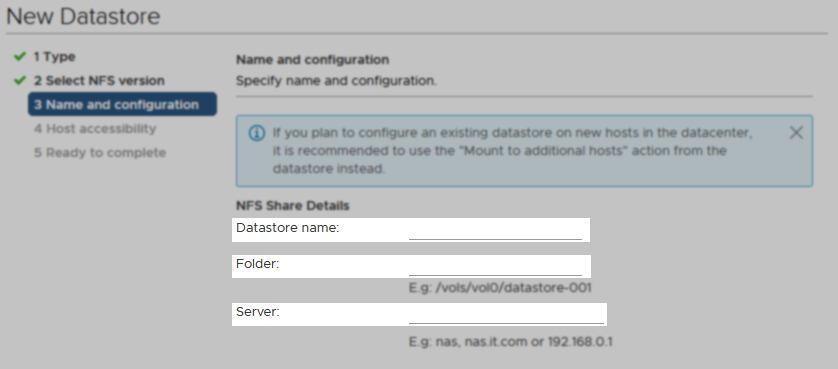
To add an NFS Datastore to an ESXi host you will need to specify Datastore name, Folder, and Server. This stage of the article will document where to find this information.
Datastore name
The Datastore name used by Veeam Backup & Replication is always the same as the 'Folder' without the leading forward slash. See Folder entry.
Folder
The Folder name is stored in the registry of Mount Server under the value nfsFolderName in the key:
HKLM\SOFTWARE\WOW6432Node\Veeam\Veeam NFS\Shared Folders\{GUID}

Server
For this, specify the IP Address of the Mount Server associated with the repository where the backup files are located.
Stage 2: Disable vPower NFS IP Authorization
Starting with Veeam Backup & Replication 9.5 U4, access to the NFS Share is restricted so that it is only accessible by the ESXi host during restore operations.
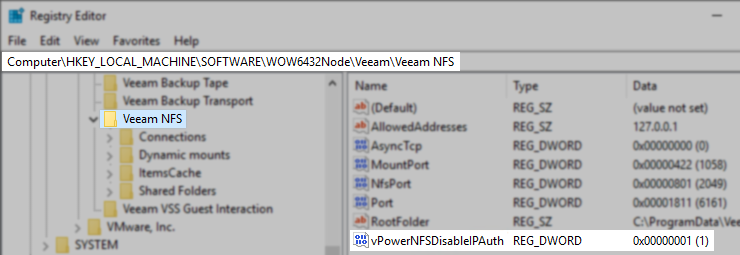
When testing the manual mounting of the vPower NFS Datastore, the IP Authorization system must be disabled to allow the inbound connection from the ESXi host to the Mount Server. To disable the IP Authorization system, create the following registry value on the Mount Server associated with the repository where the backup files are stored.
Key Location: HKLM\SOFTWARE\WOW6432Node\Veeam\Veeam NFS\
Value Name: vPowerNFSDisableIPAuth
Value Type: DWORD (32-Bit) Value
Value Data: 1
After creating the above registry value, restart the Veeam vPower NFS Service.
This value disables built-in IP authentication for the vPower NFS Share and is only recommended for testing purposes. Remember to delete the value or set it to 0 after you are done testing.
Stage 3: Manually add the VeeamBackup_ datastore
Note: The directions below document how to create an NFS datastore via the vSphere Client connected to a vCenter running vSphere 7.0. If the environment you are working with is running a previous version or does not have a vCenter, consult VMware documentation for creating an NFS datastore.
- Connect to the vCenter via the vSphere Client
- In the Hosts & Clusters view (ctrl+alt+2), locate the host specified during the restore operation.
- Right-Click on the host. In the context menu under Storage, select New Datastore.
- Select NFS for the datastore type, and click Next.
- In the New Datastore wizard that opens, select NFS 3, and click Next.
- On the next page, enter the details in Stage 1 of this article, and click Next.
- Enter the Datastore name as the nfsFolderName value found in the registry without the leading forward slash.
- Enter the Folder as it appears in the nfsFolderName registry value identified in Stage 1.
- For Server, enter the Mount Server's IP address.
- Review the summary information and click Finish to create the datastore.


More Information
Related Veeam vPower NFS Service Articles:
- Troubleshooting vPower NFS Datastore Mounting Issues (Main Troubleshooting Article)
- Veeam vPower NFS Service fails to start
- How to test manually mounting NFS folder
- Unable to Mount VPower NFS Specified Key Name or Identifier Already Exists
- NFS share cannot be used
- Upgrade of Veeam Backup & Replication fails with Error 1327. Invalid Drive:
To report a typo on this page, highlight the typo with your mouse and press CTRL + Enter.
Spelling error in text
Thank you!
Your feedback has been received and will be reviewed.
Oops! Something went wrong.
Please try again later.
You have selected too large block!
Please try select less.
KB Feedback/Suggestion
This form is only for KB Feedback/Suggestions, if you need help with the software open a support case
Thank you!
Your feedback has been received and will be reviewed.