Not every infrastructure requires multiple hosts to sustain your production environment, let alone enterprise licenses with features you don’t really need. That is where VMware Essentials Kit license steps in, providing cover for all of your basic needs and saving you quite a few bucks. But even the simplest setups may have to be reconfigured or adjusted further down the line. And, as the title says, you are now set with the task of moving a VM from one datastore to another.
The bad news is, since VMware Essentials Kit doesn’t include the handy features like vMotion and Storage vMotion, you have to move everything manually. The good news is, there is a way to substantially simplify this task with the help of Veeam! And, what’s even better, you won’t have to pay another penny for that.
In our previous post, we unveiled how you can move your VM from one ESXi host to another by using Quick Migration feature of Veeam Backup Free Edition. Quick Migration comes in every edition of Veeam Backup & Replication and is essentially a one-time replication that allows you to easily move live VMs from one VMware host to another or to move VMs between existing datastores on the same ESXi host without any downtime.
A few things to know before proceeding:
- Quick Migration is available only for VMware environments
- At least a minimum paid license of VMware ESXi is required for proper operation of Veeam Backup Free Edition due to API restrictions of free ESXi
Now, let’s get to the scenario where your host remains the same, and only location of VM’s disks is due to change. If you’re already familiar with our product or have used Quick Migration before, then you can skip to step six.
1. Download Veeam Backup Free Edition.
- It is also advised to download latest update.
2. Install it on a virtual or physical 64-bit Windows machine (see the full list of supported operating systems) that has access to the production environment. Since we’re rolling with Veeam Backup Free Edition, no license is required during installation.
3. Launch Veeam Backup & Replication Console from your desktop and start by adding your VMware vSphere Server— it can be either vCenter or ESXi host.

4. Now that you’re able to browse your infrastructure, find the VM that you need to move, right-click on it and select “Quick Migration.”
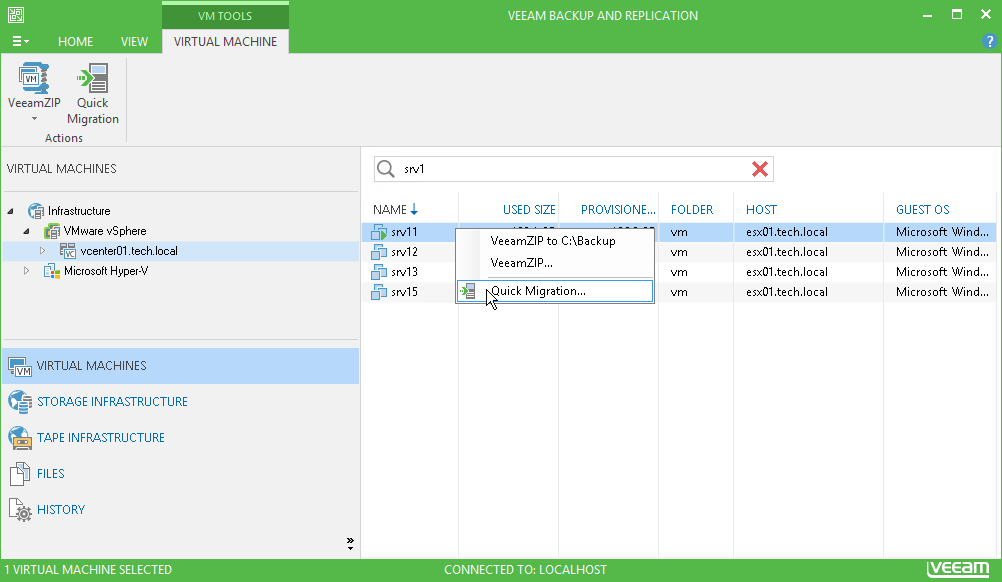
5. Inside the wizard, you’ll find this VM already added to the list. In case you need to move other VMs’ disks as well, you can always add more via the corresponding button.
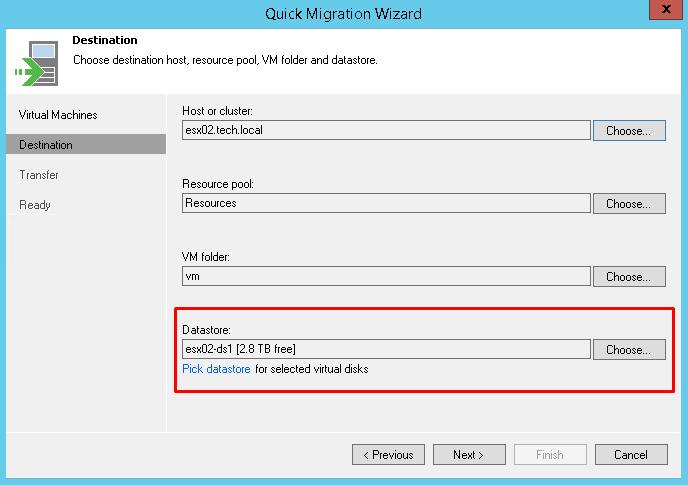
6. Proceed to the “Destination” step where you can pick a new target datastore for your VM(s). Make sure that you’ve picked correct host, resource pool and VM folder in the first three fields as well!
- If you want to move only particular disks, you can do so by clicking “Pick datastore for selected virtual disks” below the main datastore field.
7. Since we can’t pick proxies in the Free Edition, on the “Transfer” step they will be left at automatic and will use Veeam backup server itself.
8. Next step will give you a summary of current settings, so make sure to double check them and you’re good to go!
- If you don’t want your original VM(s) to be deleted, you can untick the option “Delete source VM files upon successful migration” so “_migrated” suffix will be appended to original VM(s).

And that’s it! You have successfully moved your VM from one datastore to another!
While you’re at it, why don’t you try to create a reserve copy of your VM now? After all, you always have to be prepared for the worst! And nothing says safety better than the full image of your valuable data with flexible restore options that Veeam offers.
If you still have questions about Quick Migration or require a bit more insight into every step taken, feel free to check out this overview of the feature on our portal.