- Veeam Support Knowledge Base
- Hyper-V Guest processing skipped (check guest OS VSS state and integration components version)
Hyper-V Guest processing skipped (check guest OS VSS state and integration components version)
Cheers for trusting us with the spot in your mailbox!
Now you’re less likely to miss what’s been brewing in our knowledge base with this weekly digest
![]()
Oops! Something went wrong.
Please, try again later.
Challenge
Guest VMs will fail to engage VSS when Application-Aware Processing is enabled, generating the error:
Error Guest processing skipped (check guest OS VSS state and integration components version) (System.Exception)
Solution
At the time this article was written in 2014, resolving this error required checking several factors, which are still listed below as they may continue to impact Hyper-V checkpoint operations. In recent years, however, most issues can be resolved by either:
- Rebooting the VM's Guest OS.
or
- Restarting the "Hyper-V Volume Shadow Copy Requestor" service within the VM's Guest OS.
(If the service does not start, verify that the Backup option is enabled in the VM's Integration Services settings.)
If the problem persists, please review the additional information provided in the remainder of the article below.
The solution section of this knowledge base article has been split into four different sections. Please review each step of the following areas:
- Integration Services (Only for Server 2012 R2 and older)
- Within the Guest
- VM Configuration
- Verification
Part 1: Integration Services (Server 2012 R2 and older)
Click here for a list of Hyper-V Integration Services and their corresponding build numbers.
How to Identify Integration Services State
Run the following command in an Administrative PowerShell prompt on the host where the VM that failed to backup resides.
Get-VM | select VMName,IntegrationServicesState
The results will list each present VM and the state of its integration services.
How to Install or Update the Integration Services
- Open Hyper-V Manager.
- Right-click the virtual machine and click Connect.
- From the Action menu of Virtual Machine Connection, click Insert Integration Services Setup Disk.
Depending on the guest operating system, you may need to start the installation manually. - After the installation finishes, you may be prompted to restart.
Part 2: Within the Guest
The following steps and checks are to be performed within the Guest OS of the VM that is failing to backup.
- Ensure that the latest OS updates are installed.
- Ensure that the VSS Storage Area and Volume Match
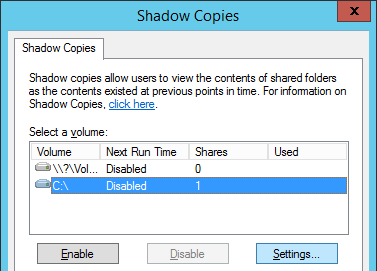
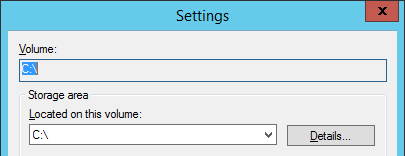
- From an Administrative Command Prompt, run the command ‘VSSUIRUN.exe”
- Check the [Settings] for each Volume and ensure that the Volume and the Storage area match.
- From an Administrative Command Prompt, run the command ‘VSSUIRUN.exe”
- Ensure there are no Dynamic disk or FAT\FAT32 volumes
- Open Disk Management (diskmgmt.msc)
- Review the Type and File System columns
- All volumes must be NTFS or ReFS. VSS is not compatible with Dynamic disks or FAT\FAT32
Note: The VHD(X) that the VM runs off can be dynamic; the volume within the Guest OS cannot.
- Check that the System Reserved partition has sufficient free space.
- The System Reserved partition must have more than 42MB of space free.
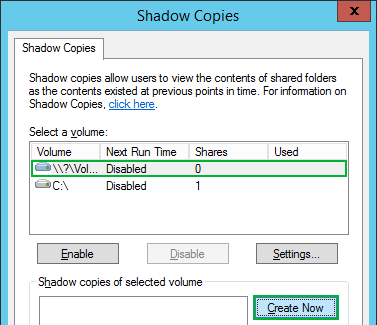
- If less than 42MB is free, try creating a shadow copy for the volume.
- Remember to delete the Shadow Copy if it is successful.
- Restart the “Hyper-V Volume Shadow Copy Requestor" service.
- Open Services (services.msc)
- Find the Hyper-V Volume Shadow Copy Requestor service.
- If it is Stopped, start it.
(If the service will not start, check in the VM settings under Integration Services, and ensure the “Backup (volume Checkpoint)” option is enabled.) - If it is Running, restart it.
- If it is Stopped, start it.
Part 3: VM Configuration
The following steps and checks are to be performed from the Hyper-V host level.
- Make sure the VM has a SCSI controller.
A SCSI controller must be present, even if there are no devices to use the SCSI controller.
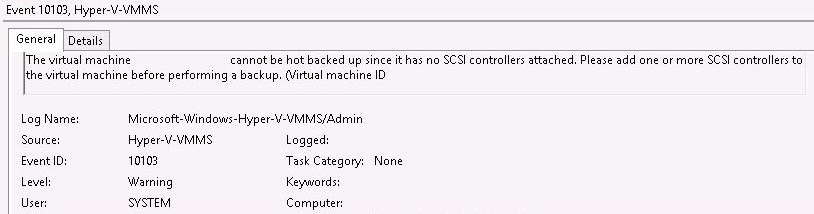
If a SCSI controller is absent, an error will be present in the Hyper-V VMMS > Admin event log:
“The virtual machine ‘Vm-Name’ cannot be hot backed up since it has no SCSI controllers attached. Please add one or more SCSI controllers to the virtual machine before performing a backup. (Virtual machine ID).”
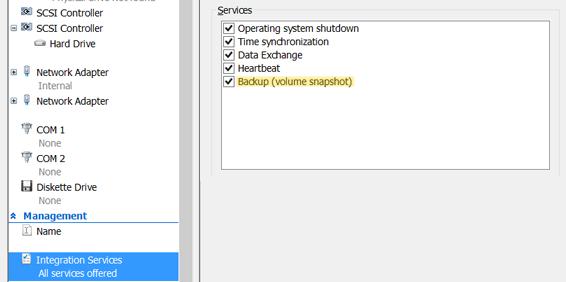
- Verify that the “Backup (Volume Snapshot)” option is enabled within the Virtual Machine settings.

- Ensure that the virtual machine disk files (VHD files) are not sitting in the root folder of the CSV, as this may prevent correct snapshot creation due to permission restrictions. We strongly recommend keeping virtual machine files in separate folders. More information regarding this can be found here.
Part 4: Verification
The following steps will allow you to determine if the actions performed above have corrected the issue without the need to run the Veeam Backup & Replication job again.
Please carry out the following steps on the Hyper-V host where the VM is currently running.
- Open an Administrator Command Prompt.
- Run the command:
Diskshadow /L C:\writers.txt
- Run the command:
list writers
- Open the file that was created.
- Locate the VM name in the section for the Hyper-V writer.
- For each VM, there's a "Caption" entry.
- For Application-Aware Processing to function correctly, the caption must read "online" or "child partition" and not "offline" or "saved state".
If this KB article did not resolve your issue or you need further assistance with Veeam software, please create a Veeam Support Case.
To submit feedback regarding this article, please click this link: Send Article Feedback
To report a typo on this page, highlight the typo with your mouse and press CTRL + Enter.
Spelling error in text
Thank you!
Your feedback has been received and will be reviewed.
Oops! Something went wrong.
Please, try again later.
You have selected too large block!
Please try select less.
KB Feedback/Suggestion
This form is only for KB Feedback/Suggestions, if you need help with the software open a support case
Thank you!
Your feedback has been received and will be reviewed.
![]()
Oops! Something went wrong.
Please, try again later.