|
Part 1 — Nano Server Creation |
DISCLAIMER: Starting with a 1709 update, Microsoft has shifted Nano Server from being a compact server option to an optimized container image and will continue to improve it in this direction only. Please refer to release notes for more details.
Previously, on our Nano Server Deployment series, we’ve created a new Nano Server image in the part 1 and deployed it on a physical server in part 2. Now we will go through configuration.
First we need to connect remotely to that machine over PowerShell for further configuration.
$cred=get-credential
$nanoname='NANO_SRV'
Enter-PSSession -ComputerName $nanoname -Credential $cred

As we are connected to Nano Server remotely we should verify PowerShell execution policy to avoid potential issues with some scripts later.
Set-ExecutionPolicy -ExecutionPolicy Unrestricted
Set-Item WSMan:\localhost\Client\TrustedHosts * -force
In my case I have test environment, so I set first command to Unrestricted. Be careful with this setting in production as it allows to run unsigned scripts. Later, with the Restricted or RemoteSigned parameter you can lock back the execution policy.
The second command is for removing restriction for PowerShell remoting. I used asterisk to allow any computer in my lab to connect remotely. Don’t do this in production. Instead limit allowed computers by name or IP.
Again, I recommend you to carefully use both commands in production. It’s NOT security best practice to open computer so widely.

In the following steps, let’s add additional storage in the VMs location.
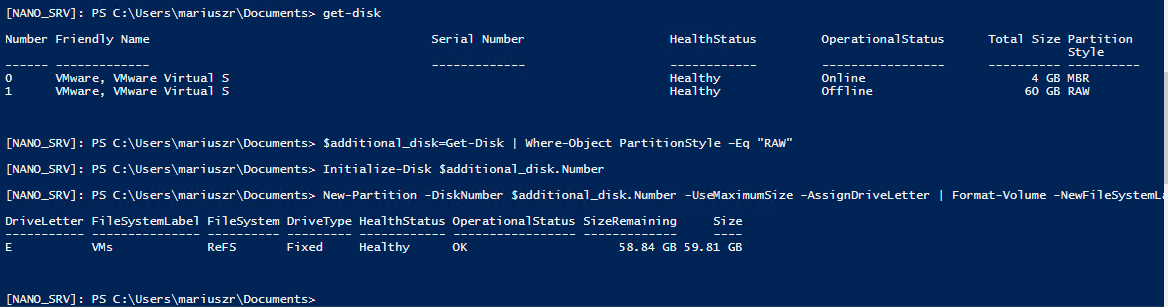
- Get information about all connected disks
Get-Disk - Select disk with RAW partition
$additional_disk=Get-Disk | Where-Object PartitionStyle –Eq "RAW" - Initialize selected disk
Initialize-Disk $additional_disk.Number - Create new partition with maximum size and format it with ReFS file system.
New-Partition -DiskNumber $additional_disk.Number -UseMaximumSize -AssignDriveLetter | Format-Volume -NewFileSystemLabel "VMs" -FileSystem ReFS
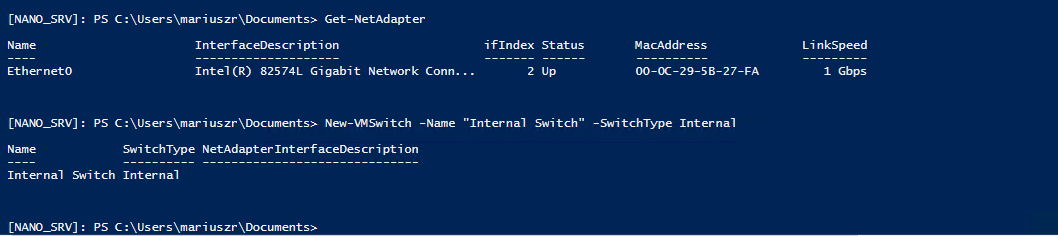
Now creating a switch. I’ll start with the Internal one. Creating Internal Switch is optional. I’m creating it for future tests only. So, if you are working with production environment and you don’t need such swich you can skip this step.
Get-NetAdapter
New-VMSwitch -Name "Internal Switch" -SwitchType Internal
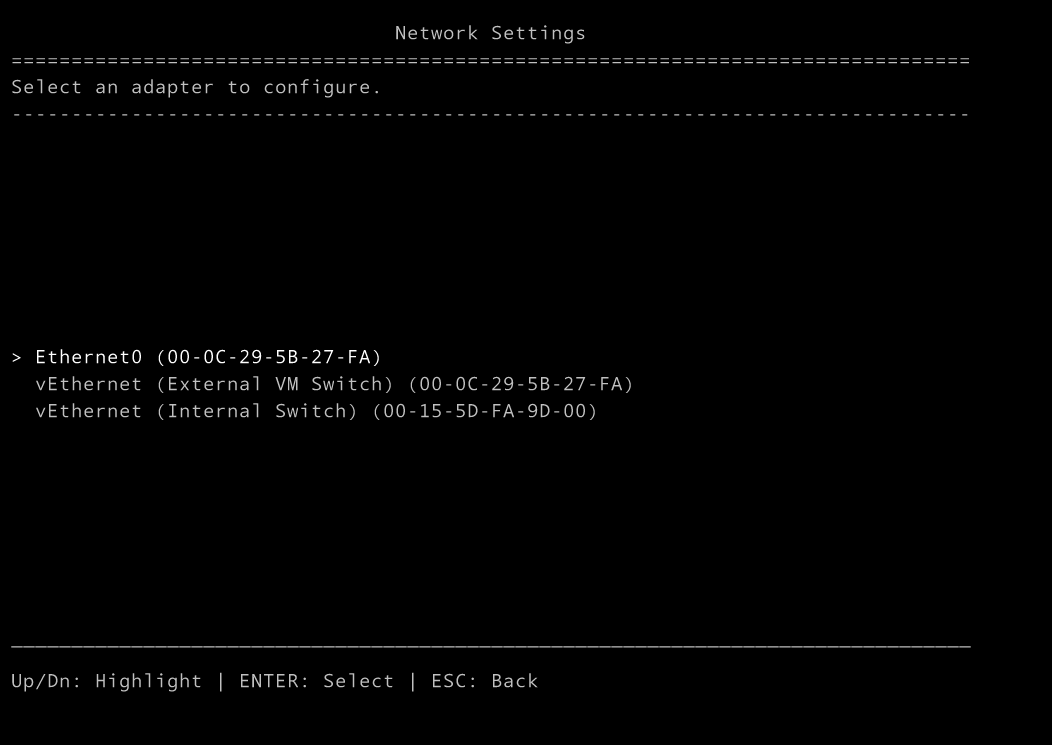
And now the normal switch. You can create it on any network interface. In my example I have only one, so I’ll create it on Ethernet0. AllowManagementOS parameter will enable management traffic over that switch.
$net = Get-NetAdapter -Name 'Ethernet0'
New-VMSwitch -Name "External VM Switch" -AllowManagementOS $True -NetAdapterName $net.Name

This process will create an external switch linked to my Ethernet0 adapter. As part of this move, the IP settings are transferred to a new (virtual) adapter connected to that switch.
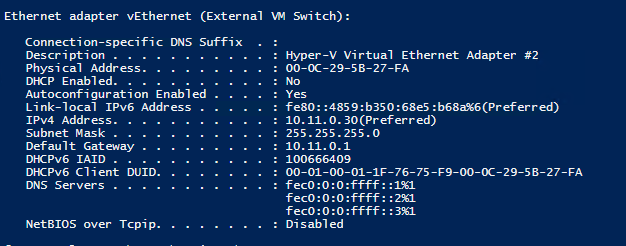
Because of a known bug with Microsoft, the DNS settings are cleared and we must reset it on the newly created switch interface:
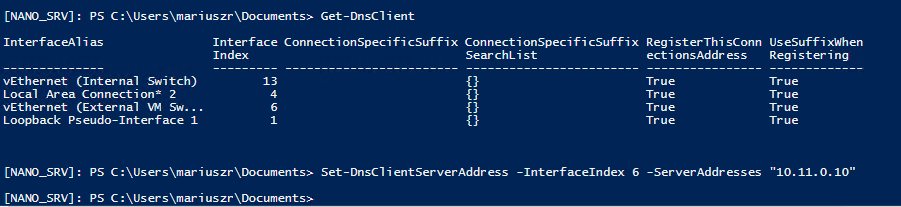
- Identify ID of newly created switch
Get-DnsClient - Set new DNS server
Set-DnsClientServerAddress -InterfaceIndex 6 -ServerAddresses "10.11.0.10"
Now you should be able to log in to the Nano console with the domain credentials again. You can also check newly added switches directly in the Nano Server Recovery console.
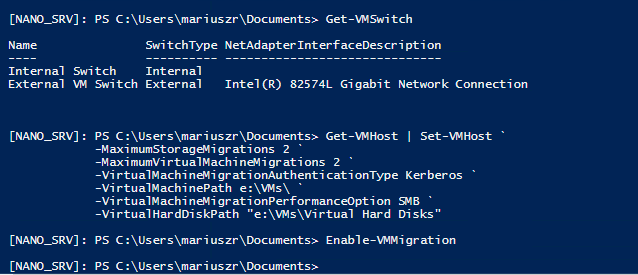
Last thing before we create the first VM is to set some Hyper-V default options like default paths for VM and Virtual Hard Disk, authentication type, migration limitations, etc.
Get-VMSwitch
Get-VMHost | Set-VMHost -MaximumStorageMigrations 2 -MaximumVirtualMachineMigrations 2 -VirtualMachineMigrationAuthenticationType Kerberos -VirtualMachinePath e:\VMs\ -VirtualMachineMigrationPerformanceOption SMB -VirtualHardDiskPath "e:\VMs\Virtual Hard Disks"
Enable-VMMigration
Next step, we’ll create the new VMs located on the local storage. We can use PowerShell or Hyper-V Manager for this. Bellow PowerShell way of creation.
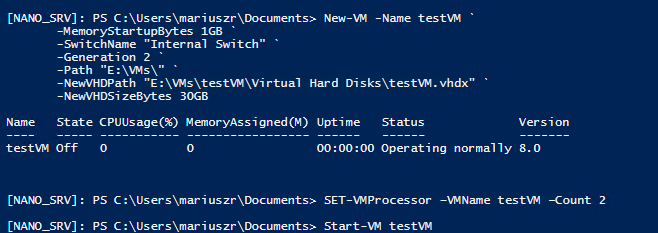
New-VM -Name testVM -MemoryStartupBytes 1GB -SwitchName "Internal Switch" -Generation 2 -Path "E:\VMs\" -NewVHDPath "E:\VMs\testVM\Virtual Hard Disks\testVM.vhdx" -NewVHDSizeBytes 30GB
SET-VMProcessor –VMName testVM –Count 2
Start-VM testVM
We are creating Generation 2 VM with testVM name, 2 CPU, 1GB memory, new VHDX with 30GB size and connection to my Internal Switch.
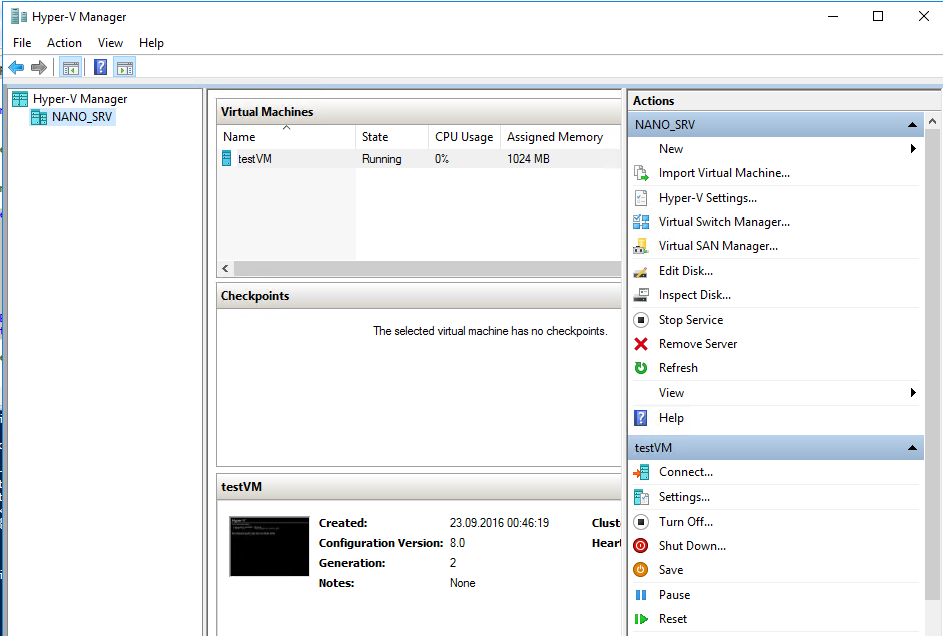
At this moment we have a single Nano host with the Hyper-V role installed. We should be able to run the VMs from the local Nano storage. As there are no local management tools, we must use Hyper-V Manager from a remote server or workstation or use PowerShell. In the next part of this guide, we’ll go through clustering of Hyper-V Nano.
See Also: