Where has the time gone? It was in 2015 when Veeam jumped in to enable endpoint protection for Microsoft Windows. In 2016, we expanded agent support to include Linux, and in 2020, provided application consistency for MySQL and PostgreSQL via the Veeam Agent for Linux. Now with the release of Veeam Backup & Replication v11, Veeam enables protection for macOS with Veeam Agent for Mac!
You may be wondering, “How do I get Veeam Agent for Mac installed on all my Mac endpoints?” There are a couple different methods:
- User-initiated:
- A user will initiate the installation via a native Mac installation package (pkg)
Typically used in deployments with a small number of macOS systems that require protection
- Automated:
- Leverage a Mobile Application Management (MAM) solution
Typically used in deployments with a large number of MacOS system that require protection
One MAM solution that is growing in popularity is Microsoft Intune. This is a cloud-based service that provides MAM capabilities for laptops, phones, tablets and computers, including Macs! And if you were wondering how to leverage Microsoft Intune to automate the installation of Veeam Agent for Mac, you have come to the right place!
This blog will be broken down into the following sections:
- Pre-requisites for a successful installation
- Creation of a “Computers with pre-installed agents” protection group
- Prepare the Veeam Agent for Mac installation package for Intune
- Setup Intune for package deployment
- Validation Veeam Agent for Mac has been installed
Pre-requisites/Assumptions
The list below contains pre-requisites for installing Veeam Agent for Mac via Microsoft Intune:
- Mac systems are
enrolled in Intune
- Company Portal application is installed on each applicable Mac
- User signed-in to Company Portal application on Mac
Creation of protection group
The first step to installing Veeam Agent for Mac (and this applies to both user-initiated and automated deployments) will be to create a “Computers with pre-installed agents” protection group.


The “Computers with pre-installed agents” type of protection group in V11 has numerous benefits beyond Veeam Agent for Mac:
- A Windows system does not require the admin$ share
- A Linux system does not require SSH to be enabled
- Uses certificates to connect/authenticate to the Veeam backup server

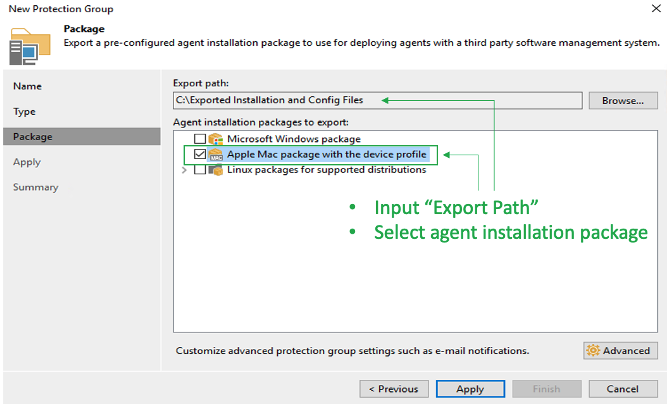
After selecting the “Computers with pre-installed agents” protection group type, you will then be given the option of where the export will be saved and which agent installation packages will be exported. In Figure 4, you will see that the export location is defined as “C:\Exported Installation and Config Files” and the “Apple Mac package with the device profile” is selected.
The export will generate the following files:

Here’s a brief description of each exported file:

Once the export has completed, you will copy the files to a Mac where they will be prepared for Microsoft Intune deployment.
Prepare the Veeam Agent for Mac installation package for Intune
The first step to prepare Veeam Agent for Mac is to download the “Intune App Wrapping Tool for Mac” from the official GitHub of the Microsoft Intune SDK team.
Once downloaded, perform the following:
- Start the Terminal App
- Change to the directory where IntuneAppUtil is located
- Run the following command to make the tool executable
chmod +x IntuneAppUtil
Now that IntuneAppUtil is executable, you will be able to use it to “wrap” the Veeam Agent for Mac installer (.pkg) into an “intunemac” file. This is the type of file that Microsoft Intune uses for application deployment on macOS.
The syntax of the utility is quite simple:
IntuneAppUtil -c <Veeam Agent for Mac PKG> -o <output folder>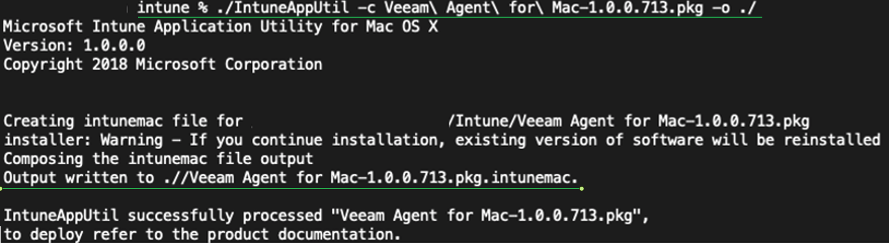
Once the command is run, an “intunemac” file will be created which you will use when creating the MAM policy in Microsoft Intune:

Setup Intune for package deployment
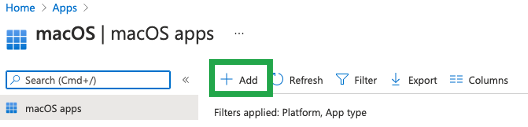
Now that we have the “intunemac” installer file created, we need to make our way over to Microsoft’s EndPoint Manager and access the “Apps” blade:

Once you are in the “Apps” blade, select “macOS” and click “Add”:
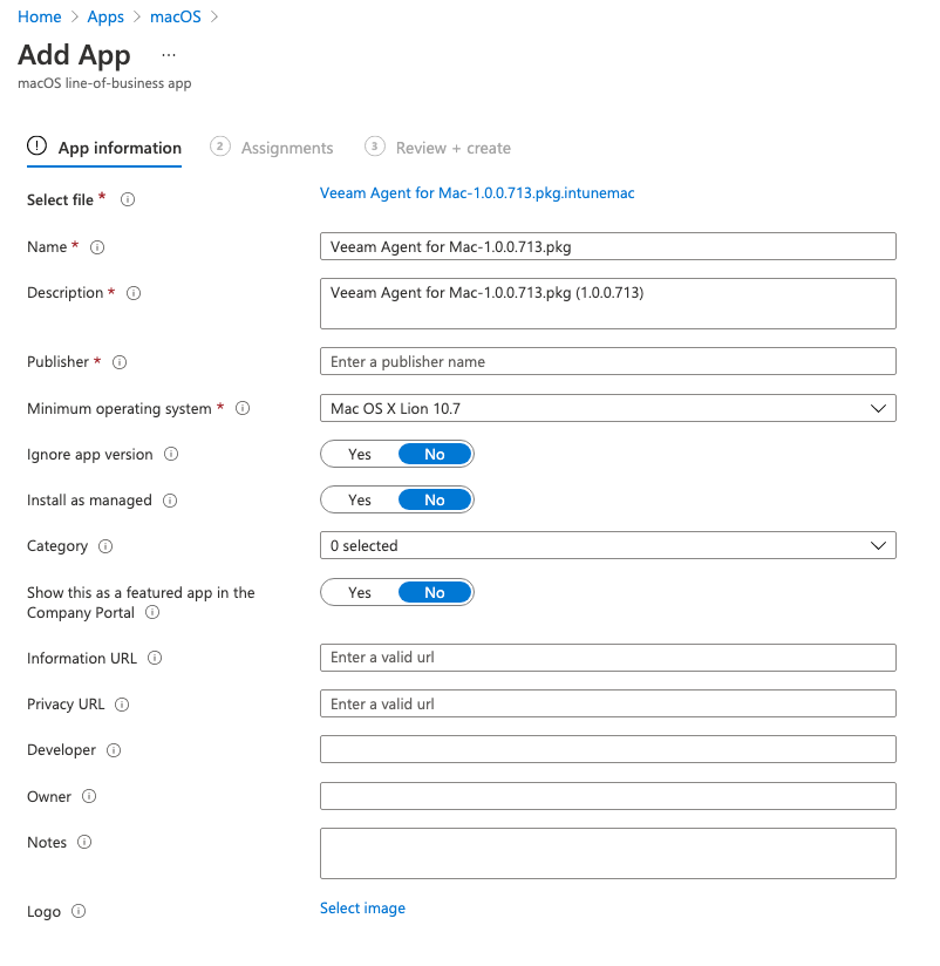
For the App Type, select “Line-of-business” app:

For the “App Package File”, select the “intunemac” file previously created:

Now you can input/update all application information:
Next, you will define the assignments. This means you can identify which device type (required or enrolled) and which users/group will have access to Veeam Agent for Mac.

You are now ready to review and create the application in Microsoft Intune:

Validating Veeam Agent for Mac has been installed
Once the application is created, it will either be installed automatically (required assignment) or available to enrolled devices to install if they choose. Below is a screen capture of the Microsoft Intune Company Portal application installed on an enrolled Mac:

If the application is not installed, a button will be available to select and “Install.” If the application has been installed, a re-install option is available (as seen in the screenshot).
Finally, if you look on the Macs that were assigned or selected to install Veeam Agent for Mac, a “Veeam” folder will be present under “Applications” with the following applications:

Conclusion
As more organizations embrace the Apple platform, you are seeing business-critical data reside on macOS systems. This can be through IT departments providing Mac-based computers and laptops as well as organizations embracing the Bring Your Own Device (BYOD) model. This is why it’s important to protect that data with Veeam Agent for Mac. As the number of macOS devices in your organization increases, you will need to ensure that there is a simple and scalable method to install Veeam Agent for Mac, and this is where Microsoft Intune helps.
Once Veeam Agent for Mac has been installed, the next step will be to configure the agent to connect to the Veeam backup server. To find out how you can centrally configure Veeam Agent for Mac, proceed to part 2 in my Veeam Agent for Mac series “Leveraging Microsoft Intune to configure Veeam Agent for Mac.”