Previously, we’ve set up a Windows Server 2016 in Core mode with Hyper-V role and prepared it to host VMs. On this blog post, we will discuss the Veeam Backup & Replication deployment and configuration process. After preparing the Hyper-V server running on a Windows Server 2016, Veeam Backup & Replication can be deployed on either virtual or physical machines that will be up to these specifications.
Basic installation
The software installation process happens once you mount the downloaded ISO image and launch setup.exe from it. Then, you will be greeted with the following window:

Hint: Don’t miss the big green button for the main Veeam Backup & Replication installation! There is an option on the right to install just a remote console and you’ll need it only if you already have the main Veeam Backup & Replication installation in place and want to have a thin client for connection to the said server.
If you choose to ignore the minimum hardware requirement (especially the CPU count), then you will face the below pop-up warning:

Then, your installation will continue to the well-known End User License Agreement (EULA) step after accepting, when you will be asked to provide the license key file that you bought. Alternatively, you can add this license key later through the Veeam Backup & Replication console to unlock all your license features. Until then, Veeam will run in Free Edition mode.

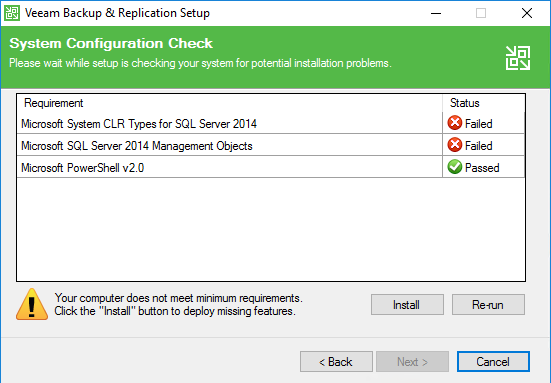
Further on, the Veeam installation process will determine if there are any necessary packages missing on your intended backup server. If there are any, it will deploy them once you hit the additional Install button.
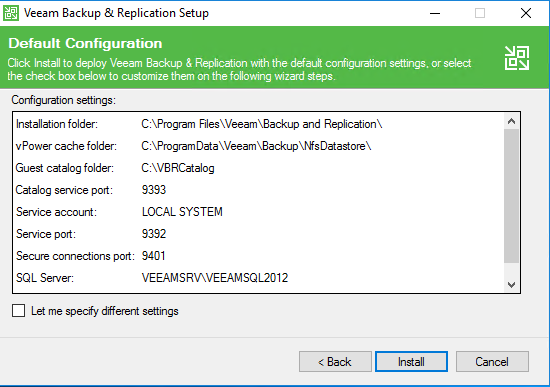
You can keep the default installation option, such as the ports, installation paths and SQL server. If you don’t have any SQL instance pre-installed, Veeam will deploy a Microsoft SQL 2012 SP3 Express Edition version for you that should be enough for environments of up to 500 VMs. The Express version also has a database size limit of 10 GB.
If your environment requires specific ports or paths, you will be able to change them via the Let me specify different settings checkbox.
Once you complete the deployment steps, you are ready to run the Veeam console and start your backup infrastructure configuration. Now, I will discuss adding Hyper-V server and two crucial Veeam backup components: the backup proxy and backup repository.
Backup infrastructure configuration
To start your backup infrastructure configuration, you need to add your Hyper-V server to the Veeam backup infrastructure via the console. To do so, follow the below steps:
- Run the Veeam Backup & Replication console
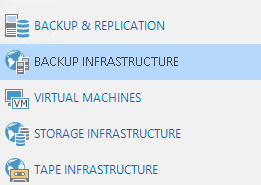
- Navigate to BACKUP INFRASTRUCTURE on the bottom left panel

- Right-click on the Managed Servers tab and select Add Server
- Choose the Microsoft Hyper-V Be aware that if you have a cluster, you will need to add the cluster itself rather than a standalone host

- Run through the Configuration wizard by providing the server (Hyper-V) DNS or IP address and the credentials

Once complete, you will be ready to start configuring the other two backup components: backup proxy and Veeam backup repository.
Veeam Hyper-V backup proxies
Veeam backup proxy is a Veeam architecture server role responsible for retrieving, compressing, deduplicating, encrypting and sending the backup data to the Veeam backup repository. It’s the engine running the Veeam backup jobs that manages the data. Within the Hyper-V infrastructure, you can deploy the Veeam proxy in two different modes.
On-Host backup proxy
By default, this proxy type will be deployed after adding your Hyper-V server to the Veeam console. In this case, Veeam uses the same Hyper-V host where your production VMs are running as a backup proxy. Because this type of deployment will use the same source Hyper-V server to process the backup data, a high CPU and RAM usage will be noticeable on the production Hyper-V server. For this reason, you may want to consider another type of proxy deployment.
Off-Host backup proxy
To offload the performance overhead from the production Hyper-V server, an off-host proxy server can additionally be deployed. This will move the proxy role to another server to process the backup data. You will need a Windows Server with Hyper-V role installed, but no further Hyper-V configuration required. Make sure you have met all the requirements for the Off-Host backup proxy before proceeding.
Once you’ve decided what type of proxy you wish to use, follow the below steps:
- Navigate to BACKUP INFRASTRUCTURE on the bottom left panel.

- Right-click on Backup Proxies and select Add Hyper-V Off-Host Backup Proxy.


As you will notice, the On-Host proxy is not shown here because it was already deployed automatically when you added the Hyper-V server to the Veeam backup infrastructure.
The last step before you do the actual backups is adding a backup repository to the Veeam console.
Veeam backup repository
The Veeam backup repository is another Veeam architecture server role. Technically speaking, it is a place used for backup data storage. Because Veeam is storage-agnostic, it does support various storage types: DAS, SAN, NAS, deduplication appliances, network shares and Windows/Linux servers with locally attached disks in basically any scenario you might come up with. While you evaluate these options, be sure to check the full list of supported types and appliances to correctly add and configure your repository and learn about the intricacies of each type and appliance.
After these essential components are set up, your VMs will be ready for backup! Give it a try and leave your questions in the comments.