I’ve seen lately many requests in our forums, and I personally received some, about how to generate and manage SSL certificates on Windows machines. It seems one of those topics that is always hot, especially these days with all the services available over public internet connections, and all the scary stories about security breaches.
Whatever “web” service you are willing to execute and publish over the internet, an SSL certificate can protect you as a provider, and your users connecting to it. It’s extremely important to deploy properly configured SSL certificates, yet many don’t do this. Why? Maybe because only Microsoft IIS (Internet Information Services) has an easy wizard to accomplish these tasks. But if you follow this quick tutorial, SSL certificate will be easy to install on any Windows machine, with our without IIS. If you are using or planning to use Veeam software solutions, you can use SSL certificates, for example, to protect the access for example to Enterprise Manager or Cloud Connect.
Several software products have the possibility to generate and use a self-signed certificate. This is a quick and easy method to complete deployments and to test them, but gives no security to users, since they cannot verify the certificate, and thus the authenticity of the service provider.
When a user connects to one of these services, this is the result when a self-signed certificate is used:

In order to properly protect the service and give its users guaranteed security, you should use a proper and generally recognized certificate, issued by one of the Certification Authorities recognized by internet browsers and operating systems.
Step 1: Create the Certificate Signing Request (CSR)
In a public key infrastructure (PKI), a certificate signing request (CSR or certification request) is the text created by the “applicant” (the Service Provider running the service in our case) to a Certificate Authority, that in return sends back a Signed Certificate. It’s like sending out an order, that is then processed following the instructions in it, and the ordered goods are finally delivered.
When creating the CSR, the applicant also generates a key pair and keeps the private key secret. The CSR contains information about the applicant, like the company information and the service DNS, which are signed using the applicant’s private key. The CSR also contains the public key chosen by the applicant.
The first operation you should do is to decide the public “fully qualified domain name” the service will listen to; this will be the DNS name users will contact to use the service; just like opening a website. This name should match the one used in DNS and the one used in the CSR.
To obtain a real certificate, a real domain name must be used. So, in this tutorial, I used my blog’s domain virtualtothecore.com, and the FQDN is:
cc.virtualtothecore.com
In order to generate the CSR, on the Windows Server, you need first to create with a text editor a .inf file. This file (it can be called request.inf) should contain a text like this example:
;----------------- request.inf -----------------
[Version]
Signature="$Windows NT$"
[NewRequest]
Subject = "CN= cc.virtualtothecore.com, OU=IT, O=Skunkworks, L=Milan, S=Lombardy, C=IT"; replace attributes in this line
KeySpec = 1
KeyLength = 2048
; Can be 2048, 4096, 8192, or 16384.
; Larger key sizes are more secure, but have
; a greater impact on performance.
Exportable = TRUE
FriendlyName = "cc"
MachineKeySet = TRUE
SMIME = False
PrivateKeyArchive = FALSE
UserProtected = FALSE
UseExistingKeySet = FALSE
ProviderName = "Microsoft RSA SChannel Cryptographic Provider"
ProviderType = 12
RequestType = PKCS10
KeyUsage = 0xa0
[EnhancedKeyUsageExtension]
OID=1.3.6.1.5.5.7.3.1 ; this is for Server Authentication
[RequestAttributes]
; SAN="dns=FQDN_you_require&dns=other_FQDN_you_require"
The parts in red are to be changed with the specific values of your service, and some informations about your company. Skunkworks, by the way, is the name I gave to my home lab.
After the configuration file has been edited, it can be saved in a useful location like a dedicated folder c:\certificates. Then, open a command prompt with Administrator rights (right click and select “Run as Administrator”), move into c:\certificates and run this command:
certreq -new request.inf certreq.txt
If you open the certreq.txt file with a text editor, its content is like this:
—–BEGIN NEW CERTIFICATE REQUEST—–
MIID9jCCAt4CAQAwdTELMAkGA1UEBhMCSVQxETAPBgNVBAgMCExvbWJhcmR5MQ8w
DQYDVQQHDAZWYXJlc2UxEzARBgNVBAoMClNrdW5rd29ya3MxCzAJBgNVBAsMAklU
MSAwHgYDVQQDDBdjYy52aXJ0dWFsdG90aGVjb3JlLmNvbTCCASIwDQYJKoZIhvcN
AQEBBQADggEPADCCAQoCggEBAJUBkduH0xQfJbnt2ryIjdn5z8euMM4zHyd4CFBd
2eCXAnfaskOc3F9eW9zP1KMk0Z/8K9GfezZDkMcbno5hnIkuwBcLoHJUeiWQDm1a
Dutxvgvo1RO2TEQJes5CBKB7vrEakRCco3Cq26rXEparx1MjdmcOVyk2weF9TJNI
UIFr1Tadw/NWCLqwUw4ZGBsDJL0lftuQe0VmxJciZC1EZQXppsXSanSdaIZECJzH
USu0wA5nZL9pltvO3593Kqr-qYkbocRj+T2hixA7n+Y8Bi5pO6pDOs/UdCQodteb
0qCcLUCXBtQoimEL7uwtAPQ07RfiTX9EIeeIxX0+FHD6T7UCAwEAAaCCATowGgYK
KwYBBAGCNw0CAzEMFgo2LjIuOTIEMC4yMFMGCSqGSIb3DQEJDjFGMEQwDgYDVR0P
AQH/BAQDAgWgMBMGA1UdJQQMMAoGCCsGAQUFBwMBMB0GA1UdDgQWBBTEaoWXriXL
I1DePK17Mxh2s8ryRzBTBgkrBgEEAYI3FRQxRjBEAgEJDBZ2YnIuY2xvdWRjb25u
ZWN0LmxvY2FsDBpDTE9VRENPTk5FQ1RcYWRtaW5pc3RyYXRvcgwLY2VydHJlcS5l
eGUwcgYKKwYBBAGCNw0CAjFkMGICAQEeWgBNAGkAYwByAG8AcwBvAGYAdAAgAFIA
UwBBACAAUwBDAGgAYQBuAG4AZQBsACAAQwByAHkAcAB0AG8AZwByAGEAcABoAGkA
YwAgAFAAcgBvAHYAaQBkAGUAcgMBADANBgkqhkiG9w0BAQUFAAOCAQEAQaUqU2Y9
7wH3JhgiDvn85HEZq+60a4WqgXXHiriIG1FnJwuzdG3k+m185N+smSX/VlIXT9fI
Tak034muIRpqwNJR7fz4gPaLnmNowa3Don1la8TihI47Pezl8h76ig04hFfSOUH7
Z4Atq+2XZ55lj/mRksq2oVZUeEzHCf0V7MSQD6M3Yf/WLJGLZG/kDexwDz2I5W9q
6vu2OwmD0eA2mHW1RjycqBJktyaZ7Hy6BF1T1F3AVyJYpTVMT/IbDAzMYZQ4U1/b
sKD5ZHkY2WhrRkD4D2UQpFShPdlaCYf3OP9F9FbLY4mZ7yKaQxrZWaKqRzKEaEMP
ng8IKtDYJRCVAw==
—–END NEW CERTIFICATE REQUEST—–
This is the generated CSR you will use.
Step 2: Obtain a Signed Certificate
With the Certificate Request correctly created, it’s time to get a signed certificate from a Certificate Authority. There are several online services where you can get a certificate, and some of them also offer free time-limited certificates that are useful to test real SSL connections at no expense.
The involved steps vary depending on the selected Certificate Authority, but they usually involve a validation of the CSR, a check against the registered domain via whois protocol to collect the registrant email address, and a verification procedure sent to this email to validate the authenticity of the request.
Whatever are the differences in the procedures, the final result is a Signed Certificate. It can usually be retrieved in text format or downloaded, and its content is going to be like this:
—–BEGIN CERTIFICATE—–
MIIFLTCCBBWgAwIBAgIQLgiJg4U3yijkhjzA5FK1VjANBgkqhkiG9w0BAQUFADBy
MQswCQYDVQQGEwJHQjEbMBkGA1UECBMSR3JlYXRlciBNYW5jaGVzdGVyMRAwDgYD
VQQHEwdTYWxmb3JkMRowGAYDVQQKExFDT01PRE8gQ0EgTGltaXRlZDEYMBYGA1UE
AxMPRXNzZW50aWFsU1NMIENBMB4XDTE0MDgwNTAwMDAwMFoXDTE0MTEwMzIzNTk1
OVowWDEhMB8GA1UECxMYRG9tYWluIENvbnRyb2wgVmFsaWRhdGVkMREwDwYDVQQL
EwhGcmVlIFNTTDEgMB4GA1UEAxMXY2MudmlydHVhbHRvdGhlY29yZS5jb20wggEi
MA0GCSqGSIb3DQEBAQUAA4IBDwAwggEKAoIBAQCVAZHbh9MUHyW57dq8iI3Z+c/H
rjDOMx8neAhQXdnglwJ32rJDnNxfXlvcz9SjJNGf/CvRn3s2Q5DHG56OYZyJLsAX
C6ByVHolkA5tWg7rcb4L6NUTtkxECXrOQgSge76xGpEQnKNwqtuq1xKWq8dTI3Zn
DlcpNsHhfUyTSFCBa9U2ncPzVgi6sFMOGRgbAyS9JX7bkHtFZsSXImQtRGUF6abF
0mp0nWiGRAicx1ErtMAOZ2S/aZbbzt+fdyqq/qmJG6HEY/k9oYsQO5/mPAYuaTuq
QzrP1HQkKHbXm9KgnC1AlwbUKIphC+7sLQD0NO0X4k1/RCHniMV9PhRw+k+1AgMB
AAGjggHXMIIB0zAfBgNVHSMEGDAWgBTay+qtWwhdzP/jlTOSeVVxjj0+DAdBgNV
HQ4EFgQUxGqFl64lyyNQ3jytezMYdrPK8kcwDgYDVR0PAQH/BAQDAgWgMAwGA1Ud
EwEB/wQCMAAwNAYDVR0lBC0wKwYIKwYBBQUHAwEGCCsGAQUFBwMCBgorBgEEAYI3
CgMDBglghkgBhvhCBAEwTwYDVR0gBEgwRjA6BgsrBgEEAbIxAQICBzArMCkGCCsG
AQUFBwIBFh1odHRwczovL3NlY3VyZS5jb21vZG8uY29tL0NQUzAIBgZngQwBAgEw
OwYDVR0fBDQwMjAwoC6gLIYqaHR0cDovL2NybC5jb21vZG9jYS5jb20vRXNzZW50
aWFsU1NMQ0EuY3JsMG4GCCsGAQUFBwEBBGIwYDA4BggrBgEFBQcwAoYsaHR0cDov
L2NydC5jb21vZG9jYS5jb20vRXNzZW50aWFsU1NMQ0Ffmi5jcnQwJAYIKwYBBQUH
MAGGGGh0dHA6Ly9vY3NwLmNvbW9kb2NhLmNvbTA/BgNVHREEODA2ghdjYy52aXJ0
dWFsdG90aGVjb3JlLmNvbYIbd3d3LmnjLnZpcnR1YWx0b3RoZWNvcmUuY29tMA0G
CSqGSIb3DQEBBQUAA4IBAQCEUHCth5o9h6MYINOnx6GMH3NchYo+BXPtCMsUyf2R
CB/iuteEODUW8Up+UWffF8tFSb9eIuNXyjhzKxqWcSms4qQkvVcH7WI4EZNvczzz
e8WGvbEckoCeGapYS+r5Z6hG865/BX/iiCHFyEB7UwR4xYtMis4XxFNGZLhtOX6D
zmLyVVTYFLyrhrFqOSxjRD25yfKdvG3dKKVBIwnb4xKdNZX/37KSkW15lIz0t2Bx
laMqyZZAOxvKMXRpiAKcReEKQg+TRjdPd0TL9uNOk6YWph/HQX2W7jSlm6HJRvNF
IGNh1H6V2REtiTSnTaFdvbhptJq0oc+N/sRGvvOhKMu/
—–END CERTIFICATE—–
Step 3: Install the Signed Certificate
Back in the Windows server, create an empty text file in c:\certificates and call it cert.crt. Open it with a text editor and paste in it the certificate text received from the Certification Authority.
Then, open again a high privileges command prompt, go into the c:\certificates directory, and run this command:
certreq –accept cert.crt
Once the command is executed, the certificate is stored in the local Certificate Store of the Windows Operating System.
To manage this and future certificates, you can use the Certificates MMC (Microsoft management console), that gives you graphical access to the Certificate Store. When configuring the console, it only requires you to select “Computer account” and then “local computer”. Imported certificates like the one created in this tutorial is stored under Personal Certificates.

Step 4: A practical use with Veeam Cloud Connect
Let’s see now how this certificate can be used in a real senario. In Veeam Backup & replication, you can protect for example a Cloud Connect deployment. To use the certificate, go into the Cloud Connect Infrastructure node of the Veeam Console, and select “Manage Certificates”. First, you choose “Select certificate from Certificate Store”:

In the following screen, you select to browse the Certificate Store. Here, you expand the “My” tree, and you see the imported certificate. You select it.

The next step of the wizard also shows the Thumbprint of the certificate; this can be sent to customers for additional verifications.

Finished the wizard, the certificate is ready to be used for SSL cyphered connections.
When a user starts a connection to the service, this is the certificate that will be used:

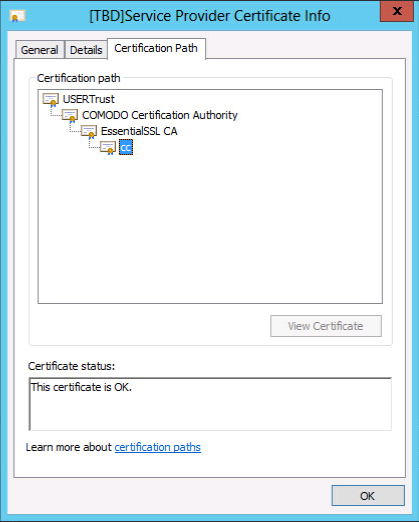
As you can see, and as the user can verify, the certificate is issued to cc.virtualtothecore.com as requested, it’s valid, and the Certification Path is recognized; this means Windows is able to recognize the Certificate Authority that signed the certificate as valid, and accept its certificates.