CONGRATULATIONS! You have successfully installed Veeam Backup for Salesforce, and you are ready to provide access to your backup and / or Salesforce teams. But how do I accomplish this? Where do I start? What steps must I take to enable Role Based Access Control (RBAC)? How can I leverage my users and groups in Azure Active Directory? The good news is that Veeam Backup for Salesforce makes it incredibly easy, and only takes a few steps.
Let’s jump into it!
After the installation completes, a URL will be provided to perform the initial configuration – for example:

If you copy the URL into a supported browser, you can perform the initial configuration. One step of the initial configuration will be to create a local administrator account:

Important: the username can be anything. The username of “admin” was used in the screenshot but is not specifically required.
Once the local administrator is created and the rest of the configuration is completed, you will receive the following login prompt:
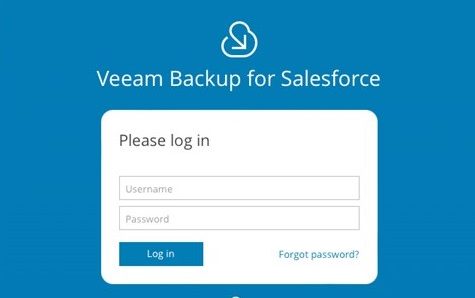
One item I would like to highlight is that no link calls out “Single Sign-on with Azure AD.” This is how you know that Azure Active Directory integration is not yet configured.
At this point, the only login credentials available will be the local administrator previously configured as part of the initial configuration. The local administrator can perform all operations in the Veeam Backup for Salesforce console. These include, but are not limited to:
- Establish configuration settings
- Create backup policies
- Monitor backup jobs
- Perform recoveries
But managing Veeam Backup for Salesforce using a single account is not practical. This would mean multiple users accessing the management server using the same account. This brings up a whole host of challenges:
- Inability to determine which user performs which action.
- Inability to restrict access to certain actions / functions for specific users.
The solution, Veeam Backup for Salesforce integrates with Azure Active Directory so you can include pre-existing users and/or groups. In addition, these users and groups can be assigned specific roles to define what actions they can perform. This is known as “Role Based Access Control” (RBAC).
There are four roles that you can assign to user and groups working with Veeam Backup for Salesforce:
| Role name | definition |
| Administrator | Can perform all configuration actions and backup and restore operations. This role gives a user access to all companies and all Salesforce organizations added to Veeam Backup for Salesforce. |
| Backup Operator | Can create and manage backup policies, manage the protected data and perform all restore operations. You can limit access to companies and Salesforce organizations for users when assigning this role. |
| Restore Operator | Can only perform restore operations. You can limit access to companies and Salesforce organizations for users when assigning this role. |
| Viewer | Can monitor backup and restore processes without performing any operations. You can limit access to companies and Salesforce organizations for users when assigning this role. |
| No Access | Explicitly prevents specific user(s) / group(s) from managing Veeam Backup for Salesforce |
Now the question is, how do you configure Veeam Backup for Salesforce to leverage Azure Activity Directory and RBAC? It is simple and here are the steps you perform:
- Login to the Veeam Backup for Salesforce management console with the local administrator account configured as part of the initial setup.
- Perform the following steps:
- Select “Configuration” in the upper right corner
- Select “Users and Roles”
- Select “Single Sign-on”
- Set the “Enable Azure AD Authentication” to “On”

3. Log in to the Azure portal and launch Azure Active Directory:

4. Create an app registration:

Select “New Registration” and you will provide the following information:
- The name of the app registration
- Select the “Supported Account Types”
- Configure the Redirect URI
- Type = Web
- The URL can be found in the Veeam Backup for Salesforce configuration as the “Callback URL”

5. Perform the following steps to assign Microsoft Graph API permissions to the app registration:
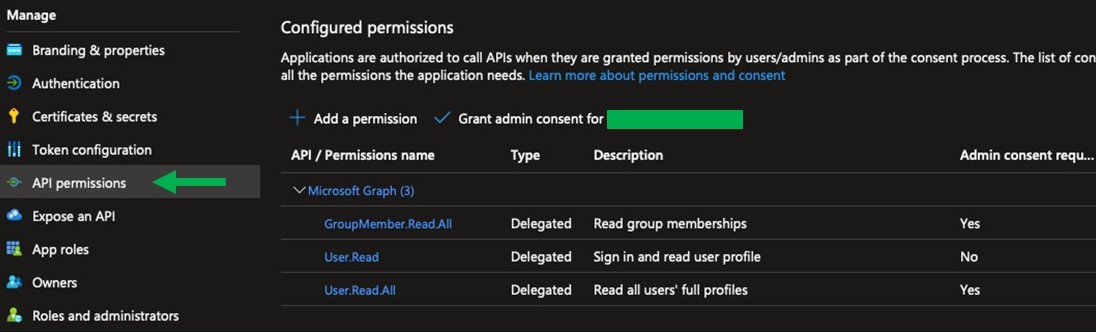


At this point, you will be able to search / select the following permissions
- GroupMember.Read.All
- User.Read
- User.Read.All
For example:

One additional / important note, for the GroupMember.Read.All and User.Read.All permissions, you will need to “Grant admin consent” for these permissions. Simply click the “Grant admin consent for <Azure Tenant>”.

6. Once the app registration is created and the appropriate permissions are assigned, you will need to update the Azure AD authentication information in the Veeam Backup for Salesforce console:
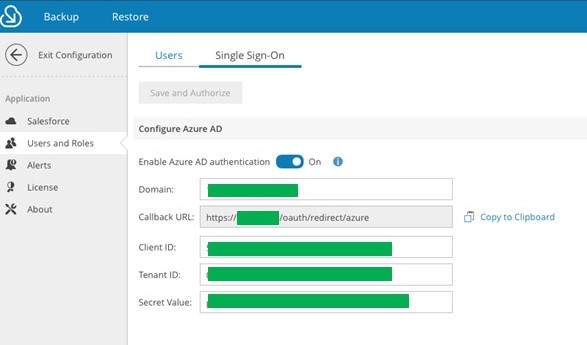
The following fields will need to be updated:
| Field Name | Field value and where to find |
| Domain | The IP address, hostname, or fully qualified domain name that you will be accessing the Veeam Backup for Salesforce console with. |
| Callback URL | Auto-generated based on the domain information inputted |
| Client ID | The Application (client) ID of the registered Azure AD application. |
| Tenant ID | The Directory (tenant) ID of the registered Azure AD application. Can be found in the “Properties” pane in Azure Active Directory. |
| Secret Value | A secret string that the application uses to prove its identity when requesting a token. Also can be referred to as application password. Can be found and generated in “Certificates & Secrets” / “Client secrets” for the app registration created. |
7. Once all the information is inputted, you can save and authenticate:

You are now ready to add users / user groups and assign roles!
8. Within the Veeam Backup for Salesforce management console:
- Select “Configuration” in the upper right corner
- Select “Users and Roles”
- Select “Add User”
- Select “Select user or group”
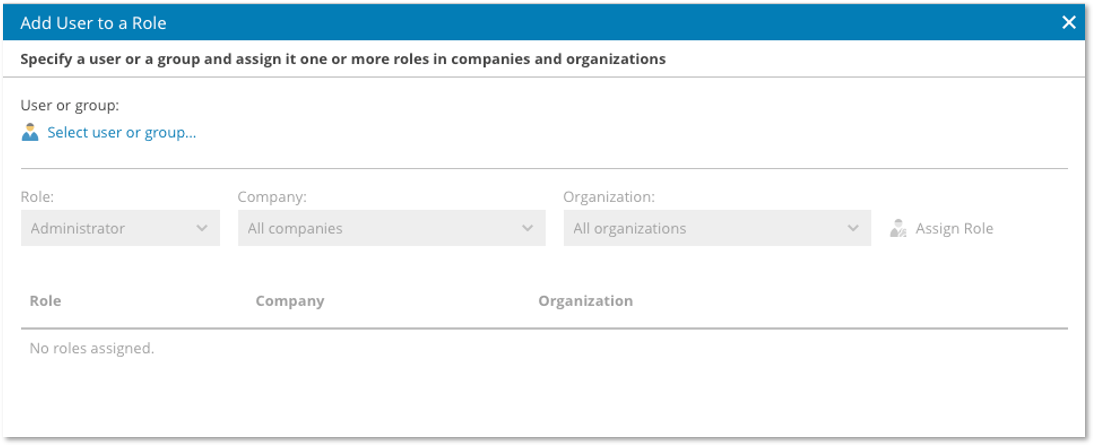
- Select the applicable user or group
- Select the applicable:
- Role
- Company
- Organization
- Select “Assign Role”

Now you are fully configured and ready to log in and manage Veeam Backup for Salesforce with your Azure AD credentials.
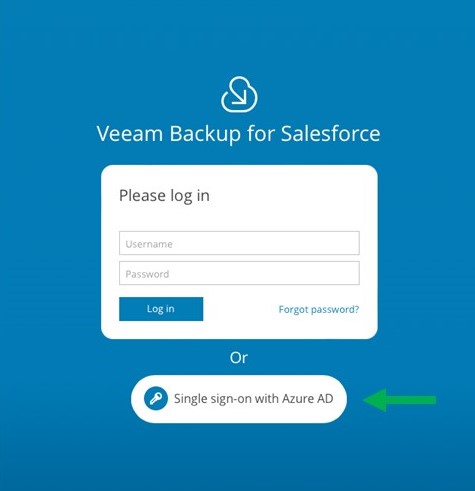
To verify that all is configured successfully, log out of the Veeam Backup for Salesforce console, and when the login prompt is once again displayed, it should now look like this:
It is as simple as that! Just follow the above steps outlined above, and you will be able to integrate and leverage Azure Active Directory in your Veeam Backup for Salesforce deployment.