Disclaimer
Please be aware that Windows Data Deduplication technology in Windows Server 2016 has had critical bugs, that were recently fixed. More details can be found in this discussion on Veeam Forums and in this official blog post, written by the Microsoft R&D team. To make a long story short, it’s strongly recommended to apply KB4013429 on your Windows Server 2016 installations as it resolves this issue and includes some other important fixes for general reliability. If you happen to run into “the volume bitmap is incorrect” on deduplicated Windows Server 2016 volumes, please follow this Veeam forum thread.
Intro
The amount of data we use grows every day. Everyone can notice this trend with the ever-expanding range of devices, all of which are collecting and storing data 24/7. In the IT world, these devices make up the Internet of Things (IOT). Microsoft says that by 2020, the amount of created information per person (sic!) will be just above 5 TB. With that said, everyone is participating in this trend but only a few must deal with it in their everyday work. It’s no secret that data management is an important part of a system administrator’s agenda. We are constantly looking to implement technologies and services that allow us to manage information flow better and let us store data efficiently without eating up our budget. There are many ways to achieve that but today I wanted to talk about one special example — Data Deduplication technology (often referred as “Dedup”), developed by the Microsoft Windows Server team. While the technology itself is interesting, it’s much more interesting to me if I can leverage it to save some space for my Veeam backup repository. So, this article should be useful for people who are considering data deduplication technology and would like to know its benefits as well as practical savings with specific Veeam scenarios.
What’s Data Deduplication in Windows Server 2016?
Files, which are stored to a disk volume and left there for several days (to ensure it’s not fast-changing data), can be checked by a special process, splitting this data into small blocks, named chunks (32 KB – 128 KB) and then analyzed chunk by chunk. The system preserves unique blocks only, moving them into a chunk store and leaving references (reparse points) for those blocks that are used more than once. This allows you to have valuable storage savings if the said data is similar. The most important use cases include: Hyper-V VDI environment, backup storages and file servers. A Data Deduplication process runs one of four different task types: Optimization (splitting data into chunks and moving them into the chunk store), garbage collection (reclaiming space by removing obsolete chunks), integrity scrubbing (detecting corruption in the chunk store) or unoptimization (undoing optimization and disabling data deduplication on this volume).
Please refer to the Microsoft knowledge base for more details about Data Deduplication basics.
How to run Data Deduplication
Enabling Dedup is as easy as adding a new server feature via Server Manager (Figure 1). As an alternative, you are able to install Windows Server Data Deduplication by running a simple PowerShell cmdlet:
Install-WindowsFeature -Name FS-Data-Deduplication
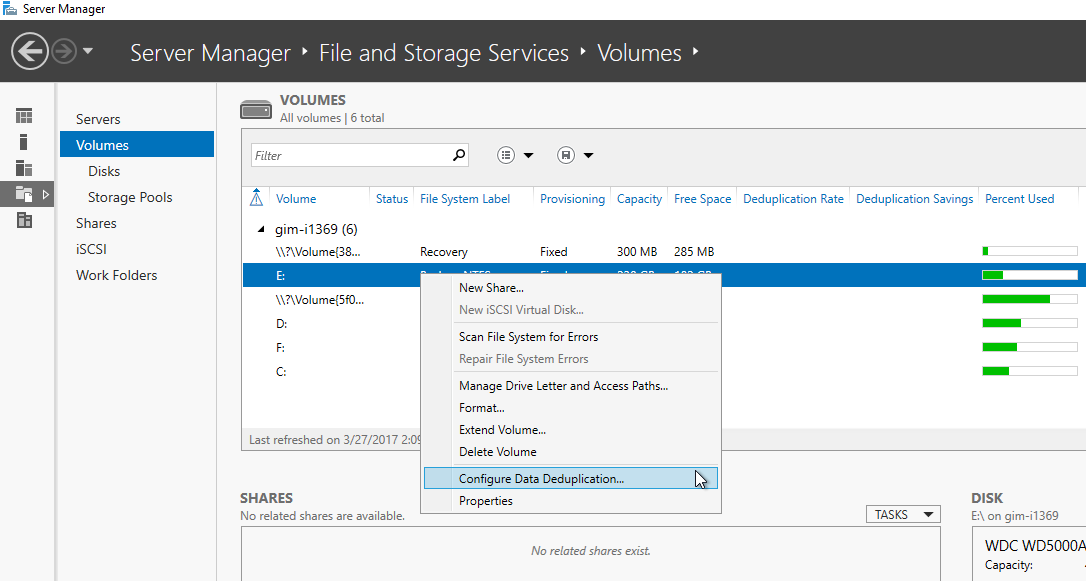
Now, you can go to the list of disk volumes in Server Manager and enable Data Deduplication on NTFS volumes (ReFS is not supported yet), which are not system volumes (Figure 1) or again use PowerShell:
Enable-DedupVolume -Volume <Volume-Path> -UsageType <Default/HyperV/Backup>
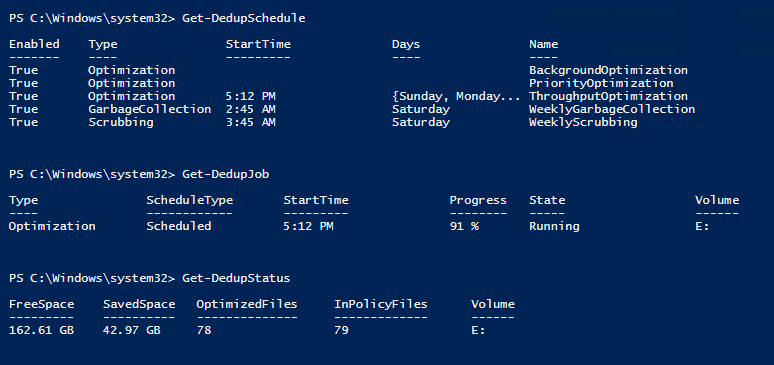
Then, you will need to select the schedule for the data deduplication job and adjust the default settings if required. Now, the feature is running and you should be getting your results as scheduled. It’s helpful to use PowerShell cmdlets to get more insight on the process. Get-DedupSchedule lists information about all deduplication tasks are that are configured on a system. Get-DedupJob shows the running Dedup job and its progress. Get-DedupStatus allows to see the details of the task: Amount of saved space and number of processed files on a volume. (Figure 2)
How to use Dedup with Veeam backup repository
If you’re familiar with Veeam products, you know that Veeam Backup & Replication has an internal data deduplication mechanism. Veeam Proxy Server, a component which processes the data and pushes it from source to target, analyzes VM data blocks on the fly, calculates a unique hash for those blocks and saves identical blocks into the backup file only once, providing inline data deduplication.
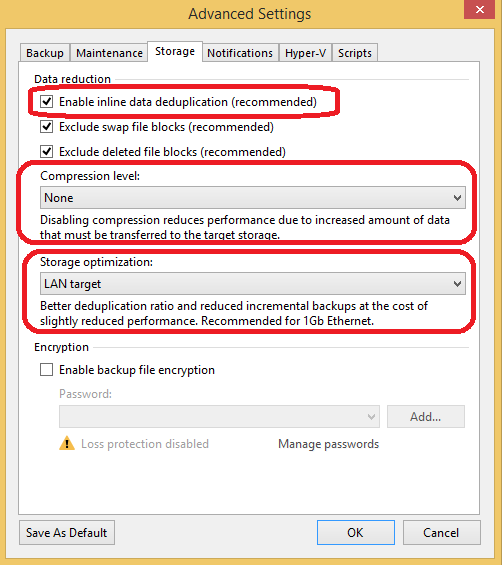
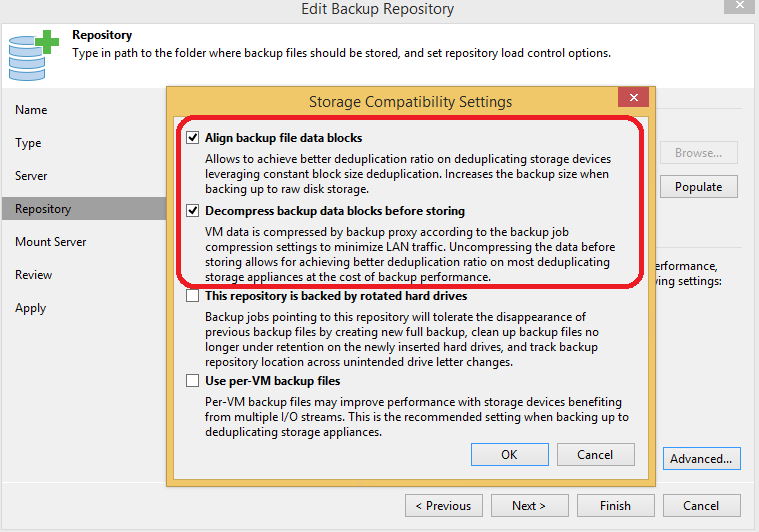
But the most interesting case happens if the administrator wants to put Veeam backups in a repository which resides on a disk volume with Windows Data Deduplication enabled. For those cases, we have several important requirements to ensure these two technologies work together perfectly. An administrator must make Veeam aware of the upcoming Windows Data Deduplication so it behaves accordingly, not trying to do the whole job itself. It’s recommended to set up the Backup Job properly: Navigate to its settings in Storage -> Advanced -> Storage tab and make sure that inline data deduplication is enabled, compression level is set to “None”, storage optimization is selected with “LAN target” (Figure 3).
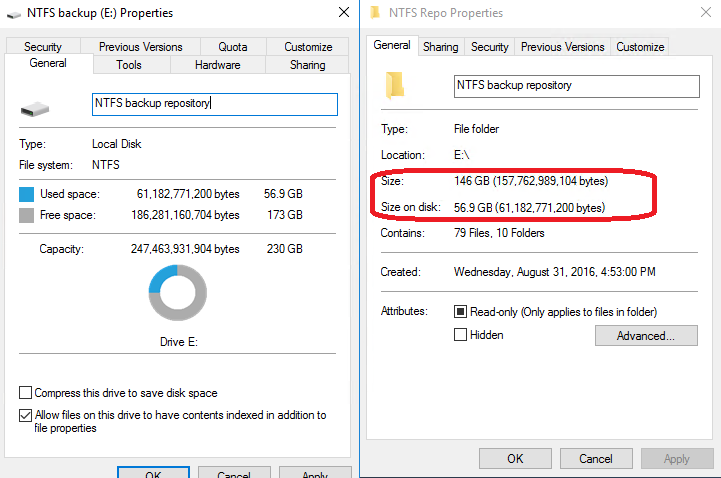
Now comes the most interesting part — practice. I’ve configured a Veeam Backup Job containing 15 VMs, mostly Windows VMs with some applications I run for different tests and point this Veeam Job to a newly created 230GB NTFS repository in my lab. I followed Veeam best practices in terms of job settings and let it run for a couple of days. I’ve got approximately 150GB of backup data (two full backups and a bunch of incremental points) and then I turned on Windows Data Deduplication on this volume and let it run overnight
The results I’ve got were amazing, Dedup job processed the volume, taking 150 GB of initial data down to 60GB and giving me 60% space savings (Figure 5). Incredible, isn’t it?
With that in mind, I highly encourage you to read more about data deduplication and experiment with this technology if you’re interested in space savings. This doesn’t make it the ultimate solution, however, when used smartly it can give you great results. As a bonus, it doesn’t require any new investment and no need to convince your boss to pay for an expensive data deduplication storage appliance.
What is your experience with data deduplication? Feel free to share in the comments.