Today, ransomware and malware attacks are top of mind for every business. In fact, no business, large or small is immune. What’s even more concerning is that ransomware attacks are increasing worldwide at an alarming rate, and because of this, many of you have expressed concern. In a recent study administered by ESG, 70% of Veeam customers indicated malicious malware and virus contamination are major concerns for their businesses (source: ESG Data Protection Landscape Survey).
There are obviously multiple ways your environment can be infected by malware; however, do you currently have an easy way to scan backups for threats before introducing them to production? If not, Veeam DataLabs Secure Restore is the perfect solution for secure data recovery!
The premise behind Veeam DataLabs Secure Restore is to provide users an optional, fully-integrated anti-virus scan step as part of any chosen recovery process. This feature, included in the latest Veeam Backup & Replication Update 4 addresses the problems associated with managing malicious malware by providing the ability to assure any of your copy data that you want or need to recover into production is in a good state and malware free. To be clear, this is NOT a prevention of an attack, but instead it’s a new, patent-pending unique way of remediating an attack arising from malware hidden in your backup data, and also to provide you additional confidence that a threat has been properly neutralized and no longer exists within your environment.
Sounds valuable? If so, keep reading.
Recovery mode options
Veeam offers a number of unique recovery processes for different scenarios and Veeam DataLabs Secure Restore is simply an optional enhancement included in many of these recovery processes to make for a truly secure data recovery. It’s important to note though that Secure Restore is not a required, added step as part of a restore. Instead, it’s an optional anti-virus scan that is available to put into action quickly if and when a user suspects a specific backup is infected by malware, or wants to proceed with caution to ensure their production environment remains virus-free following a restore.
Workflow
The workflow for Secure Restore is the same regardless of the specific recovery scenario used.
- Select the restore mode
- Choose the workload you need to recover
- Specify the desired restore point
- Enable Secure Restore within the wizard
Once Secure Restore is enabled you are presented with a few options on how to proceed when an infection has been detected. For example, with an Entire VM recovery, you can choose to continue the recovery process but disable the network adapters on the virtual machine or choose to abort the VM recovery process. In the event an actual infection is identified, you also have a third option to continue scanning the whole file system to protect against other threats to notify the third-party antivirus to continue scanning, to get visibility to any other threats residing in your backups.
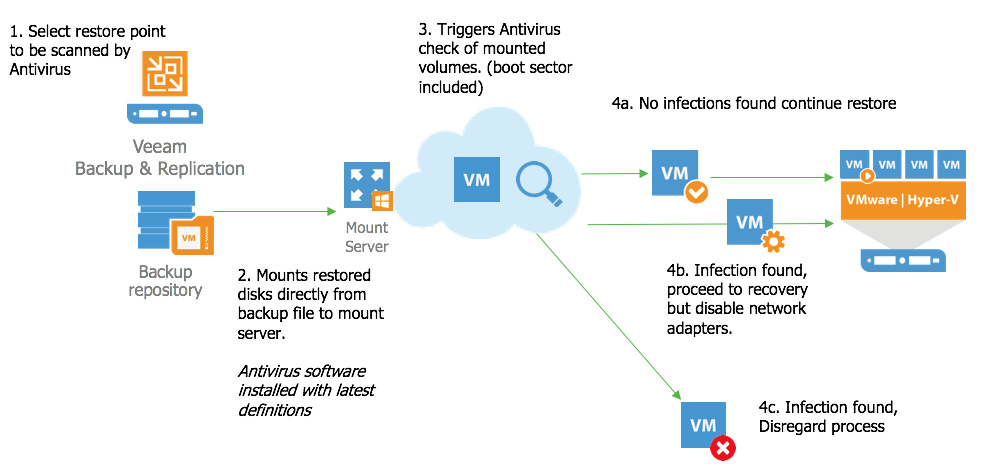
As you work inside the wizard and the recovery process starts, the first part of the recovery process is to select the backup file and mount its disks to the mount server which contains the antivirus software and the latest virus definitions (not owned by Veeam). Veeam will then trigger an antivirus scan against the restored disks. For those of you familiar with Veeam, this is the same process leveraged with Veeam file level recovery. Currently, Veeam DataLabs Secure Restore has built-in, direct integrations with Microsoft Windows Defender, ESET NOD32 Smart Security, and Symantec Protection Engine to provide virus scanning, however, any antivirus software with CMD support can also interface with Secure Restore.
As a virus scan walks the mounted volumes to check for infections, this is the first part of the Secure Restore process. If an infection is found, then Secure Restore will default to the choice you selected in the recovery wizard and either abort the recovery or continue with the recovery but disable the network interfaces on the machine. In addition, you will have access to a portion of the antivirus scan log from the recovery session to get a clear understanding of what infection has been found and where to locate it on the machine’s file system.
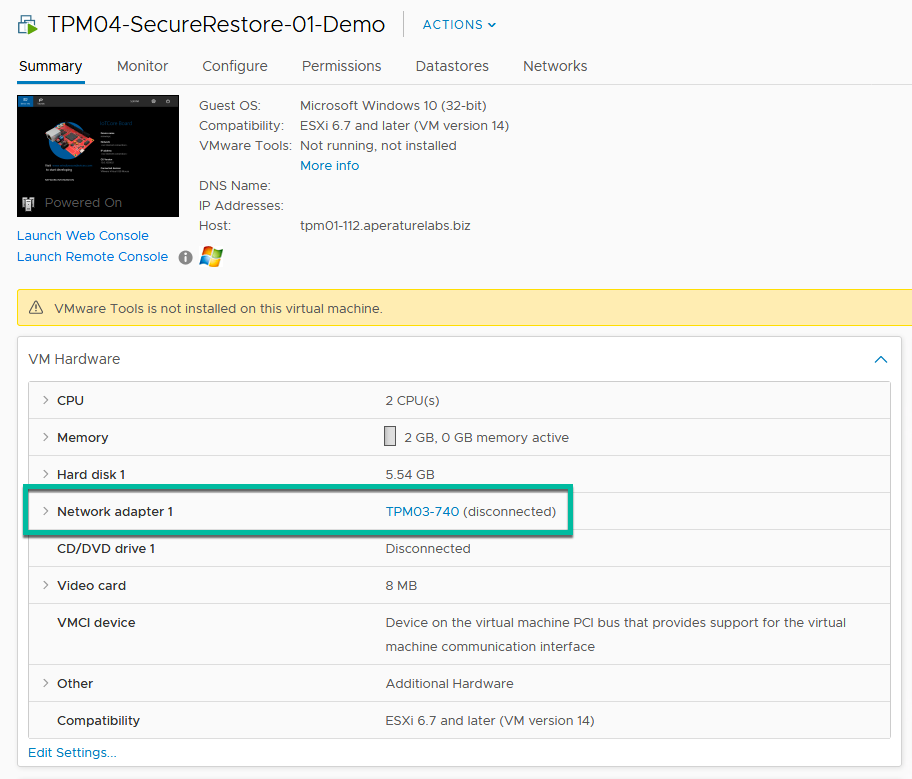
This particular walkthrough is highlighting the virtual machine recovery aspect. Next, by logging into the Virtual Center, you can navigate to the machine and notice that the network interfaces have been disconnected, providing you the ability to login through the console and troubleshoot the files as necessary.
To quickly summarise the steps that we have walked through for the use case mentioned at the beginning, here they are in a diagram:
SureBackup
Probably my favourite part of this new feature is how Secure Restore fits within SureBackup, yet another powerful feature of Veeam DataLabs. For those of you unfamiliar with SureBackup, you can check out what you can achieve with this feature here.
SureBackup is a Veeam technology that allows you to automatically test VM backups and validate recoverability. This task automatically boots VMs in an isolated Virtual Lab environment, executes health checks for the VM backups and provides a status report to your mailbox. With the addition of Secure Restore as an option, we can now offer an automated and scheduled approach to scan your backups for infections with the antivirus software of your choice to ensure the most secure data recovery process.
PowerShell
Finally, it’s important to note that the options for Veeam DataLabs Secure Restore are also fully configurable through PowerShell, which means that if you automate recovery processes via a third-party integration or portal, then you are also able to take advantage of this.
Veeam DataLabs – VeeamHUB – PowerShell Scripts


