- Veeam Support Knowledge Base
- Veeam Agent – Windows recovery image file not found
Veeam Agent – Windows recovery image file not found
| KB ID: | 2685 |
| Product: | Veeam Agent for Microsoft Windows | 3.0.2 | 4.0 | 5.0 | 6.0 | 6.1 | 6.2 | 6.3 | 6.3.1 | 6.3.2 | 6.3.3 | 13 |
| Published: | 2018-07-12 |
| Last Modified: | 2024-09-17 |
Cheers for trusting us with the spot in your mailbox!
Now you’re less likely to miss what’s been brewing in our knowledge base with this weekly digest
![]()
Oops! Something went wrong.
Please, try again later.
Challenge
Windows recovery image file not foundCause
Solution
Part 1: Preparing the Image File
To resolve the issue of missing Windows Recovery Environment files, you will need to copy them from the Windows Installation media to the running system. Perform the following steps on the machine that is having the issue:
- Mount the Windows Installation ISO or insert the installation media.
- Using Windows Explorer, check the "sources" folder on the Windows installation media:
- If
install.wimis present, skip to Part 2: Using Diskpart Check if the Recovery Partition is Present - if
install.esdis present, proceed to step 3
- If
- Use the DISM Export-Image function to extract the install.wim from the install.esd file in the installation media.
How to export install.wim from install.esd file
Modify file paths as needed for your environment.
dism /get-imageinfo /imagefile:D:\sources\install.esdNext, use the Export-Image function to export the install.wim for the Index ID that you need. For the example command below, the machine had Windows 10 Pro installed, and Index #6 matched that edition.
Be sure to include the /Compress switch; if it is not included, the resulting WIM file will fail to mount using DISM.
dism /Export-image /SourceImageFile:D:\sources\install.esd /SourceIndex:6 /DestinationImageFile:C:\tempsources\install.wim /Compress:fast /CheckIntegrityPart 2: Using Diskpart Check if the Recovery Partition is Present
Open an elevated Command Prompt, and run the following commands in Diskpart:
- List all available disks:
list disk- Select the disk where the OS is installed. (Usual Disk 0)
select disk #- List all partitions on the selected disk:
list part
Part 3: Recovery Image Handling
Below are three expandable sections that provide information on the next actions to take based on whether the Recovery partition is available.
Scenario Summaries:
-
Scenario 1: Replace the Existing Recovery Image in the Recovery Partition
The Recovery partition is present, and you would prefer to update it instead of storing the recovery image on the OS partition.
-
Scenario 2: Create a New Recovery Partition
There is no Recovery partition, but you would like to create one and store the Recovery image there.
-
Scenario 3: Place the Recovery Image on the OS Volume
There is no Recovery partition, and you don't want to create one.
Scenario 1: Replace the Existing Recovery Image in the Recovery Partition
In this scenario, you will assign a drive letter to the existing Recovery partition, replace the recovery image on that partition with the one from the ISO, and then reinitialize the recovery environment.
- Assign a Drive letter to the existing Recovery partition:
- Open an elevated Command Prompt
- Run Diskpart:
diskpart- List all available disks:
list disk- Select the disk where the OS is installed. (Usual Disk 0)
select disk #- List all partitions on the selected disk:
list part- Select the Recovery partition.
select part #- Assign the selected Recovery partition a drive letter:
The letter R:\ is used throughout this section to make the steps consistent.
assign letter=R- Exit Diskpart, and complete the remaining steps in this Scenario guide from the existing elevated Command Prompt.
exit- Disable the recovery environment:
reagentc /disable- Using the DISM Mount-Image function, mount the install.wim:
Correct file paths as needed depending on the location of the install.wim. For example, if you had to extract the install.wim from the install.esd on the ISO, correct the imagefile path to match where you exported that install.wim.
DISM /Mount-image /imagefile:D:\sources\install.wim /Index:1 /MountDir:C:\dism /readonly /optimize- Copy WinRe.wim and ReAgent.xml files from the mounted image to the system's C:\Windows\System32\Recovery folder:
Note: The example command will overwrite all data in the C:\Windows\System32\Recovery folder with content from the mounted image. (WinRe.wim is a system file and is hidden by default, as such, you won't be able to see the file once it's copied to the target location.)
robocopy /MIR /XJ C:\dism\Windows\System32\Recovery\ C:\Windows\System32\Recovery- Unmount the image:
dism /unmount-image /mountdir:C:\dism /discard- On the Recovery partition that you assigned a Drive letter to in Step 2 of this scenario, check if there is a folder named Recovery and within it is a folder named WindowsRE.
dir R: /A /S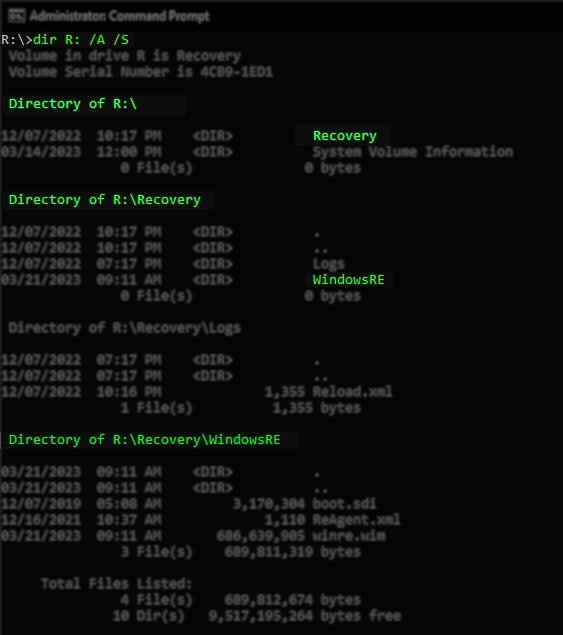
- If the folders are present (R:\Recovery\WindowsRE), skip the mkdir command and proceed to Step 8.
- If those folders are not present, create them:
mkdir R:\Recovery\WindowsRE- Copy the recovery environment image to the R:\Recovery\WindowsRE folder:
xcopy /h C:\Windows\System32\Recovery\Winre.wim R:\Recovery\WindowsRE- Enable Recovery image using REAgentC:
reagentc /setreimage /path R:\Recovery\WindowsRE /target C:\Windows- Enable the recovery environment:
reagentc /enable- Check that the Recovery environment is pointed to the correct partition:
reagentc /info- Remove the drive letter from the Recovery partition:
- Open Diskpart
diskpart- List all available disks:
list disk- Select the disk where the OS is installed. (Usual Disk 0)
select disk #- List all partitions on the selected disk:
list part- Select the Recovery partition.
select part #- Remove the drive letter from the Recovery partition:
remove letter=R- Exit Diskpart, and close the Command Prompt
exitScenario 2: Create a New Recovery Partition
In this scenario, you will shrink the last partition on the OS disk, create a new partition, assign it the Recovery type, copy the recovery image into that new partition, then reinitialize the recovery environment.
Note:
- If the last partition on the OS disk is not large enough to shrink, you may have to shrink the next-to-last partition to make space for the Recovery partition.
- Shrink the last partition on the OS disk and create the new Recovery partition:
- Open an elevated Command Prompt
- Run Diskpart:
diskpart- List all available disks:
list disk- Select the disk where the OS is installed. (Usual Disk 0)
Tip: Take note of whether the disk you select is marked as GPT or not, you'll need to know that in a future step.
select disk #- List all partitions on the selected disk:
list part- Select the last partition on the disk, which you are going to shrink to make space for the new Recovery Partition. (Usually, it is the OS partition)
Critical Note: The partition you select must have sufficient space to be shrunk by 8GB. If the last partition on the disk is unable to be shrunk by 8GB, you may need to shrink the next-to-last partition instead and insert the new Recovery partition before the last partition.
select part #- Shrink the partition to create space for the new Recovery partition:
shrink desired=8192- Create a new Primary partition:
create partition primary- After the partition command in the previous step completes, the new partition will be selected. Now, format it as NTFS and give it the label "Recovery"
format quick fs=ntfs label="Recovery"- Update the partition type ID:
- If the disk was not marked as GPT, use the command:
set id = 27
- If the disk was marked as GPT, use the command:
set id = "de94bba4-06d1-4d40-a16a-bfd50179d6ac"
- If the disk was not marked as GPT, use the command:
- Assign the new Recovery partition a drive letter:
The letter R:\ is used throughout this section to make the steps consistent.
assign letter=R- Exit Diskpart, and complete the remaining steps in this Scenario guide from the existing elevated Command Prompt.
exit- Disable the recovery environment:
reagentc /disable- Using the DISM Mount-Image function, mount the install.wim:
Correct file paths as needed depending on the location of the install.wim. For example, if you had to extract the install.wim from the install.esd on the ISO, correct the imagefile path to match where you exported that install.wim.
DISM /Mount-image /imagefile:D:\sources\install.wim /Index:1 /MountDir:C:\dism /readonly /optimize- Copy WinRe.wim and ReAgent.xml files from the mounted image to the system's C:\Windows\System32\Recovery folder:
Note: The example command will overwrite all data in the C:\Windows\System32\Recovery folder with content from the mounted image. (WinRe.wim is a system file and is hidden by default, as such, you won't be able to see the file once it's copied to the target location.)
robocopy /MIR /XJ C:\dism\Windows\System32\Recovery\ C:\Windows\System32\Recovery- Unmount the image:
dism /unmount-image /mountdir:C:\dism /discard- Create the Recovery folders:
mkdir R:\Recovery\WindowsRE- Copy the recovery environment image to the R:\Recovery\WindowsRE folder:
xcopy /h C:\Windows\System32\Recovery\Winre.wim R:\Recovery\WindowsRE- Enable the Recovery image using REAgentC:
reagentc /setreimage /path R:\Recovery\WindowsRE /target C:\Windows- Enable the recovery environment:
reagentc /enable- Check that the Recovery environment is pointed to the correct partition:
reagentc /info- Remove the drive letter from the Recovery partition:
- Open Diskpart
diskpart- List all available disks:
list disk- Select the disk where the OS is installed. (Usual Disk 0)
select disk #- List all partitions on the selected disk:
list part- Select the Recovery partition.
select part #- Remove the drive letter from the Recovery partition:
remove letter=R- Exit Diskpart, and close the Command Prompt
exitScenario 3: Place the Recovery Image on the OS Volume
In this scenario, you will extract the recovery image from the install.wim to the C:\Windows\System32\Recovery folder and then initialize the recovery environment to use that recovery image.
- Using the DISM Mount-Image function, mount the install.wim:
Correct file paths as needed depending on the location of the install.wim. For example, if you had to extract the install.wim from the install.esd on the ISO, correct the imagefile path to match where you exported that install.wim.
DISM /Mount-image /imagefile:D:\sources\install.wim /Index:1 /MountDir:C:\dism /readonly /optimize- Disable the recovery environment:
reagentc /disable- Copy WinRe.wim and ReAgent.xml files from the mounted image to the system's C:\Windows\System32\Recovery folder:
Note: The example command will overwrite all data in the C:\Windows\System32\Recovery folder with content from the mounted image. (WinRe.wim is a system file and is hidden by default, as such, you won't be able to see the file once it's copied to the target location.)
robocopy /MIR /XJ C:\dism\Windows\System32\Recovery\ C:\Windows\System32\Recovery- Enable the Recovery image using REAgentC:
reagentc /setreimage /path C:\Windows\System32\Recovery /target C:\Windows- Unmount the image:
dism /unmount-image /mountdir:C:\dism /discard- Enable the recovery environment:
reagentc /enableIf this KB article did not resolve your issue or you need further assistance with Veeam software, please create a Veeam Support Case.
To submit feedback regarding this article, please click this link: Send Article Feedback
To report a typo on this page, highlight the typo with your mouse and press CTRL + Enter.
Spelling error in text
Thank you!
Your feedback has been received and will be reviewed.
Oops! Something went wrong.
Please, try again later.
You have selected too large block!
Please try select less.
KB Feedback/Suggestion
This form is only for KB Feedback/Suggestions, if you need help with the software open a support case
Thank you!
Your feedback has been received and will be reviewed.
![]()
Oops! Something went wrong.
Please, try again later.