If you haven’t come across the term “LAPS” before, you might wonder what it is. The acronym stands for the “Local Administrator Password Solution.” The idea behind LAPS is that it allows for a piece of software to generate a password for the local administrator and then store that password in plain text in an Active Directory (AD) attribute.
Storing passwords in plain text may sound counter to all good security practices, but because LAPS using Active Directory permissions, those passwords can only be seen by users that have been given the rights to see them or those in a group with rights to see them.
The main use case here shows that you can freely give out the local admin password to someone who is travelling and might have problems logging in using cached account credentials. You can then have LAPS request a new password the next time they want to talk to an on-site AD over a VPN.
The tool is also useful for applications that have an auto login capability. The recently released Windows Admin Center is a great example of this:

To set up LAPS, there are a few things you will need to do to get it working properly.
- Download the LAPS MSI file
- Schema change
- Install the LAPS Group Policy files
- Assign permissions to groups
- Install the LAPS DLL
Download LAPS
LAPS comes as an MSI file, which you’ll need to download and install onto a client machine, you can download it from Microsoft.
Schema change
LAPS needs to add two attributes to Active Directory, the administrator password and the expiration time. Changing the schema requires the LAPS PowerShell component to be installed. When done, launch PowerShell and run the commands:
Import-module AdmPwd.PS
Update-AdmPwdADSchema
You need to run these commands while logged in to the network as a schema admin.
Install the LAPS group policy files
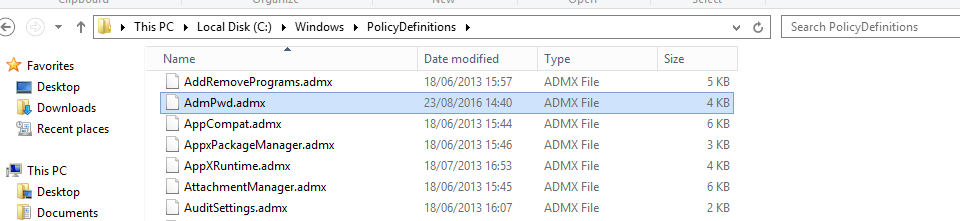
The group policy needs to be installed onto your AD servers. The *.admx file goes into the “windows\policydefintions” folder and the *.adml file goes into “\windows\policydefinitions\[language]”
Once installed, you should see a LAPS section in GPMC under Computer configuration -> Policies -> Administrative Templates -> LAPS
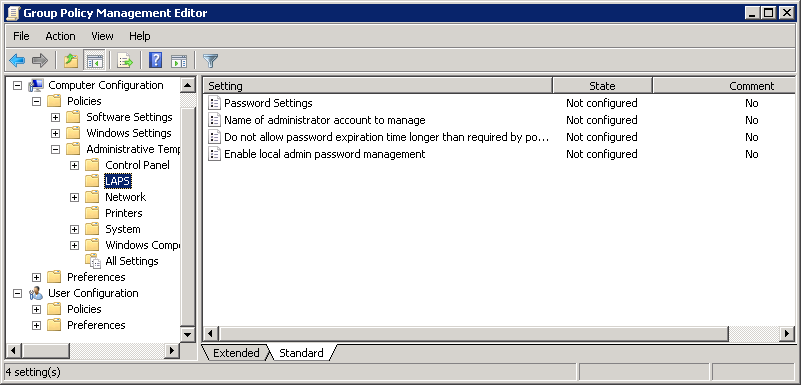
The four options are as follows:
Password settings — This lets you set the complexity of the password and how often it is required to be changed.
Name of administrator account to manage — This is only required if you rename the administrator to something else. If you do not rename the local administrator, then leave it as “not configured.”
Do not allow password expiration time longer than required by policy — On some occasions (e.g. if the machine is remote), the device may not be on the network when the password expiration time is up. In those cases, LAPS will wait to change the password. If you set this to FALSE, then the password will be changed regardless of it can talk to AD or not.
Enable local password management — Turns on the group policy (GPO) and allows the computer to push the password into Active Directory.
The only option that needs to be altered from “not configured” is the “Enable local admin password management,” which enables the LAPS policy. Without this setting, you can deploy a LAPS GPO to a client machine and it will not work.
Assign permissions to groups
Now that the schema has been extended, the LAPS group policy needs to be configured and permissions need to be allocated. The way I do this is to setup an organizational until (OU), where computers will get the LAPS policy and a read-only group and a read/write group.
Because LAPS is a push process, (i.e. because the LAPS client on the computer is the one to set the password and push it to AD) the computer’s SELF object in AD needs to have permission to write to AD.
The PowerShell command to allow this to happen is:
Set-AdmPwdComputerSelfPermission -OrgUnit <name of the OU to delegate permissions>To allow helpdesk admins to read LAPS set passwords, we need to allow a group to have that permission. I always setup a “LAPS Password Readers” group in AD, as it makes future administration easier. I do that with this line of PowerShell:
Set-AdmPwdReadPasswordPermission -OrgUnit <name of the OU to delegate permissions> -AllowedPrincipals <users or groups>The last group I set up is a “LAPS Admins” group. This group can tell LAPS to reset a password the next time that computer connects to AD. This is also set by PowerShell and the command to set it is:
Set-AdmPwdResetPasswordPermission -OrgUnit <name of the OU to delegate permissions> -AllowedPrincipals <users or groups>
Once the necessary permissions have been set up, you can move computers into the LAPS enabled OU and install the LAPS DLL onto those machines.
LAPS DLL
Now that the OU and permissions have been set up, the admpwd.dll file needs to be installed onto all the machines in the OU that have the LAPS GPO assigned to it. There are two ways of doing this. First, you can simply select the admpwd dll extension from the LAPS MSI file.

Or, you can copy the DLL (admpwd.dll) to a location on the path, such as “%windir%\system32”, and then issue a
regsvr32.exe AdmPwd.dllcommand. This process can also be included into a GPO start-up script or a golden image for future deployments.
Now that the DLL has been installed on the client, a
gpupdate /forceshould allow the locally installed DLL to do its job and push the password into AD for future retrieval.
Retrieving passwords is straight forward. If the user in question has at least the LAPS read permission, they can use the LAPS GUI to retrieve the password.
The LAPS GUI can be installed by running the setup process and ensuring that “Fat Client UI” is selected. Once installed, it can be run just by launching the “LAPS UI.” Once launched, just enter the name of the computer you want the local admin password for and, if the permissions are set up correctly, you will see the password displayed.

If you do not, check that that the GPO is being applied and that the permissions are set for the OU where the user account is configured.
Troubleshooting
Like anything, LAPS can cause a few quirks. The two most common quirks I see include when staff with permissions cannot view passwords and client machines do not update the password as required.
The first thing to check is that the admpwd.dll file is installed and registered. Then, check that the GPO is applying to the server that you’re trying to change the local admin password on with the command
gpresult /rI always like to give applications like LAPS their own GPO to make this sort of troubleshooting much easier.
Next, check that the GPO is actually turned on. One of the oddities of LAPS is that it is perfectly possible to set everything in the GPO and assign the GPO to an OU, but it will not do anything unless the “Enable Local password management” option is enabled.
If there are still problems, double check that the permissions that have been assigned. LAPS won’t error out, but the LAPS GUI will just show a blank for the password, which could mean that either the password has not been set or that the permissions have not been set correctly.
You can double check permissions using the extended attribute section of windows permissions. You can access this by launching Active Directory users and computers -> Browse to the computer object -> Properties -> Security -> Advanced

Double click on the security principal:

Scroll down and check that both Read ms-Mcs-AdmPwd and Write ms-Mcs-admpwd are ticked.
In summary, LAPS works very well and it is a great tool for deployment to servers, especially laptops and the like. It can be a little tricky to get working, but it is certainly worth the time investment.
See more:
- Learn the basics of AD with our Active Directory 101 webinar
- Read our Windows and Physical Servers Backup Best Practices whitepaper