- Veeam Support Knowledge Base
- How to do an Application Item Restore using Standalone Veeam Agent Backups in a Cloud Connect Repository
How to do an Application Item Restore using Standalone Veeam Agent Backups in a Cloud Connect Repository
| KB ID: | 2668 |
| Product: |
Veeam Backup & Replication | 10 | 11 | 12 | 12.1 | 12.2 | 12.3 | 12.3.1 | 12.3.2 | 13 Veeam Agent for Microsoft Windows | 5.0 | 6.0 | 6.1 | 6.2 | 6.3 | 6.3.1 | 6.3.2 | 6.3.3 | 13 |
| Published: | 2018-06-09 |
| Last Modified: | 2023-06-15 |
Cheers for trusting us with the spot in your mailbox!
Now you’re less likely to miss what’s been brewing in our knowledge base with this weekly digest
![]()
Oops! Something went wrong.
Please, try again later.
This article documents a method for performing Application Item Restore from restore points created by a Standalone Veeam Agent for Microsoft Windows deployment and stored in a Cloud Connect Repository.
For Veeam Agent for Microsoft Windows deployments managed by a tenant's Veeam Backup Server, perform the Application Item Restore from within the Veeam Backup & Replication Console that manages the Veeam Agent for Microsoft Windows deployments.
Purpose
Solution
Application Item Restore using Veeam Explorers requires a Veeam Backup & Replication server. To perform such restores using the restore points created by a standalone Veeam Agent for Microsoft Windows deployment, those restore points must be made visible to a Tenant-side Veeam Backup & Replication server.
There are two ways to give a Veeam Backup & Replication Server access to those restore points:
- Add the Cloud Connect Service Provider used by the Standalone Veeam Agent for Microsoft Windows backup job to the tenant Veeam Backup & Replication server.
or - Import a copy of the restore points from the Cloud Connect Repository into the tenant Veeam Backup & Replication console.
If the tenant does not have a Veeam Backup & Replication Server, a temporary one may be created or the Veeam Backup & Replication software may be installed on the machine where the restore will take place.
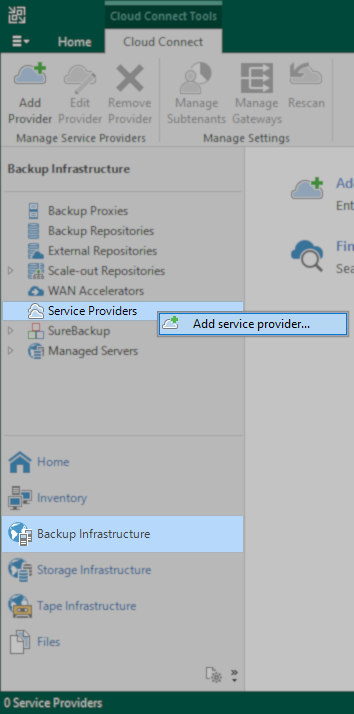
Method 1: Add Cloud Connect Repository to Tenant's Veeam Backup & Replication
Note: The Application Item Restore will lock the backup files during the restore, preventing the Veeam Agent for Microsoft Windows job from running.
- Connect to the machine where Veeam Agent for Microsoft Windows was installed and created the restore points from which an Application Item Restore will be performed.
- Within Veeam Agent for Microsoft Windows, edit the job that created the restore points.
- Within the job settings, review the Service Provider and Credentials tab, and note the connection information used.
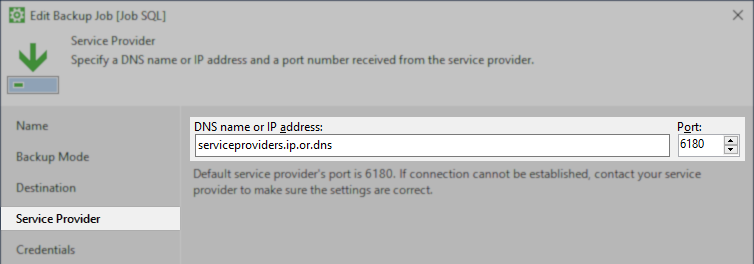
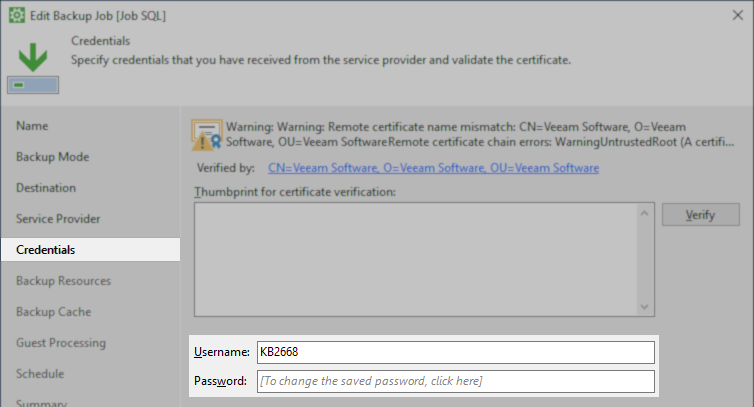
- Open the Veeam Backup & Replication Console, and add that service provider.
This may be a Veeam Backup & Replication deployment on a temporary machine or a deployment of Veeam Backup & Replication that has been temporarily installed on the production machine.
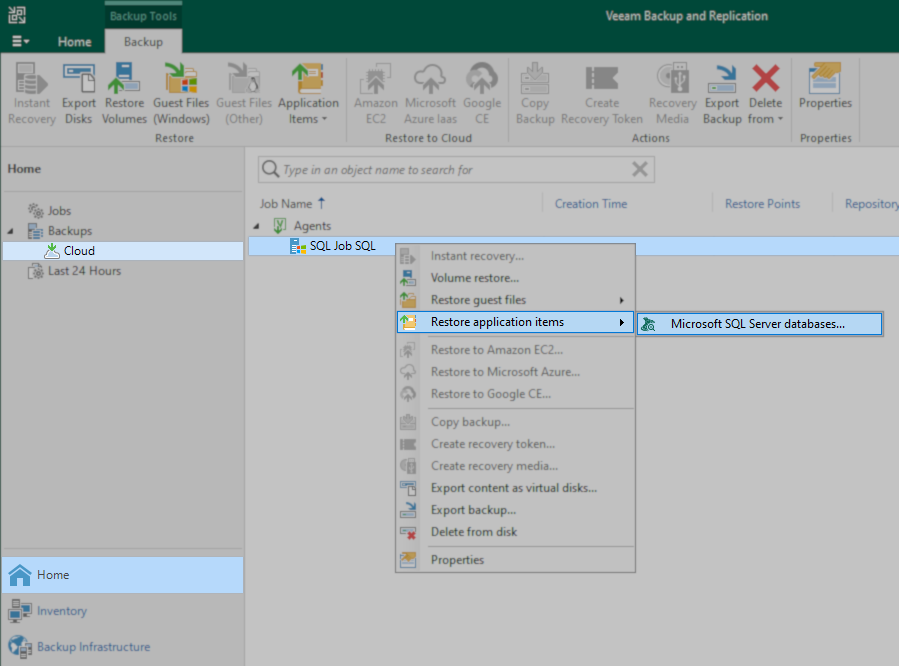
- Perform the Application Item Restore using the restore points that should now appear in the Home view under Backup > Cloud > Agents.
Method 2: Copy and Import Restore Points to Veeam Backup & Replication
This alternate method may be used if a Veeam Backup & Replication server cannot be created with access to the Cloud Connect Service Provider.
- Copy the backup files created by the Standalone Veeam Agent for Microsoft Windows backup job to a location accessible by the Veeam Backup & Replication server at the tenant's site.
- Open the Veeam Backup & Replication Console for the that Veeam Backup & Replication server and use the Import Backup function.

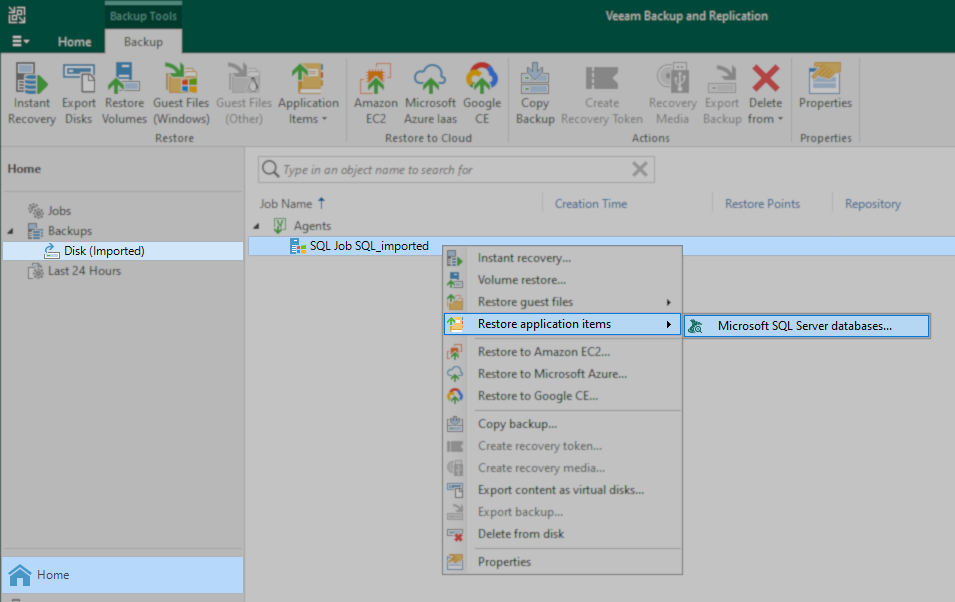
- Perform the Application Item Restore using the restore points that should now appear in the Home view under Backup > Disk (Imported).
More Information
If the "Restore application items" option is greyed out, use the "Restore guest files" option instead. Then, manually launch the Veeam Explorer application and use the manually add option to perform the restore using the files mounted by the Guest Files Restore within C:\VeeamFLR\
If this KB article did not resolve your issue or you need further assistance with Veeam software, please create a Veeam Support Case.
To submit feedback regarding this article, please click this link: Send Article Feedback
To report a typo on this page, highlight the typo with your mouse and press CTRL + Enter.
Spelling error in text
Thank you!
Your feedback has been received and will be reviewed.
Oops! Something went wrong.
Please, try again later.
You have selected too large block!
Please try select less.
KB Feedback/Suggestion
This form is only for KB Feedback/Suggestions, if you need help with the software open a support case
Thank you!
Your feedback has been received and will be reviewed.
![]()
Oops! Something went wrong.
Please, try again later.