How to Collect Process Dumps and Logs
| KB ID: | 4563 |
| Product: | Veeam Backup & Replication |
| Published: | 2024-03-22 |
| Last Modified: | 2024-10-03 |
| Languages: | JP |


This article was created to complement KB1727 and provide customers with specific instructions to collect information that will:
- Help Veam Support identify if the job or task is actually stuck or if it is working on something in the background.
- Help the Development team diagnose the underlying issue if Support determines the job or task is legitimately stuck.
Purpose
Solution
Part 1: Collect Process Dumps
- On the Veeam Backup Server, open Task Manager.
- Within Task Manager, switch to the Details view, which lists all running processes.
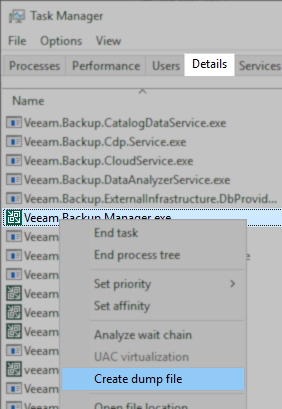
- Create a Process dump file for each process named Veeam.Backup.Manager.exe or VeeamAgent.exe.
- Right-click on the Process
- From the context menu, select Create dump file.
- Note the location where the 'Dumping process' window reports the .dmp file was stored.
Part 2: Export Command Line Info for Active Processes
- Save the output from the following script to a text file:
- Combine the generated .dmp files from Step 3 and the output text file from Step 4 into a single ZIP file.
Part 3: Collect Veeam Backup & Replication Logs
- Open the Veeam Backup & Replication Console
- Export logs from Veeam Backup & Replication. Select all components, and specify a time range of the past 1 day.
Part 4: Attach Collected Diagnostic Data to Case
- Attach the two zip files (from step 5 and step 7) to a Veeam Support case.
Note: The log bundle generated by Veeam Backup & Replication must remain separate and attached to the case individually.
More Information
Automated Collection via Script
This script is provided as a courtesy for exporting Process Dumps and other relevant information to investigate a "stuck" job.
Please be aware that the process dump generation may cause a short burst of high CPU activity.
No support is provided for this script, and should it fail, please proceed to collect the required information manually.
This script requires the Sysinternals tool ProcDump from Microsoft.
The combination of this script and procdump.exe can be run on the Veeam Backup Server or any related Windows-based component server to collect relevant process dumps. The script will only export Veeam Backup & Replication logs when run on the Veeam Backup Server.
- Download ProcDump and extract ProcDump.exe to a folder.
Note: The default folder used by the script is C:\temp\. - Save the following script as ProcDump.ps1 file in the same folder as where you stored ProcDump.exe.
- Update the script and ensure the paths specified for $procDump and $logFolder are correct.
- Open an Administrative PowerShell console and run the script. It will:
- For each Veeam.Backup.Manager.exe and VeeamAgent.exe that is running:
- Write to a log file the command line used to start that process, which helps correlate each process to a task GUID.
- Create a process dump file.
- Export a list of all jobs and their associated GUIDs.
- Export Veeam Backup & Replication logs for all components for the past 1 day.
- Create two zip bundles within the $logFolder:
- KB1727_Logs_<hostname>_yyyymmdd_hhmmss.zip
- VeeamSupportLogs\yyyy-mm-ddThhmmss_VeeamBackupLogs.zip
Note: This zip file will be stored in the VeeamSupportLogs subfolder of the specified $logFolder.
- For each Veeam.Backup.Manager.exe and VeeamAgent.exe that is running:
- After running the script, attach the two generated zip files to the Veeam Support case for review.
Note: The log bundle generated by Veeam Backup & Replication must remain separate and attached to the case individually.
Using ProcDump as a Postmortem Debugger
In situations where a process related to Veeam operations crashes unexpectedly, ProcDump can be configured to act as the postmortem debugger, allowing for the capture of data that can help Veeam Support investigate the process crash.
Install ProcDump as the (AeDebug) postmortem debugger:
If this KB article did not resolve your issue or you need further assistance with Veeam software, please create a Veeam Support Case.
To submit feedback regarding this article, please click this link: Send Article Feedback
To report a typo on this page, highlight the typo with your mouse and press CTRL + Enter.
