How to Investigate 'Encrypted Data Event' from Malware Detection
| KB ID: | 4632 |
| Product: | Veeam Backup & Replication | 12.1 | 12.2 | 12.3 | 12.3.1 | 12.3.2 | 13 |
| Published: | 2024-07-01 |
| Last Modified: | 2026-09-14 |


Veeam Backup & Replication User Guide > Analyzing Encrypted Data Events
Purpose
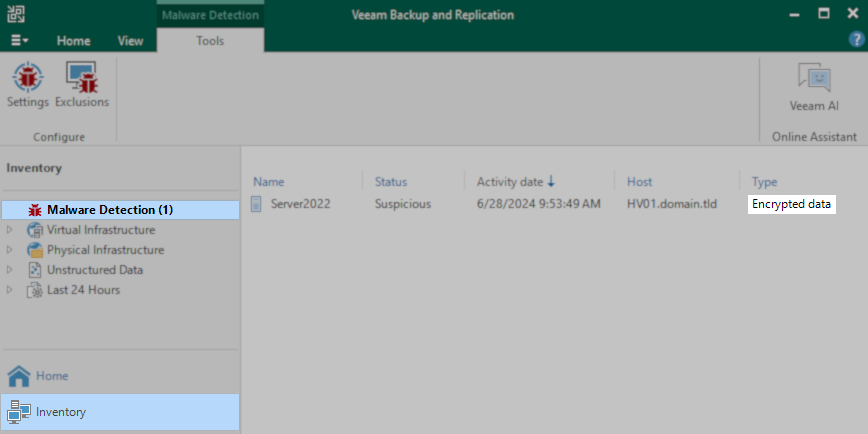
This article documents how to investigate which files are encrypted within a machine when the Malware Detection system flags a machine as having Encrypted data.
This tool only works for malware inline detection events created by Veeam Backup & Replication 12.1.2 and newer. Previous versions of Veeam Backup & Replication are not supported.
Solution
Step 1: Identify Malware Detection Event ID
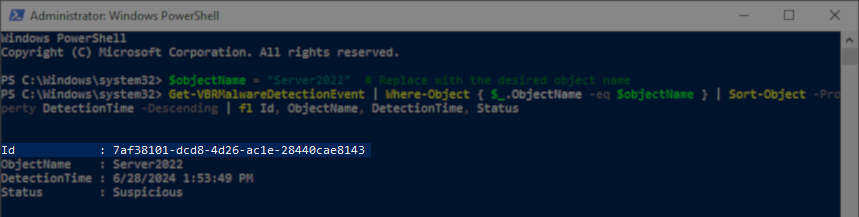
The Find Encrypted Data script requires the user to provide the Malware Detection Event ID to investigate.
The following PowerShell script can be used to output a list of recent Malware Events:
Step 2: Run the Find Encrypted Data PowerShell Script
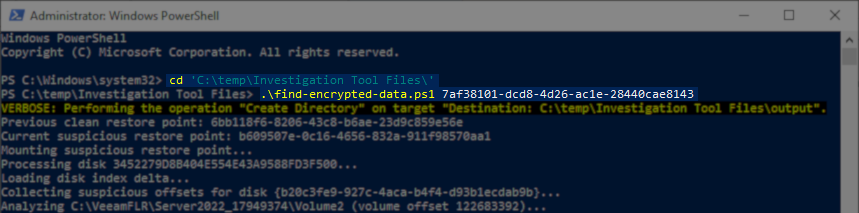
With the Event ID to be investigated now identified, pass that guid to the find-encrypted-data.ps1 script:
How It Works
- The script compares the ransomware index (ridx) file of the restore point associated with the malware event ID provided and the ridx from the prior restore point to determine which disk offsets should be investigated.
- The script then mounts the restore point for investigation and checks the files associated with the offsets identified in Step 1.
- Each file associated with the suspect offset is checked to determine how much encryption is present in the file's first megabyte (default).
- The file path, its offset, and the percentage of encryption in the first 1MB are then output to the results CSV.
Considerations and Limitations
- The results files are named after the GUID of the machine's disk being investigated. If the script is run multiple times for the same machine, the results of a previous script run will be overwritten. If you are investigating multiple malware events across different restore points, copy the results CSV file from earlier runs to a different location for later review.
- A file being present in the results CSV does not mean it was maliciously encrypted; it is merely that the file existed at an offset where encryption was detected. Environments that use file encryption often may receive false positive alerts and should adjust the Encryption Detection sensitivity as needed.
- The final column of the CSV report displays the percentage of encryption detected in the first 1MB of the file. As most ransomware encrypts only a portion of each file, the encryption detection tool only checks the first 1MB of the file to maximize investigation performance.
If a file is listed in the report with 0% in the final column, there are two possible reasons:
This tool cannot differentiate between these two possibilities as it only reviews the first megabyte of the file.
- Part of the file is located in blocks with encryption, but the file itself is not encrypted.
or - The file is encrypted, just but not in the 1st MB.
- Part of the file is located in blocks with encryption, but the file itself is not encrypted.
Review Results CSV File
The find-encrypted-data.ps1 script will create a subfolder named "output" and write the results CSV file into that folder.
Example: {b20c3fe9-927c-4aca-b4f4-d93b1ecdab9b}_Volume0_result.csv
Open the CSV file in a spreadsheet editor or plain text editor and review the results.
As this tool only checks for encryption within the first MB of a file, false positives may occur, and a manual review by an administrator is necessary to determine whether a file has been impacted by malware/ransomware.

Download Information
Investigation Tool Files v2 (VBR v12.x and v13)
What's New
- New in v2.1 Added support for backups from Nutanix AHV.
- If the script is run without any parameters, it will now automatically detect the latest malware encrypted event and generate a report.
- Added a column to the report for EstimatedFileEncryption.
- Improvements to the script to cause the paths in the .csv file to now list paths similar to those expected on the source VM, and no longer display paths like "C:\VeeamFLR\VMName\Volume2\...".
- A subfolder with the VM name will now be created in the output folder to store the results.
- The boolean parameter
-SkipSmallFilesInResultwas added to force the script to exclude information about files smaller than 8 KB from the output report. - The script will now attempt to detect and skip disks that do not have a DiskID.
- Support for non-default-location installs has been improved by adding the ability to pass the installation location using the parameter
-CorePathto declare the folder whereVeeam.Backup.CatalogFsLib.dllis located.
Investigation Tool Files v1 (VBR v12.x only)
The script assumes Veeam Backup & Replication is installed using the default C:\ locationC:\Program Files\Veeam\Backup and Replication\Backup\. If Veeam Backup & Replication has been installed on a different drive letter, please update line 165 within the PowerShell script.
Line 165:
static [String] $LibPath = "C:\Program Files\Veeam\Backup and Replication\Backup\Veeam.Backup.CatalogFsLib.dll"
If this KB article did not resolve your issue or you need further assistance with Veeam software, please create a Veeam Support Case.
To submit feedback regarding this article, please click this link: Send Article Feedback
To report a typo on this page, highlight the typo with your mouse and press CTRL + Enter.
