- Veeam Support Knowledge Base
- Restored Linux Machine Fails to Boot
Restored Linux Machine Fails to Boot
Cheers for trusting us with the spot in your mailbox!
Now you’re less likely to miss what’s been brewing in our knowledge base with this weekly digest
Oops! Something went wrong.
Please, try again later.
Challenge
An issue with initiramfs may cause the restored Linux machine to fail to boot with the following symptoms:
- For RHEL/CentOS/SUSE systems, during the boot process, they will drop into the dracut emergency shell and display errors similar to:
dracut-initqueue timeout - starting timeout scripts
/dev/vgroot/root does not exist
- For Debian systems, a different error message may be shown. By default, Debian doesn't use dracut to generate initramfs images, so the following error is displayed:
Kernel panic - not syncing: VFS: Unable to mount root fs on unknown-block()
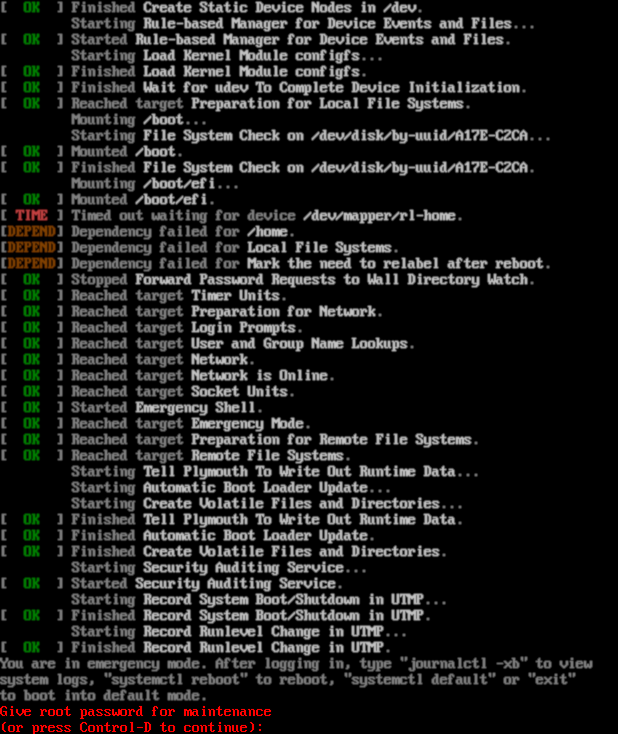
The LVM system.devices file limits which device IDs can be accessed by LVM, causing a restored Linux machine to fail to boot because the disk IDs will have changed. When this occurs, the restored Linux server will fail to boot with the error:
-
Timed out waiting for device /dev/mapper/<lvm-name>
Dependency failed for /
Dependency failed for Local File System
Cause
Faulty initramfs
This issue occurs because the initial ramdisk image does not contain the necessary block device kernel modules (drivers).
The initial ramdisk image (initramfs/initrd) is an image of an initial root filesystem used as a part of the Linux boot process.
The most common scenario for this is when restoring a virtual machine that was backed up using Veeam Agent for Linux to completely new hardware. For example, a virtual machine was backed up in VMware and restored to a Hyper-V environment.
Limited LVM Visibility
This issue occurs because the original Linux machine was configured to limit which devices are visible to LVM through the use of /etc/lvm/devices/system.devices in conjunction with use_devicesfile=1 being set within /etc/lvm/lvm.conf.
Per RHEL Documentation, "In Red Hat Enterprise Linux 9, the /etc/lvm/devices/system.devices file is enabled by default."
Solution
Scenario 1: Faulty initramfs
To resolve this issue, you must regenerate the initramfs image.
This consists of:
- Locating partitions/volumes on the target system corresponding to the root filesystem, /boot, and /boot/efi partitions.
- Mounting these to a target directory and bind-mounting system pseudo filesystems.
- Chrooting into the mounted OS.
- Rebuilding the initramfs from within the chrooted environment.
- The following troubleshooting steps are provided as a courtesy and should be performed by a knowledgeable Linux Administrator.
- You should only perform the steps in this article on a machine that has been restored using Veeam. If you make a mistake, re-restore the VM and try again.
- Readers are strongly advised to read each section carefully. Some command examples are not meant to be directly copied and pasted into a bash prompt.
Part 1: Prerequisites
- You must have a Linux LiveCD matching the distribution and release version of the restored Linux system that is compatible with the target system hardware. It can be either a distribution-supplied live/rescue CD or Custom Veeam Recovery Media generated on the machine prior to restore.
- You must be aware of the target system's disk and volume layout and the devices corresponding to the root filesystem and boot partitions. If this information is not readily available, you may use File-level Restore (with Veeam Recovery Media, Veeam Agent for Linux, or Veeam Backup&Replication) to mount the backup contents and inspect the /etc/fstab file.
Part 2: Boot from LiveCD
- Boot from the distro's LiveCD or Custom Veeam Recovery Media.
- Switch to the bash shell (elevate to root user if necessary).
- Locate the volumes/partitions hosting the Linux VM's root and boot filesystems. You can use commands like lsblk (list hierarchy of block devices), lvdisplay (list logical volumes), etc.
Part 3: Mount Guest OS Filesystem and Chroot
- Create a directory where the system root will be mounted.
Example:
mkdir /targetroot- Mount the device hosting the guest OS root filesystem inside the directory (/targetroot).
Example for sda3 partition:
mount /dev/sda3 /targetrootmount /dev/centos/root /targetrootmount /dev/mapper/centos-root /targetroot- Mount the guest OS's boot partition inside /targetroot/boot.
Example for sda2 boot partition:
mount /dev/sda2 /targetroot/boot- If UEFI is in use: The guest OS's EFI system partition (/boot/efi) needs to be mounted to /targetroot/boot/efi.
Assuming EFI system partition on sda1:
mount /dev/sda1 /targetroot/boot/efiNote: If BTRFS using separate subvolumes is in use for any of the required partitions, you might have to use subvol= or subvolid= parameters in the mount command to specify a subvolume to mount.
Example:
mount -o subvol=/@/boot/grub2/x86_64-efi /dev/sda2 /targetroot/boot/grub2/x86_64-efi
This command mounts /@/boot/grub2/x86_64-efi BTRFS subvolume from /dev/sda2 device to /targetroot/boot/grub2/x86_64-efi
For more information on BTRFS mount options refer to the BTRFS manpage.
- Bind mount the pseudo filesystems inside target root - /dev, /proc, /sys, and /run:
mount --bind /dev /targetroot/dev
mount --bind /proc /targetroot/proc
mount --bind /sys /targetroot/sys
mount --bind /run /targetroot/run- Chroot into the mounted system:
chroot /targetroot /bin/bashPart 4: Rebuilding initramfs
Identifying and Correlating Kernel Versions to Initial Ramdisk Images
The initial ramdisk image (initramfs/initrd) is an image of an initial root filesystem used as a part of the Linux boot process. Initial ramdisk images are stored as files under /boot, named initramfs-<kernel version>.img or initrd-<kernel version>.
Example for Red Hat Enterprise Linux 8:
# ls -la /boot/initramfs-*
-rw-------. 1 root root 65698610 Aug  8  2019 /boot/initramfs-0-rescue-b15a66f034f840ecb6a1205c983df822.img
-rw-------. 1 root root 19683576 Sep 13  2020 /boot/initramfs-4.18.0-193.19.1.el8_2.x86_64kdump.img
-rw-------. 1 root root 27783687 Nov  8  2020 /boot/initramfs-4.18.0-193.28.1.el8_2.x86_64.img
-rw-------. 1 root root 22324786 Nov  8  2020 /boot/initramfs-4.18.0-193.28.1.el8_2.x86_64kdump.img
-rw-------. 1 root root 27989970 Dec  6 13:17 /boot/initramfs-4.18.0-240.10.1.el8_3.x86_64.img
-rw-------. 1 root root 22485564 Jan 17  2021 /boot/initramfs-4.18.0-240.10.1.el8_3.x86_64kdump.img
-rw-------. 1 root root 27943270 Jan 17  2021 /boot/initramfs-4.18.0-240.1.1.el8_3.x86_64.img
-rw-------. 1 root root 22485474 Jan 17 2021 /boot/initramfs-4.18.0-240.1.1.el8_3.x86_64kdump.img# ls -la /boot/initrd*
lrwxrwxrwx 1 root root 29 Aug 23 2019 /boot/initrd -> initrd-4.12.14-197.15-default
-rw------- 1 root root 11142180 Dec 27 16:37 /boot/initrd-4.12.14-197.15-default
-rw------- 1 root root 15397016 Dec 22 2020 /boot/initrd-4.12.14-197.15-default-kdump
-rw------- 1 root root 10994816 Dec 27 16:37 /boot/initrd-4.12.14-197.15-default.backupInitial ramdisk image files correspond to GRUB/GRUB2 boot menu entries - when a specific entry is selected in the boot menu, a corresponding initramfs image is loaded. The association between GRUB menu entries and initial ramdisk image files can be determined via grub.cfg file (generally located under /boot/grub or /boot/grub2) - look for menuentry records which denote GRUB boot menu entries.
Example from SUSE Linux Enterprise Server 15 SP1:
### BEGIN /etc/grub.d/10_linux ###
menuentry 'SLES 15-SP1'  --class sles --class gnu-linux --class gnu --class os $menuentry_id_option 'gnulinux-simple-bf547c2f-3d66-4be6-98c3-8efe845a940d' {
<...>
        echo    'Loading Linux 4.12.14-197.15-default ...'
        linuxefi /boot/vmlinuz-4.12.14-197.15-default root=UUID=bf547c2f-3d66-4be6-98c3-8efe845a940d  ${extra_cmdline} splash=silent resume=/dev/disk/by-path/pci-0000:03:00.0-scsi-0:0:0:0-part3 mitigations=auto quiet crashkernel=175M,high
        echo    'Loading initial ramdisk ...'
       initrdefi /boot/initrd-4.12.14-197.15-default
}
Red Hat Enterprise Linux 8 uses BLS framework with boot menu entries stored under /boot/loader/entries:
# ls /boot/loader/entries/
b15a66f034f840ecb6a1205c983df822-0-rescue.conf                      b15a66f034f840ecb6a1205c983df822-4.18.0-240.10.1.el8_3.x86_64.conf
b15a66f034f840ecb6a1205c983df822-4.18.0-193.28.1.el8_2.x86_64.conf  b15a66f034f840ecb6a1205c983df822-4.18.0-240.1.1.el8_3.x86_64.conf
# cat /boot/loader/entries/b15a66f034f840ecb6a1205c983df822-4.18.0-240.10.1.el8_3.x86_64.conf
title Red Hat Enterprise Linux (4.18.0-240.10.1.el8_3.x86_64) 8.3 (Ootpa)
version 4.18.0-240.10.1.el8_3.x86_64
linux /vmlinuz-4.18.0-240.10.1.el8_3.x86_64
initrd /initramfs-4.18.0-240.10.1.el8_3.x86_64.img $tuned_initrd
<...>
Note: Rebuilding the initial ramdisk will overwrite the existing image. You should consider making a copy of the existing initramfs/initrd image beforehand. Example:
cp /boot/initramfs-<kernel version>.img /boot/initramfs-<kernel version>.img.backup
Distro Specific Initramfs Rebuild Instructions
Now that you have identified the initramfs that needs to be rebuilt, expand the section below matching the distro for information about rebuilding it.
RHEL/CentOS/Oracle Linux
dracut -f -v /boot/initramfs-<kernel version>.img <kernel version>Here, <kernel version> has to be replaced with the kernel version for which the initramfs is being rebuilt.
Example:
# ls -la /boot/initramfs-*
-rw-------. 1 root root 65698610 Aug  8  2019 /boot/initramfs-0-rescue-b15a66f034f840ecb6a1205c983df822.img
-rw-------. 1 root root 19683576 Sep 13  2020 /boot/initramfs-4.18.0-193.19.1.el8_2.x86_64kdump.img
-rw-------. 1 root root 27783687 Nov  8  2020 /boot/initramfs-4.18.0-193.28.1.el8_2.x86_64.img
-rw-------. 1 root root 22324786 Nov  8  2020 /boot/initramfs-4.18.0-193.28.1.el8_2.x86_64kdump.img
-rw-------. 1 root root 27989970 Dec  6 13:17 /boot/initramfs-4.18.0-240.10.1.el8_3.x86_64.img
-rw-------. 1 root root 22485564 Jan 17  2021 /boot/initramfs-4.18.0-240.10.1.el8_3.x86_64kdump.img
-rw-------. 1 root root 27943270 Jan 17  2021 /boot/initramfs-4.18.0-240.1.1.el8_3.x86_64.img
-rw-------. 1 root root 22485474 Jan 17  2021 /boot/initramfs-4.18.0-240.1.1.el8_3.x86_64kdump.img
Here, /boot/initramfs-4.18.0-240.1.1.el8_3.x86_64.img image corresponds to 4.18.0-240.1.1.el8_3.x86_64 kernel.
To rebuild it with dracut, run:
dracut -f -v /boot/initramfs-4.18.0-240.1.1.el8_3.x86_64.img 4.18.0-240.1.1.el8_3.x86_64More information:
How to rebuild the initial ramdisk image in Red Hat Enterprise Linux
Debian/Ubuntu
update-initramfs –u –k <kernel version>Where <kernel version> is replaced with the kernel version for which the initramfs is being rebuilt.
More information:
SUSE Linux Enterprise/openSUSE
Run:
mkinitrdBecause mkinitrd-suse is just a wrapper for dracut, dracut can be used for the same purpose as well. For more information, refer to RHEL/CentOS/Oracle Linux section above.
Alternate example using dracut:
dracut -f -v /boot/initrd-4.12.14-197.15-default 4.12.14-197.15-defaultPart 5: Unmount and Reboot
With the initramfs having been rebuilt, exit the chroot environment:
exitExample:
umount /targetroot/dev
umount /targetroot/proc
umount /targetroot/sys
umount /targetroot/run
umount /targetroot/boot/efi
umount /targetroot/boot
umount /targetrootFinally, the system can be rebooted.
During the next boot, select the image in the GRUB interface with the same version as the initramfs image that was rebuilt.
Scenario 2: Limited LVM Visibility
To resolve this issue, remove the /etc/lvm/devices/system.devices file. Removing that file will unrestrict which devices LVM can access, allowing the system to boot.
Note: After the machine is able to boot correctly, you may choose to reconfigure the system.devices file. For more information, review RHEL Documentation: Limiting LVM device visibility and usage.
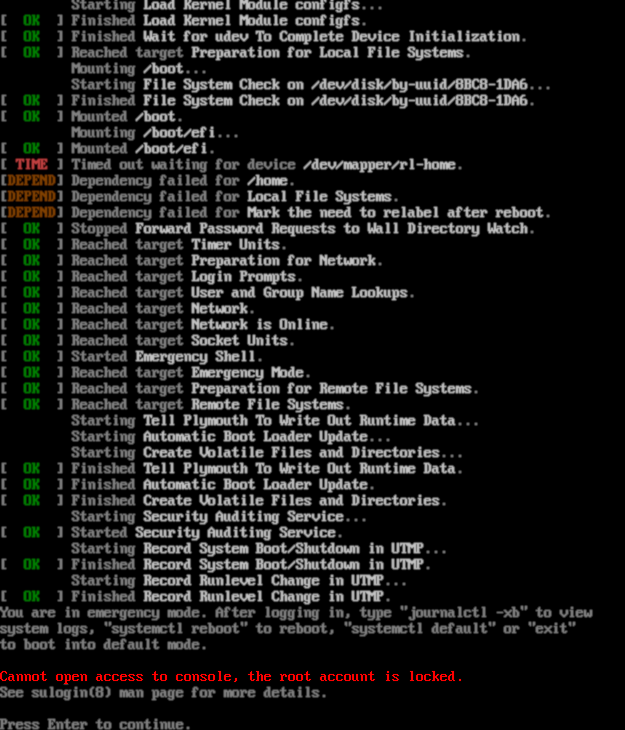
The procedure for removing the system.devices file will depend on whether the root account is disabled or not. You can determine which steps to follow based on whether the system fails to boot and either dumps you into a maintenance prompt or, instead, displays the message "Cannot open access to console, the root account is locked."
Outcome 1: Boot Fails to Emergency Shell as Root
The system fails to boot, and because a root account was enabled, it dumps the user into an emergency shell.
Example:
- Enter the root user password to access the Emergency console.
- Remove the /etc/lvm/devices/system.devices file.
rm -f /etc/lvm/devices/system.devices- Reboot.
reboot
Outcome 2: Boot Fails without Emergency Shell
The system fails to boot, but because the root account was disabled, it displays the message:
Cannot open access to console, the root account is locked.
Example:
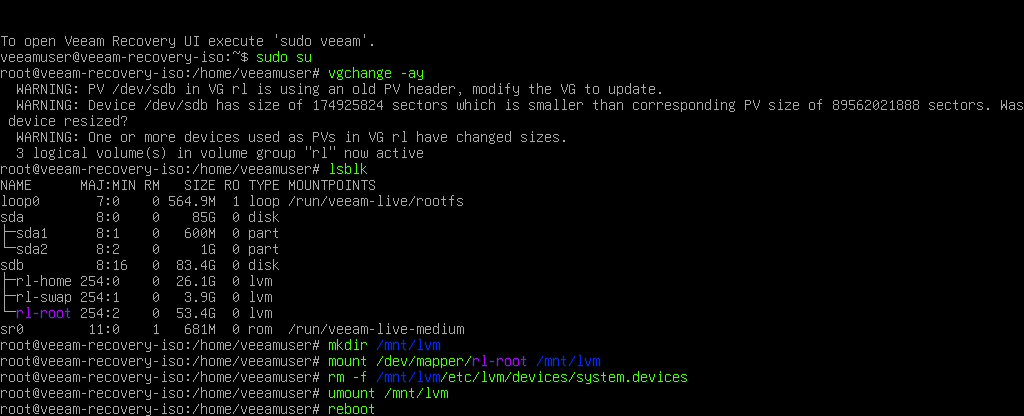
- Boot from the Veeam Recovery Media or any preferred recovery ISO.
- Activate all volume groups with the command:
vgchange -ay- Review the available block devices using:
lsblk- Make a directory where the root filesystem will be mounted:
mkdir /mnt/lvm- Mount the root filesystem to the folder.
The root filesystem path may be different than the example shown here. Review the results from lsblk.
mount /dev/mapper/rl-root /mnt/lvm- Remove the /etc/lvm/devices/system.devices file.
rm -f /etc/lvm/devices/system.devices- Unmount the root filesystem.
umount /mnt/lvm- Reboot the machine.
rebootIf this KB article did not resolve your issue or you need further assistance with Veeam software, please create a Veeam Support Case.
To submit feedback regarding this article, please click this link: Send Article Feedback
To report a typo on this page, highlight the typo with your mouse and press CTRL + Enter.
Spelling error in text
Thank you!
Your feedback has been received and will be reviewed.
Oops! Something went wrong.
Please, try again later.
You have selected too large block!
Please try select less.
KB Feedback/Suggestion
This form is only for KB Feedback/Suggestions, if you need help with the software open a support case
Thank you!
Your feedback has been received and will be reviewed.
Oops! Something went wrong.
Please, try again later.


