Introduction
In the dynamic landscape of cloud infrastructure management, automation plays a crucial role in streamlining workflows and ensuring efficient development processes. GitHub Actions, combined with Terraform and Azure, offers a powerful solution for automating the deployment of Infrastructure as Code.
In this step-by-step guide, we’ll walk through the process of setting up a workflow that uses GitHub Actions to deploy and manage Azure resources using Terraform.
Before diving into the workflow creation, we’ll cover the prerequisites, including setting up an Azure storage container for Terraform state storage and creating an Azure Service Principal.
Let’s get started on the journey towards a more automated and efficient development workflow.
Pre-Requisites
- Azure Subscription
- GitHub Account
- Basic knowledge of Terraform
- A code editor installed on your local machine such as VS Code
Create Azure Storage Container for Terraform State Storage
We need somewhere to store our Terraform state file and for this example, we’re going to use an Azure storage container.
Let’s create one you can use.
Below is a script that deploys an Azure resource group, an Azure storage account and then a container. At the start of the script are some variables that will be used to define the location and name of the resources. Please amend them to suit your environment needs.
To execute the script head over to https://shell.azure.com and make sure you are using a PowerShell session.
Copy the script and allow it to run.
```powershell
# Declare variables
$resourceGroup = "terraformstorage"
$location = "North Europe"
$storageAccountName = "terraformtechielass"
$containerName = "terraform-state"

# Create Azure Resource Group
New-AzResourceGroup -Name $resourceGroup -Location $location

# Create an Azure Storage Account
New-AzStorageAccount -ResourceGroupName $resourceGroup -Name $storageAccountName -Location $location -SkuName Standard_LRS -Kind StorageV2 -AllowBlobPublicAccess $false

# Gather information about the storage account
$storageAccountKey = (Get-AzStorageAccountKey -ResourceGroupName $resourceGroup -AccountName $storageAccountName).Value[0]

$ctx = New-AzureStorageContext -StorageAccountName $storageAccountName -StorageAccountKey $storageAccountKey

# Create an Azure storage container inside the storage account
New-AzureStorageContainer -Name $containerName -Context $ctx

$OutputObject = [PSCustomObject]@{
    resourceGroup = $resourceGroup
    storageaccountname = $storageAccountName
    containername = $containerName
}

$OutputObject | ConvertTo-Json

```
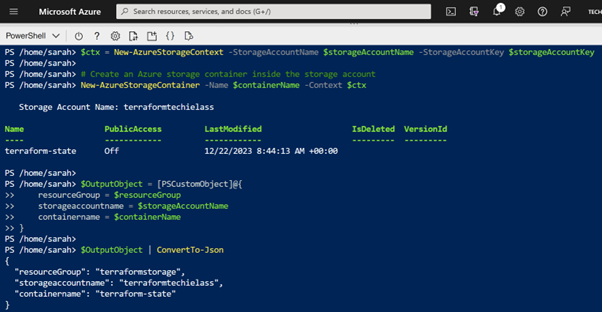
Your storage account and container have now been created. The script should output three details at the end when it completes, take note of this information we’ll need later on.
Create Azure Service Principal
To create that connection between GitHub Actions and Azure we’re going to use an Azure Service Principal. This will allow GitHub Actions to be able to create resources, modify resources, or delete them within your Azure environment it.
We’re going to use PowerShell to create our Service Principal, create our secret and then display the information we need for later on.
Head over to https://shell.azure.com, and ensure you are using a PowerShell session.

Take a copy of the below code, modifying the variables at the top to suit your environment and needs.
```powershell
## Declare variables
$ServicePrincipalName = "gha-terraform-sp”
$AzSubscriptionName = “Contoso Azure Subscription"
$endDate = "12/01/2024"

New-AzADServicePrincipal -DisplayName $ServicePrincipalName

Connect-AzureAD

$Subscription = (Get-AzSubscription -SubscriptionName $AzSubscriptionName)
$ServicePrincipal = Get-AzADServicePrincipal -DisplayName $ServicePrincipalName
$AzureADApplication = Get-AzureADApplication -SearchString $ServicePrincipalName
$clientSecret = New-AzureADApplicationPasswordCredential -ObjectID $AzureADApplication.ObjectId -EndDate $endDate

$OutputObject = [PSCustomObject]@{
    clientId = $ServicePrincipal.AppId
    subscriptionId = $Subscription.Id
    clientsecret = $clientSecret.value
    tenantId = $Subscription.TenantId
}

$OutputObject | ConvertTo-Json

```

Take note of the information outputted from this script, we will need it later when we move into setting up GitHub.
We now need to give Service Principal rights to either a resource group or subscription.
In this example, I am going to give the Service Principal Contributor access to my subscription, but you can scope this as you feel necessary.
Still, within https://shell.azure.com I issue the PowerShell command:
```powershell
## Declare variables
$ServicePrincipalName = "gha-terraform-sp”
New-AzRoleAssignment -ObjectId $servicePrincipal.id -RoleDefinitionName "Contributor"
```

My Service Principal is set up with the required permissions ready for use.
Create GitHub Repository
We want to have a new GitHub repository for our Terraform deployment. To create a new repository head on over to https://www.github.com
Ensure you are logged into your account and click on Repositories at the top left-hand corner.

Select the New button which will be near the right-hand side.

You will be asked some questions to create your repository.
Select your account as the owner of the repository and give the repository a name.
You can select the repository to either be publicly accessible or private, this tutorial will work with either setting.
Tick the box that says Add a README file. In the box below, select the Terraform .gitignore template.
You can leave the licence selection blank.
Click on Create repository.

With your new repository created, we want to take a copy of it to our local machine so we can work with it there. To do this open, up your command prompt/terminal tool of choice.
I will be using Windows Terminal on my Windows 11 machine.
The first step is to create a new folder so you can store your GitHub repository, you can do this by typing:
```bash
mkdir GitHub
```
Now you want to switch to that folder, you can do that by using this command:
```bash
cd GitHub
```
Now we need to grab the URL of our new GitHub repository, head back to your browser and within your new repository click on the Code button.
Copy the HTTPS address that it displays.

Back within your command prompt/terminal type the following:
```bash
Git clone <GitHub repository URL>
```
You now have a copy of your GitHub repository on your local machine we can work on.
Create Terraform files
We need to define what Azure resources we will create with our deployment. In this example, we’re going to create a Terraform deployment that deploys the following:
- Azure Resource Group
- Azure Virtual Network & subnet
- Azure DDoS Protection plan
To create these resources, we are going to follow best practices with Terraform and create three files:
- tf – this file will define our Terraform configuration
- tf – this file will define our Azure resources to be deployed
- tf – this file will define any variables we need to call on for our Azure resources
Open your favourite code editor, mine is VS Code. Open the folder of the cloned GitHub repository that we created earlier.
Create a new file called terraform.tf, within the file copy the following:
```terraform
##
# Terraform Configuration
##

terraform {

  backend "azurerm" {
    key                  = "github.terraform.tfstate"
  }

  required_version = ">=0.12"

  required_providers {
    azurerm = {
      source  = "hashicorp/azurerm"
      version = "~>2.0"
    }
  }
}

##
# Providers
##

provider "azurerm" {
  features {}
}
```
This file defines that our Terraform backend files will be stored within Azure, and we’ve declared the state file name.
We’ve also declared what version of the Azure Terraform provider we want to use.
Next, we need to create a new file called variables.tf, copy the following into that file:
```terraform
##
# Variables
##

variable "location" {
    type = string
    default = "uksouth"
}

variable "naming_prefix" {
  type    = string
  default = "techielassgha"
}

variable "tag_environment" {
  type    = string
  default = "test"
}

variable "tag_owner" {
  type    = string
  default = "sarah"
}

```
In this file, we’ve declared the location we’ll be using for our Azure resources, a prefix name for our resources, and also some tag information. Feel free to change them to suit your environment.
The next file we need to create is the main.tf file. This will hold the bulk of our Azure resource deployment definitions.
```terraform
##
# Local variables
##

locals {
  resource_group_name = "${var.naming_prefix}-${random_integer.name_suffix.result}"
  ddos_plan_name = "${var.naming_prefix}-${random_integer.name_suffix.result}"
  vnet_name = "${var.naming_prefix}-${random_integer.name_suffix.result}"
  subnet_name = "${var.naming_prefix}-${random_integer.name_suffix.result}"
}

resource "random_integer" "name_suffix" {
  min = 10000
  max = 99999
}


# Create Resource Group
resource "azurerm_resource_group" "techielassrg" {
  name     = local.resource_group_name
  location = var.location
  tags = {
    environment = var.tag_environment
    owner = var.tag_owner
  }
}

# Create DDOS Protection Plan
resource "azurerm_network_ddos_protection_plan" "techielassddos" {
  name                = local.ddos_plan_name
  resource_group_name = azurerm_resource_group.techielassrg.name
  location = azurerm_resource_group.techielassrg.location
  tags = {
    environment = var.tag_environment
    owner = var.tag_owner
  }
}


# Create Virtual Network and enabled DDOS protection
resource "azurerm_virtual_network" "techielassvnet" {
  name                = local.vnet_name
  address_space       = ["10.0.0.0/16"]
  location            = azurerm_resource_group.techielassrg.location
  resource_group_name = azurerm_resource_group.techielassrg.name

  ddos_protection_plan {
    id = azurerm_network_ddos_protection_plan.techielassddos.id
    enable = true
  }
  tags = {
    environment = var.tag_environment
    owner = var.tag_owner
  }
}

# Create Subnet within virtual network
resource "azurerm_subnet" "techielasssubnet" {
  name                 = local.subnet_name
  resource_group_name  = azurerm_resource_group.techielassrg.name
  virtual_network_name = azurerm_virtual_network.techielassvnet.name
  address_prefixes     = ["10.0.0.0/24"]
}


```
Let’s take a quick walk through this file:
- We’ve declared some local variables in the file, these are a combination of a random integer the Terraform deployment creates and the variable we declared in the tf file.
- A resource group has been defined.
- A DDoS protection plan has been defined, including tags.
- A virtual network has been defined, including tags and we’ve enabled DDoS protection.
- A subnet within our virtual network has been defined within our virtual network.
With our Terraform defined on our local machine, we want to make sure they are stored within our GitHub repository. We’ll use more git commands to do that.
Open a terminal command and make sure you are in the directory where your files are stored. Issue the following commands to copy the Terraform files into your GitHub repository.
```bash
Git add .
Git commit -m “terraform files”
Git push
```
With our Terraform created, we now need to start on the creation of our GitHub Actions workflow.
Crafting Your GitHub Actions Workflow
We’re going to start crafting our workflow on our local machine, so open up your code editor again. And open the GitHub repository copy you had.
Within that folder, we want to create a new folder called .github and then within that folder create a new folder called workflows.
Our next step is to create a file called terraform.yml inside that workflows folder.

Now that we have the folder directory and an empty file, it’s time to populate the file with our workflow configuration.
The first part of the file will define the name of the workflow and when it will trigger. In this example, the workflow will be manually triggered when we click on a button. To do that we use the following code:
```yml
name: 'Terraform'

on:
  workflow_dispatch:
```
The next part of the workflow is to configure the environment our workflow will work within. We’re specifying we want a Ubuntu runner to run our workflow, specifying the default shell we want to use and defining variables or secrets we will use throughout the workflow.
```yml
jobs:
  terraform:
    name: 'Terraform'
    runs-on: ubuntu-latest
    defaults:
      run:
        shell: bash
    env:
      ARM_CLIENT_ID: ${{ secrets.ARM_CLIENT_ID }}
      ARM_CLIENT_SECRET: ${{ secrets.ARM_CLIENT_SECRET }}
      ARM_SUBSCRIPTION_ID: ${{ secrets.ARM_SUBSCRIPTION_ID }}
      ARM_TENANT_ID: ${{ secrets.ARM_TENANT_ID }}
      RESOURCE_GROUP: ${{ secrets.RESOURCE_GROUP }}
      STORAGE_ACCOUNT: ${{ secrets.STORAGE_ACCOUNT }}
      CONTAINER_NAME: ${{ secrets.CONTAINER_NAME }}
```
The next thing we want to define within the workflow is the steps it needs to go through to complete for us.
The first two steps are ensuring your GitHub Actions runner has the right information. The first step is taking the contents of the GitHub repository and making it available to the runner. The second step is ensuring that Terraform is installed on the runner and the required version is being used.
```yml
    steps:
  # Checkout the repository to the GitHub Actions runner
    - name: Checkout
      uses: actions/checkout@v4.1.1

  # Install the preferred version of Terraform CLI
    - name: Setup Terraform
      uses: hashicorp/setup-terraform@v2.0.3
      with:
          terraform_version: 1.6.6
```
The next step in the workflow is initialising Terraform within the runner. The Terraform init command prepares the working directory for use with Terraform. It initializes the backend, child module installation and plugin installation.
You can see in the code here we’re configuring the backend and specifying it uses the Azure storage account and container we created earlier.
```yml
# Initialize a new or existing Terraform working directory by creating initial files, loading any remote state, downloading modules, etc.
    - name: Terraform Init
      id: init
      run: terraform init -backend-config="storage_account_name=$STORAGE_ACCOUNT" -backend-config="container_name=$CONTAINER_NAME" -backend-config="resource_group_name=$RESOURCE_GROUP"
```
Once the Terraform init command has run, the next command we want to carry out is the Terraform plan command. This command determines the deltas between the current configuration and prior state data. It will propose changes that make the remote infrastructure match the current configuration.
```yml
# Run a terraform plan
    - name: Terraform Plan
      id: plan
      run: terraform plan -no-color
```
The last step we want to run is the Terraform apply command. Running the apply command will perform the plan that we created in the previous step and deploy the required infrastructure.
```yml
# On workflow dispatch build or change infrastructure according to Terraform configuration files
    - name: Terraform Apply
      run: terraform apply -auto-approve
```
With the workflow file created on our local machine, we need to transfer it to our GitHub repository.
Open a terminal command and make sure you are in the directory where your files are stored. Issue the following commands to copy the Terraform files into your GitHub repository.
```bash
Git add .
Git commit -m “workflow”
Git push
```

Now we need to head over to https://www.github.com to complete the next steps.
Locate your repository within your profile and click on Settings.

Then navigate to Secrets and variables > Actions

We’re going to input sensitive information, such as our Azure subscription ID into this section. The information will be securely stored and not visible to anyone, but it will be accessible by the GitHub Actions workflow so it can execute our steps.
Click on New repository secret.

Within the Name box type in ARM_CLIENT_ID, and in the Secret section copy in the Client ID you gathered when you created the Azure Service Principal earlier. Then click on Add Secret.

We have six more secrets to create.
Click on New repository secret.
Within the Name box type in ARM_SUBSCRIPTION_ID, and in the Secret section copy in the Subscription ID you gathered when you created the Azure Service Principal earlier. Then click on Add Secret.
Click on New repository secret.
Within the Name box type in ARM_CLIENT_SECRET, and in the Secret section copy in the Client Secret you gathered when you created the Azure Service Principal earlier. Then click on Add Secret.
Click on New repository secret.
Within the Name box type in ARM_TENANT_ID, and in the Secret section copy in the Tenant ID you gathered when you created the Azure Service Principal earlier. Then click on Add Secret.
Three more secrets left to create.
Click on New repository secret.
Within the Name box type in RESOURCE_GROUP, and in the Secret section copy in the Resource Group you gathered when you created the Azure storage account earlier. Then click on Add Secret.
Click on New repository secret.
Within the Name box type in CONTAINER_NAME, and in the Secret section copy in the container name you gathered when you created the Azure storage account earlier. Then click on Add Secret.
Click on New repository secret.
Within the Name box type in STORAGE_ACCOUNT, and in the Secret section copy in the storage account you gathered when you created the Azure storage account earlier. Then click on Add Secret.
We’ve now entered all the information we need to be able to run our GitHub Actions workflow!
Click on Actions within your GitHub repository.

Listed as an action should be your Terraform workflow. When you click on that it should show a button called Run workflow. Click on that.

Within a few seconds, your workflow should start to run.
You can monitor its progress, but within a few minutes, it should complete and create your Azure resource group, DDoS protection plan, virtual network, and subnet!

Best Practices for a Secure and Efficient Workflow
Looking to some best practices for ensuring you have the most secure and efficient workflow.
You should never hardcode sensitive information directly into your workflow files. As we did within the above example store sensitive information such as your API keys, password, access tokens, etc., as secrets.
Ensure you are reviewing your secrets regularly and removing any that are no longer needed. And where possible try and automate the process of updating secrets to reduce the likelihood of human error. You can update secrets programmatically using the GitHub API, or GitHub CLI, or even using Terraform!
Whenever you create a workflow make sure you are documenting it, whether it be a specific document explaining the document or ensuring there are comments built into the workflow. This helps you and your colleagues or collaborators understand the purpose and usage of each step within the workflow.
Where possible use conditional steps to skip any unnecessary actions based on specific conditions, this can save time by avoiding the execution of unnecessary steps.
When running your workflows if certain files or directories are not needed, make sure of path filtering to avoid them being monitored or pulled into your runner’s environment.
Conclusion
We have successfully navigated through the process of setting up a GitHub Actions workflow for deploying Terraform scripts to Azure.
This guide has covered essential steps, from creating Azure resources for Terraform state storage to setting up an Azure Service Principal and creating a GitHub repository. We have also crafted a GitHub Actions workflow that initializes, plans, and applies Terraform configurations.
As you move forward with your Terraform deployments using GitHub Actions, continually assess and adapt the workflow to meet evolving requirements. Explore additional features offered by GitHub Actions, stay informed about updates, and engage with the GitHub community to share experiences and learn from others.
By staying proactive, you can maximize the benefits of automation, improving the overall agility and effectiveness of your development processes.
