How to Configure "Trust relationships" for Custom Roles

KB ID: 3120
Product: Veeam Backup for AWS
Version: Any
Published: 2020-03-02
Last Modified: 2020-08-13
mailbox
Get weekly article updates
By subscribing, you are agreeing to have your personal information managed in accordance with the terms of Veeam's Privacy Notice.

Cheers for trusting us with the spot in your mailbox!

Now you’re less likely to miss what’s been brewing in our knowledge base with this weekly digest

error icon

Oops! Something went wrong.

Please try again later.

Challenge

You are using custom roles for Veeam Backup for AWS.

Cause

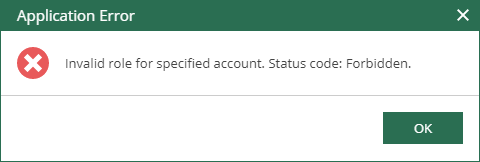
You must manually add a default role (e.g. <SERVER_NAME>-VeeamImpersonationRoleV1-XXXXXXXXXXXX) to the list of trusted relationships, otherwise the following error will be shown in the UI when you are adding a custom role into the Veeam Backup for AWS configuration:

User-added image

and the following error message will be found in the log file:

[14.02.2020 14:46:34] <ab9a> Info     [CDefaultAmazonStsInfrastructure] Assuming role 'arn:aws:iam::xxxxxxxxxxxxx:role/custom_role'.
[14.02.2020 14:46:35] <ab9a> Error    [TryInvokeAsync] Attempt: 1/10. Fail: User: arn:aws:sts::xxxxxxxxxxxxx:assumed-role/<SERVER_NAME>-VeeamImpersonationRoleV1-XXXXXXXXXXXX/x-xxxxxxxxxxxxxxxxx is not authorized to perform: sts:AssumeRole on resource: arn:aws:iam::xxxxxxxxxxxxx:role/custom_role

Solution

1. Go to Cloud Formation service in the region where Veeam Backup for AWS server is deployed.
2. Select appropriate Stack from the list by clicking its name in the Stack Name column.
3. Go to the Resources tab.
4. Find the <SERVER_NAME>-VeeamImpersonationRoleV1-XXXXXXXXXXXX in the Logical ID column.
5. Go to the role description by clicking it's name in the Physical ID column.
6. Copy Role ARN by clicking Copy to clipboard in order to add it to the trusted list for recently added role:
User-added image
7. Go to the Roles tab in Identity and Access Management (IAM) service.
8. Find the custom role you want to add into Veeam Backup for AWS.
9. Select it by clicking its name in the Role Name column.
10. Go to the Trust relationship tab.
User-added image
11. Click Edit trust relationship.
12. Add the following JSON.
{
    "Version": "2012-10-17",
    "Statement": [
    {
        "Effect": "Allow",
        "Principal":
    {
        "AWS": "ARN of the role from step 6"
    },
        "Action": "sts:AssumeRole"
    }
  ]
}
To submit feedback regarding this article, please click this link: Send Article Feedback
To report a typo on this page, highlight the typo with your mouse and press CTRL + Enter.

Spelling error in text

This site is protected by reCAPTCHA and the Google Privacy Policy and Terms of Service apply.
Thank you!

Thank you!

Your feedback has been received and will be reviewed.

Oops! Something went wrong.

Please try again later.

You have selected too large block!

Please try select less.

KB Feedback/Suggestion

This form is only for KB Feedback/Suggestions, if you need help with the software open a support case

By submitting, you are agreeing to have your personal information managed in accordance with the terms of Veeam's Privacy Notice.
This site is protected by reCAPTCHA and the Google Privacy Policy and Terms of Service apply.
Verify your email to continue your product download
We've sent a verification code to:
  • Incorrect verification code. Please try again.
An email with a verification code was just sent to
Didn't receive the code? Click to resend in sec
Didn't receive the code? Click to resend
Thank you!

Thank you!

Your feedback has been received and will be reviewed.

error icon

Oops! Something went wrong.

Please try again later.