Browser-based Application's Page Fails to Load With: ERR_SSL_KEY_USAGE_INCOMPATIBLE
| KB ID: | 4534 |
| Product: |
Veeam Backup & Replication Veeam ONE Veeam Service Provider Console |
| Published: | 2024-02-05 |
| Last Modified: | 2024-04-22 |
The error discussed in this article is caused by a misconfiguration of the website's certificate. Specifically, the ERR_SSL_KEY_USAGE_INCOMPATIBLE error occurs when the certificate used by a website has a KeyUsage value defined, but it does not include "Digital Signature" and "Non-Repudiation." This issue is not exclusive to Veeam products and instead relates to recent changes in some web browsers that has caused them to enforce KeyUsage limitations more strictly.
The KeyUsage specification is defined in RFC 5280 sub-section 4.2.1.3 as, "The key usage extension defines the purpose (e.g., encipherment, signature, certificate signing) of the key contained in the certificate."
Should this issue arise with a Veeam product, other than those discussed in this article, please contact Veeam Support.
If you encounter this issue with any non-Veeam product, please reach out to the appropriate vendor's support team to discuss how to generate and apply a new certificate with appropriate KeyUsage parameters.
Challenge
When using Chrome or Edge to load the web page for Veeam ONE Web Client, Veeam Service Provider Console, or Veeam Backup Enterprise Manager, the page fails to load with the error:
ERR_SSL_KEY_USAGE_INCOMPATIBLE

Cause
This error occurs when the certificate the site uses has KeyUsage values defined, but either the value Digital Signature or Non-Repudiation is not specified.
One potential cause for these values to be missing is if the self-signed SSL certificate in use was reused from an older version of the product during an upgrade.
Default "Veeam ONE Website self-signed certificate" History
- In Veeam ONE 10a and older, the self-signed certificate generated by the installer was created with the following:
KeyUsage: Key Encipherment, Data Encipherment - In Veeam ONE 11, the self-signed certificate generated by the installer was created with the following:
KeyUsage: Digital Signature, Key Encipherment, Data Encipherment - Starting in Veeam ONE 11a, the self-signed certificate generated by the installer is created with:
KeyUsage: Digital Signature, Non-Repudiation, Key Encipherment, Data Encipherment
This means that this issue will occur if a Veeam ONE deployment was initially installed with version 11 or earlier and then upgraded to newer versions using the same self-signed certificate.
Default Veeam Service Provider Console "Veeam Self-Signed Certificate" History
- In Veeam Service Provider Console 5 and older, the self-signed certificate generated by the installer was created with the following:
KeyUsage: Key Encipherment, Data Encipherment - Starting in Veeam Service Provider Console 6, the self-signed certificate generated by the installer is created with:
KeyUsage: Digital Signature, Non-Repudiation, Key Encipherment, Data Encipherment
This means that if a Veeam Service Provider Console deployment was initially installed with version 5 or earlier and then upgraded to newer versions using the same self-signed certificate, the issue will occur.
Default Veeam Backup Enterprise Manager "Veeam Self-Signed Certificate" History
- In Veeam Backup Enterprise Manager 10a and older, the self-signed certificate generated by the installer was created with the following:
KeyUsage: Key Encipherment, Data Encipherment - Starting in Veeam Backup Enterprise Manager 11, the self-signed certificate generated by the installer has no KeyUsage specified, meaning all uses are accepted.
This means that the issue will occur if a Veeam Backup Enterprise Manager deployment was initially installed with version 10a or earlier and then upgraded to newer versions using the same self-signed certificate.
Solution
The scripts below require at least Microsoft Windows Server 2016 or Windows 10.
In Older OS versions, the cmdlet New-SelfSignedCertificate does not accept the parameters these scripts use.
Assigning the New Certificate to the Site
With a new certificate imported or generated using the steps above, perform the following steps to assign that certificate to the site within IIS Manager.
- Open Internet Information Service (IIS) Manager (InetMgr.exe).
- Expand the node for the server's name.
- Expand the Sites node.
- Right-click on the entry for the product:
- Veeam ONE Web Client = VeeamReporter
- Veeam Service Provider Console = Veeam Availability Console Web UI
- Veeam Backup Enterprise Manager = VeeamBackup
- From the context menu, select Edit Bindings...


- In the Site Bindings window, double-click the https entry.


- Using the SSL certificate drop-down box, select the new certificate.
Note: The self-signed certificate generation scripts on this KB add a datestamp prefix to the new certificate's name for easy identification.


- After selecting the new SSL certificate, click OK to close the https site binding settings, then close the Site Bindings window with the close button.
- Right-click the site, and from the Manage Website sub-menu, select Restart.


More Information
Veeam ONE Web API Certificate
In addition to updating the SSL Certificate used for the Veeam ONE Web Client in IIS, it is also recommended to ensure that the certificate used for Veeam ONE Web API also has the KeyUsage entries for Digital Signature and Non-Repudiation. If the Veeam ONE Web API certificate is found to be missing these values, a new certificate can be generated using the Veeam ONE Setting Utility.
Note: The Veeam ONE Web API self-signed certificate and Veeam ONE Website self-signed certificate are used for different functions, and the generate option in the Veeam ONE Setting Utility will only generate a new Veeam ONE Web API self-signed certificate.
Check Current Web API Certificate
Within the Veeam ONE Setting Utility, click the View button on the Web API Certificate tab in the Server section to review the current installed Web API Certificate.

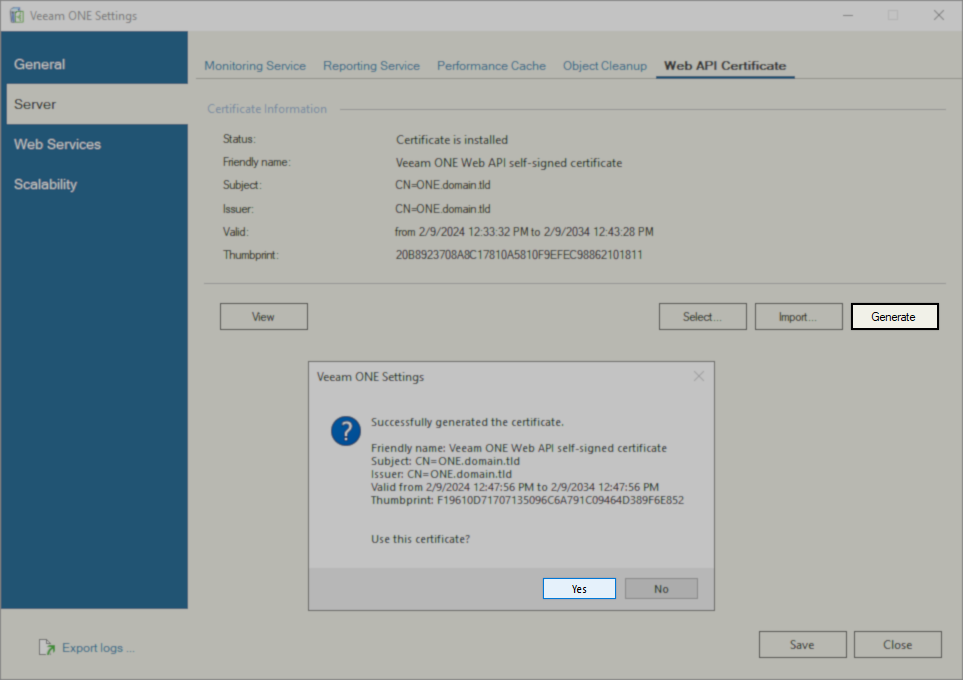
Generate a New Web API Certificate
If the installed Web API Certificate is missing the KeyUsage values Digital Signature and Non-Repudiation, and Veeam ONE version 11a (11.0.1.1880) or newer is installed, click the Generate button in the Veeam ONE Setting Utility. A new Veeam ONE Web API self-signed certificate will be created with the appropriate KeyUsage values.
If this KB article did not resolve your issue or you need further assistance with Veeam software, please create a Veeam Support Case.
To submit feedback regarding this article, please click this link: Send Article Feedback
To report a typo on this page, highlight the typo with your mouse and press CTRL + Enter.
Spelling error in text
KB Feedback/Suggestion
This form is only for KB Feedback/Suggestions, if you need help with the software open a support case