Read the full series:
|
Ch.1 — Installation |
In the previous posts of this short series, we announced the availability of Veeam Agent for Linux Beta and gave everyone a few quick tips on how to start using it. We showed how easy it is to work with the graphical user interface (GUI) in order to back up and restore files and volumes, but no program would be a true Linux solution without complete support for the command line.
Today, we’ll see how to operate Veeam Agent for Linux from the shell!
Introduction
Once the software is installed, a service is installed and configured in the Linux machine. On a Systemd Linux distribution (e.g., CentOS 7), you can check the service and its status with the command:
systemctl status veeamservice

You can see that the service is active and running. Any command we run via the shell is not executed by the command itself, but instead is passed to the service that will execute the command. This means, for example, that a backup can be completed even if the user logs out after running the backup as the commands are passed to this service.
Backup
In order to create our backups, we must create at least one repository.
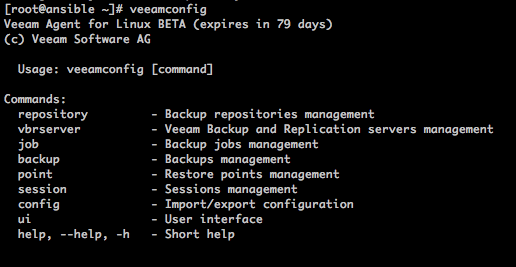
But what if we do not remember the exact command? veeamconfig is the command line tool, and it has an online menu that can be invoked by using veeamconfig help (or –help or -h), or we can also run the command without options and see the available sub commands:
Another way to quickly select any sub-command is to hit tab after the main command; if you have bash completion installed in your system, you will immediately see the available sub-commands:

In our case, we see there is a repository sub command, and if we now run veeamconfig repository without additional options, we can learn how to use this option.

Thanks to this functionality, we quickly learned all the available options and we are now ready to create our repository using:
veeamconfig repository create --name STORE --location /mnt/store/
The command returns the result “Repository was created successfully.”, and we can see it now listed among the available repositories:

Note that to create a remote repository like an NFS share, you need to do it from the graphical interface. You can only create a local repository via the command line.
Now we can create a backup job. The command is going to look like this:
veeamconfig job create --name Backup_root --repoName Repository_1 --maxPoints 7 --objects root
We instructed Veeam Agent for Linux to create a new backup job, whose name is “Backup_root”, the repository to be used is “Repository_!” (the remote NFS share), that we want to keep seven restore points and the content of the backup will be “root”. Root is the name of the LVM logical volume /dev/centos/root, mounted as / in the file system.
Veeam Agent for Linux returns the result “Job was created successfully.”, and we are now ready to run it. To do so, the next command we need is:
veeamconfig job start --name Backup_root
Veeam Agent for Linux returns the status of the operation:
Backup job is started.
Session ID: [{64bbf9db-c83c-4ca4-b60a-e93301db8de3}].
Logs stored in: [/var/log/veeam/Backup/Backup_root/Session_{64bbf9db-c83c-4ca4-b60a-e93301db8de3}].
The job is now running in unattended mode, but we can check its progress:

We can see the last session is in state “Running”, and our backup is progressing. We can eventually run veeamconfig session ui to see the progress using the GUI, but this blog is all about the shell, so we are only refreshing the session list until this last backup is listed as Success. For example, we can run:
watch veeamconfig session info --id 64bbf9db-c83c-4ca4-b60a-e93301db8de3
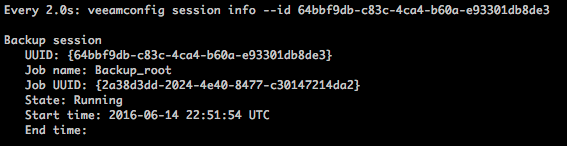
The backup is completed successfully.
Restore
A file restore can be invoked by the command line too by using a few simple commands.
First, let’s recap the backups we have available:
veeamconfig backup list
Job name Backup UUID Repository Created at
BackupJob1 {1dde4e0d-b90e-4a7a-9e3e-65a182ada70f} Repository_1 2016-06-14 21:00
Backup_root {eaf8c7fa-3048-4b41-a917-9418f876662b} Repository_1 2016-06-14 22:51
We can immediately mount the backup using:
veeamconfig backup mount --id eaf8c7fa-3048-4b41-a917-9418f876662b --mountdir /mnt/backup/
The result of the operation is returned from the software:
Backup is mounted.
Session ID: [{3aaadffb-2299-4d7f-a60c-4af4fac4afee}].
Logs stored in: [/var/log/veeam/Mount/Session_{3aaadffb-2299-4d7f-a60c-4af4fac4afee}].
Note that, compared to the simplified operations offered by the GUI, we can configure the mount point for the backup restore here.
Additional options
The command line has a complete set of features, not just for managing backups and restores.
For example, from the command line is possible to manage configurations. By running the command:
veeamconfig config export --file config.txt
We obtain this result:
Configuration file has been exported successfully.
The configuration of Veeam Agent for Linux has been exported in a text file, ready to be edited. The software uses a local database to store not only configurations, but also session history, backup jobs, repository and practically any information that is visible in the software itself. While the only method to interact with the database and its stored configurations is the Veeam command line, users may need to edit these information using different tools, like automation solutions. That’s why the config command is available.
The export command stores the configuration in a text file using XML format:
<?xml version=”1.0″ encoding=”UTF-8″?>
<Config Version=”1″ />
<Repositories>
<Repository Name=”Repository_1″ Type=”Share” RepositoryOptions=’<OnShareRepositoryOptions Version="1" Address="10.2.50.56:/var/nfsshare" FsType="nfs" Login="" Password="" Domain="" />’ />
<Repository Name=”STORE” Type=”LocalDrive” RepositoryOptions=’<LocalRepoOptions Version="1" Location="/mnt/store" DeviceMountPoint="/" />’ />
</Repositories>
<Jobs>
<Job Name=”BackupJob1″ creation_time=”2016-06-14 19:00:33″ RepoName=”Repository_1″>
<JobOptions Compression=”Lz4″ BlockSize=”KbBlockSize1024″ PrefreezeCommand=”” PostthawCommand=”” MaxPoints=”14″ IsDedupEnabled=”false” Schedule=”false”>
<Schedule Hours=”0″ Minutes=”0″>
<WeekMask Sunday=”false” Monday=”false” Tuesday=”false” Wednesday=”false” Thursday=”false” Friday=”false” Saturday=”false” />
</Schedule>
</JobOptions>
<ObjectsForBackup>
<Object ObjectType=”AllSystem” RecordType=”Include” Value=”” />
</ObjectsForBackup>
</Job>
<Job Name=”Backup_root” creation_time=”2016-06-14 20:50:51″ RepoName=”Repository_1″>
<JobOptions Compression=”Lz4″ BlockSize=”KbBlockSize1024″ PrefreezeCommand=”” PostthawCommand=”” MaxPoints=”7″ IsDedupEnabled=”false” Schedule=”false”>
<Schedule Hours=”0″ Minutes=”0″>
<WeekMask Sunday=”false” Monday=”false” Tuesday=”false” Wednesday=”false” Thursday=”false” Friday=”false” Saturday=”false” />
</Schedule>
</JobOptions>
<ObjectsForBackup>
<Object ObjectType=”SimpleDisk” RecordType=”Include” Value=”/” />
</ObjectsForBackup>
</Job>
</Jobs>
<VbrServers />
Admins can use their preferred text manipulation tool and modify any parameter in the XML file. The Veeam service only relies on its local database for any configuration, so in order to let Veeam Agent for Linux load the new configuration after the changes, we have to import the edited config file:
veeamconfig config import --file config.txt
Immediately, Veeam Agent for Linux will use the new settings.
Final notes
I hope this short series of posts about Veeam Agent for Linux has been interesting and useful. If you want to learn more, test it and contribute to improving the software before version 1.0, let me repeat what you can do.
If you didn’t sign up for the Public Beta yet, please do so here. The Public Beta is made available on a first-come, first-served basis, so the sooner you join the waiting list the better!
Once you’ve tested the software, we’d love to hear your feedback — comments, suggestions, ideas…anything! To help you with this, we opened a new section on our forums that’s dedicated to Veeam Agent for Linux. Just go here, register if you are not already a forum member and start interacting with others. We can’t wait to hear your feedback!
See Also: