- Veeam Support Knowledge Base
- How to Manually Repair a VMware Replica created by Veeam
How to Manually Repair a VMware Replica created by Veeam
| KB ID: | 1773 |
| Product: | Veeam Backup & Replication | 12 | 12.1 | 12.2 | 12.3 | 12.3.1 | 12.3.2 | 13 |
| Published: | 2013-06-20 |
| Last Modified: | 2025-08-28 |
| Languages: | JP |
Cheers for trusting us with the spot in your mailbox!
Now you’re less likely to miss what’s been brewing in our knowledge base with this weekly digest
![]()
Oops! Something went wrong.
Please, try again later.
This article is not intended for use with:
Purpose
The following are error messages that may prompt the use of this KB article:
- A replication job may fail with a message such as:
Unable to repair replica VM.
- When the replication job fails to create a snapshot on the replica with:
File or folder already exists.
This occurs most often when a loose file is named like a snapshot but is not associated with the replica (e.g., DC01-0000001.VMDK), is in the folder with the replica files. When VMware creates the first snapshot on the replica it can’t because the file it was going to create has the same name as the aforementioned loose file. - Replication job fails with:
Invalid Snapshot Configuration
Verify that the error is coming from the replica by checking the replica's Tasks & Events. - Replication job fails with:
CID mismatch error: The parent virtual disk has been modified since the child was created
Verify that the error is coming from the replica by checking the replica's Tasks & Events.
Solution
Before Beginning
- Stop all other replication jobs to the destination location of the replica facing the issue.
- Manually check each target side proxy for stuck replica hotadded disks (VMDK disks belonging to the replica that remain attached to the target proxy after the job is completed). See KB1775 for details.
Consider switching the target proxies to Network Transport mode to prevent stuck hotadded disks if it becomes a recurring issue.
Gather Information About the Replica
The following actions are performed with the replica VM using a vSphere Client.
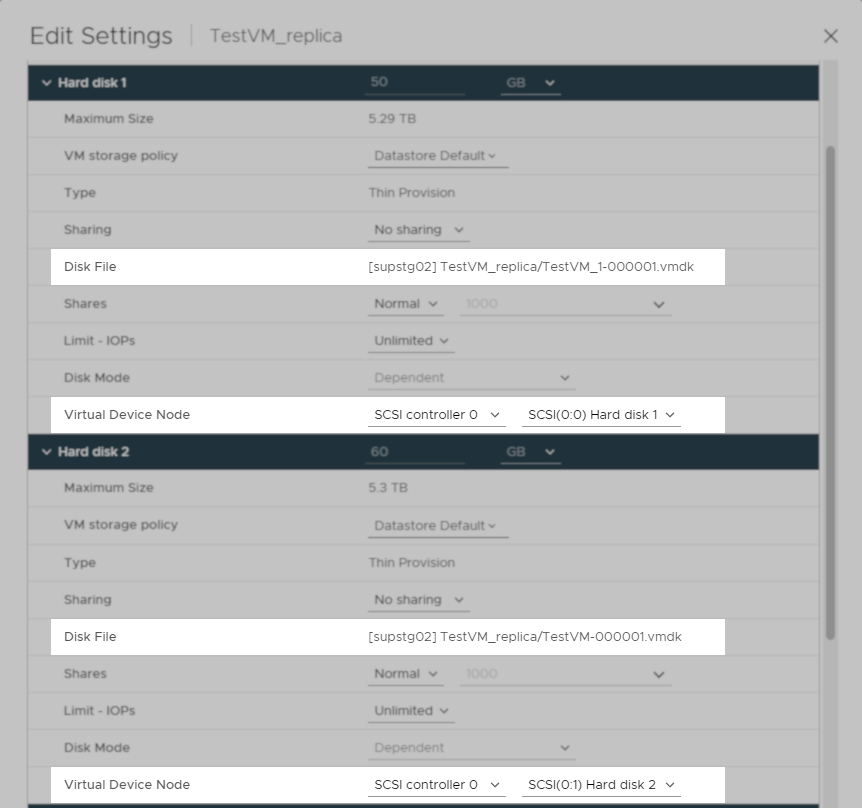
- Edit the Replica in vSphere Client.
- Note which disk files correlate to each SCSI ID.
Example:[supstg02] TestVM_replica\TestVM_1-000001.vmdk on SCSI0:0 [supstg02] TestVM_replica\TestVM-000001.vmdk on SCSI0:1 [supstg02] TestVM_replica\TestVM_2-000001.vmdk on SCSI0:2
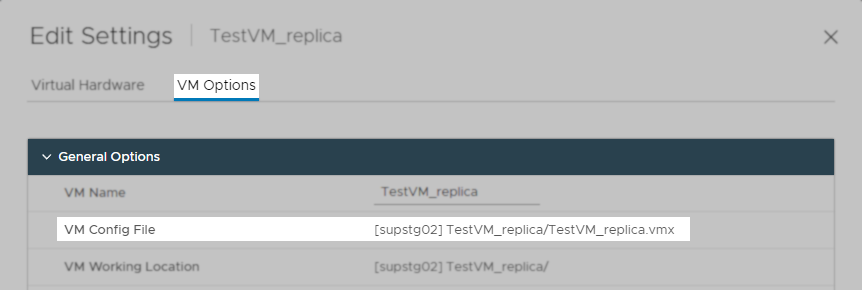
- Switch to the VM Options tab and take note of the VM Config File location.
You'll need to know this in the future step when you have to edit that config file.
Clean Up Snapshots on the Replica
The following actions are performed with the replica VM using a vSphere Client.
- Remove as many snapshots as the vSphere Client will allow:
- Open the Snapshot Manager.
- Select the oldest snapshot.
- Delete the oldest snapshot.
- Repeat the two steps above (b+c) to merge as much new data into the base disks as possible.
At some point, though, there will be a snapshot that cannot be removed.
- If any snapshots are left in the snapshot manager, try using the Delete All option in the snapshot manager.
This will likely fail, but it's worth a try to get as much recent data as possible merged into the base VMDKs. - Use the consolidate function to consolidate any orphaned snapshots.
Note: It is expected that these steps will fail at some point. When you receive a failure, move on to the next step.
Remove the Replica from Veeam Backup & Replication
- Within the Veeam Backup & Replication Console, under Replicas, find the replica to be repaired and right-click it.
- From the context menu, select Remove from configuration.
Note: After you use the Remove from configuration function, the VM will be removed from the Replication job. You'll need to manually re-add the VM to the replication job during the final steps of this procedure.
Remove VM from Inventory, Modify Replica VMX, and Re-register Replica
Due to changes starting in vSphere 7, it is no longer possible to remove a snapshot disk from a VM. Therefore, the only option is to directly modify the VM configuration file (.vmx) and re-register the VM.
- Using a vSphere Client, right-click on the Replica and select Remove from inventory.
- Edit the replica's VM configuration file (.vmx) to update the disk filename to point at the replica's base VMDK file.
Notes:- In most cases, this is as simple as removing the
-00000#portion from the filename.
Example:scsi0:0.fileName = "TestVM_1-000001.vmdk"becomesscsi0:0.fileName = "TestVM_1.vmdk" - Remember to match the SCSI ID to the correct files based on Step 4.
- In most cases, this is as simple as removing the


- After editing the scsiX:Y.filename lines in the Replica's VMX file, save it.
- Open the vSphere client and navigate to the VMX location and register the replica VM.
Datastore Cleanup
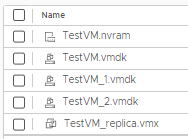
- Using the datastore browser, go to the folder of the replica.
- Most likely, there will be many files; keep in mind that the only files that are required are:
- VMX — Virtual machine configuration file
- VMXF — Optional additional virtual machine configuration files
- NVRAM — Virtual machine BIOS or EFI configuration
- VMDK — Virtual machine data disk (one base VMDK per disk)
Note: Technically, the .vmdk file is a descriptor file, and the actual data contents are stored in a -flat.vmdk (base disk) or -delta.vmdk (snapshot) file. These flat and delta files remain hidden as long as there is a matching .vmdk file in the same folder. Snapshot .vmdk files can typically be identified by their names, which include a hyphen and six digits before the .vmdk extension (e.g., TestVM-000001.vmdk).
So, for example, here is a folder pre-cleanup post repair.


Removing the associated snapshot files that are no longer needed.
Test the replica
- Create a snapshot on the replica.
- Remove the snapshot.
- If no error occurs, re-add the VM to the replication job and map the replica.
- See if the job runs successfully.
If this KB article did not resolve your issue or you need further assistance with Veeam software, please create a Veeam Support Case.
To submit feedback regarding this article, please click this link: Send Article Feedback
To report a typo on this page, highlight the typo with your mouse and press CTRL + Enter.
Spelling error in text
Thank you!
Your feedback has been received and will be reviewed.
Oops! Something went wrong.
Please, try again later.
You have selected too large block!
Please try select less.
KB Feedback/Suggestion
This form is only for KB Feedback/Suggestions, if you need help with the software open a support case
Thank you!
Your feedback has been received and will be reviewed.
![]()
Oops! Something went wrong.
Please, try again later.