- Veeam Support Knowledge Base
- Failed to call RPC function 'StartAgent': Timed out requesting agent port for client sessions.
Failed to call RPC function 'StartAgent': Timed out requesting agent port for client sessions.
Cheers for trusting us with the spot in your mailbox!
Now you’re less likely to miss what’s been brewing in our knowledge base with this weekly digest
![]()
Oops! Something went wrong.
Please, try again later.
Challenge
A task fails with the error:
Error: Failed to call RPC function 'StartAgent': Timed out requesting agent port for client sessions.
Cause
These errors may occur because of either:
- A firewall prevents the remote machine from initiating communication on one or more of the assigned transmission channel ports, causing the process to increment the port it attempted to use until it exhausted the list of ports it was given.
or - A Managed Server (Windows or Linux) has had its default configuration altered so that the range of ports it uses is insufficient, causing the process that is trying to start not to find an available port to use.
Here is an extreme example where the Managed Server has been configured only to allow two ports to be used:
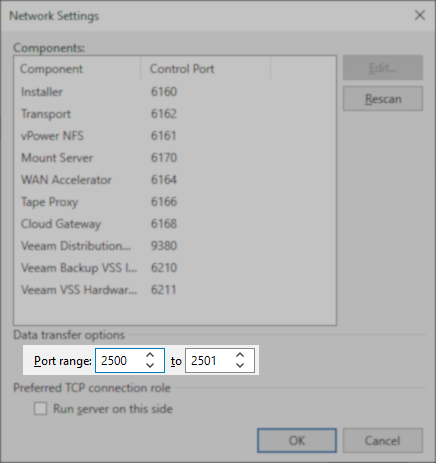
Solution
Check Firewalls
Review the firewalls in the environment to ensure accommodations have been made for the ports used by Veeam Backup & Replication.
Check Managed Server Configuration
The default range of transmission channel ports is available in the Used Ports section of the user guide.
- Within the Veeam console, click Backup Infrastructure
- From the tree on the left, expand ‘Managed servers’ and select ‘Microsoft Windows’
- On the right side, select the server related to the issue
- In the menu at the top of the screen, click Edit Server
- On the ‘Credentials’ tab, click the button labeled [Ports…]
- Within the network settings dialog, verify that the default or an appropriate number of ports have been assigned.
- Click OK to confirm the settings.
- Click Finish to commit the changes to that server.
If this KB article did not resolve your issue or you need further assistance with Veeam software, please create a Veeam Support Case.
To submit feedback regarding this article, please click this link: Send Article Feedback
To report a typo on this page, highlight the typo with your mouse and press CTRL + Enter.
Spelling error in text
Thank you!
Your feedback has been received and will be reviewed.
Oops! Something went wrong.
Please, try again later.
You have selected too large block!
Please try select less.
KB Feedback/Suggestion
This form is only for KB Feedback/Suggestions, if you need help with the software open a support case
Thank you!
Your feedback has been received and will be reviewed.
![]()
Oops! Something went wrong.
Please, try again later.