Unable to Interact with Some Hypervisors and Cloud Platforms
| KB ID: | 4687 |
| Product: |
Veeam Backup & Replication | 12.2 | 12.3 | 12.3.1 | 12.3.2 | 13 Veeam Backup for Nutanix AHV Veeam Backup for AWS Veeam Backup for Microsoft Azure Veeam Backup for Google Cloud Veeam Backup for Oracle Linux Virtualization Manager and Red Hat Virtualization Veeam Kasten for Kubernetes Veeam Plug-In for Proxmox VE Veeam Plug-in for Scale Computing HyperCore |
| Published: | 2024-11-19 |
| Last Modified: | 2026-05-22 |
During the upgrade to Veeam Backup & Replication 13.0.1 or higher, the following warning may be displayed:
Incompatible backup server certificate
The certificate does not support child certificates creation and must be replaced for virtualization and cloud plug-ins to function, see KB4687 for instructions.
The resolution for this issue can be found below in the section:
Issue 2: The Veeam Backup Server Certificate is missing the field "Basic Constraints".
Challenge
After deploying or upgrading to Veeam Backup & Replication 12.2 or higher, Veeam Backup & Replication may be unable to communicate with Virtualization and Cloud Platforms that are added to Veeam Backup & Replication via a Plug-In module.
- Nutanix AHV
- Red Hat Virtualization
- Oracle Linux Virtualization Manager
- HPE Morpheus VM Essentials
- Scale Computing HyperCore
- Veeam Backup for AWS
- Veeam Backup for Google Cloud
- Veeam Backup for Microsoft Azure
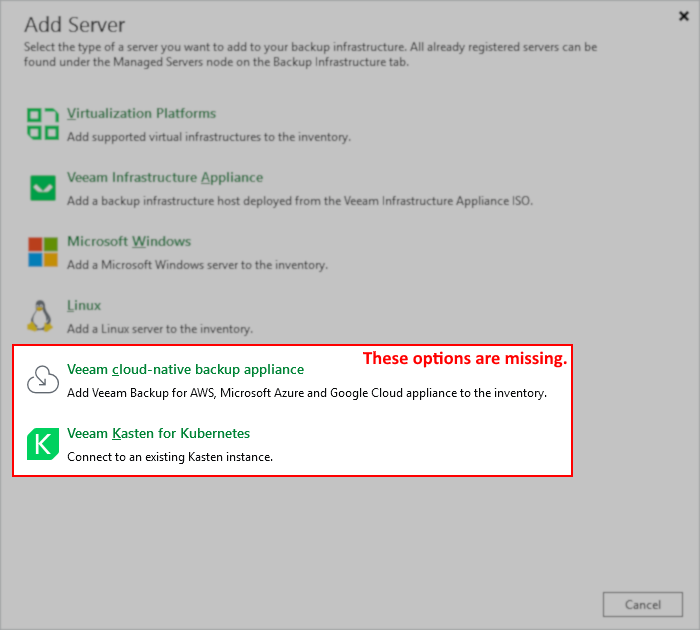
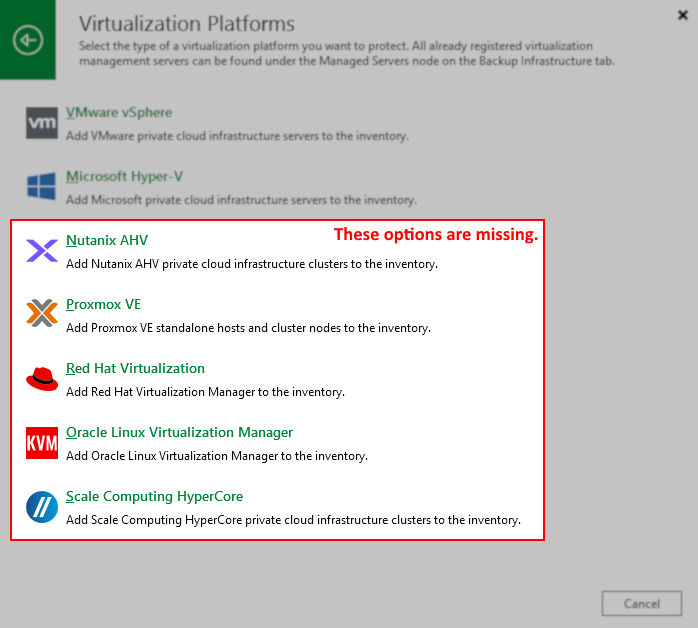
For Virtualization Platforms, this behavior will manifest as an inability to see these platforms listed when attempting to add them to Veeam Backup & Replication (as shown below).
Solution
Starting with version Veeam Backup & Replication 13.0.1.180, there are three identified possible causes for this problem.
Please review each issue's description, which details the logs to check, the specific error to look for, and provides an expandable section with the solution.
Issue 1: MFA Blocking Platform and Cloud Plug-Ins
- Related Log File: C:\ProgramData\Veeam\Backup\Utils\Util.InfrastructureStatistic.log
- Error Example:
Error (1) Failed to login to platform service (ID: [{guid}]): Failed to execute VeeamAuth: 'Veeam.Backup.Identity.Client.TokenAuthenticationException: Unable to perform authorization: The client does not have access permissions for the resource.
Solution for MFA Blocking Platform and Cloud Plug-Ins
Affects Veeam Backup & Replication 13.0.1.180 & 13.0.1.1071
Due to an unintended behavior change introduced in Veeam Backup & Replication 13.0.1.180, when MFA is enabled (or was enabled prior to an in-place upgrade), the LocalSystem account is no longer assigned the Service Account role, which would allow it to bypass MFA. To correct this issue, the account "NT AUTHORITY\SYSTEM" must be added explicitly to the Users and Roles list as a Backup Administrator and assigned as a Service Account.
This can be identified by reviewing: C:\ProgramData\Veeam\Backup\Utils\Util.InfrastructureStatistic.log
Error (1) Failed to login to platform service (ID: [{guid}]): Failed to execute VeeamAuth: 'Veeam.Backup.Identity.Client.TokenAuthenticationException: Unable to perform authorization: The client does not have access permissions for the resource.Error (1) Failed to generate certificate.
This error "The client does not have access permissions for the resource." can also be found in logs related to each plug-in:
- C:\ProgramData\Veeam\Backup\Plugins\AWS\Veeam.AWS.PlatformSvc.log
- C:\ProgramData\Veeam\Backup\Plugins\GCP\Veeam.GCP.PlatformSvc.log
- C:\ProgramData\Veeam\Backup\Plugins\Kasten\Veeam.Kasten.PlatformSvc.log
- C:\ProgramData\Veeam\Backup\Plugins\KVM\Veeam.KVM.PlatformSvc.log
- C:\ProgramData\Veeam\Backup\Plugins\Microsoft Azure\Logs\Veeam.Azure.PlatformSvc.log
- C:\ProgramData\Veeam\Backup\Plugins\PVE\Veeam.PVE.PlatformSvc.log
- C:\ProgramData\Veeam\Backup\Plugins\SCP\Veeam.SCP.PlatformSvc.log
To resolve this issue:
- Open the Veeam Backup & Replication Console.
- Click the Main Menu (≡), and select Users and Roles.
- Add a new user named NT AUTHORITY\SYSTEM
- Assign the role Veeam Backup Administrator and enable the check box "This is a service account".
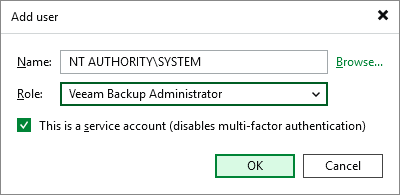
- Restart the Veeam Backup Server.
Issue 2: The Veeam Backup Server Certificate is missing the field "Basic Constraints".
- Related Log File: C:\ProgramData\Veeam\Backup\Svc.PlatformDbProvider.log
- Error Example:
Error (1)    Failed to generate certificate.
Error (1)    The issuer certificate does not have a Basic Constraints extension. (Parameter 'issuerCertificate') (System.ArgumentException)
- Secondary Logged Message:
Failed to generate child certificate from Veeam backup server certificate.
Solution for The Veeam Backup Server Certificate is missing the field "Basic Constraints".
Affects Veeam Backup & Replication 13.0.1.180 and higher
On Veeam Backup Servers where Veeam Backup & Replication was initially installed with an older version and has been upgraded over the years, the initial Veeam Backup Server Certificate may lack the "Basic Constraints" extension, which can cause issues with Platform Plug-Ins.
This can be identified by reviewing the PlatformDbProvider log file: C:\ProgramData\Veeam\Backup\Svc.PlatformDbProvider.log
Error (1)    Failed to generate certificate.
Error (1)    The issuer certificate does not have a Basic Constraints extension. (Parameter 'issuerCertificate') (System.ArgumentException)
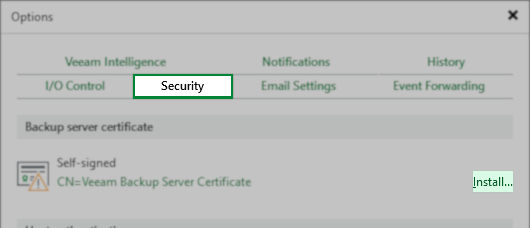
Issue Validation
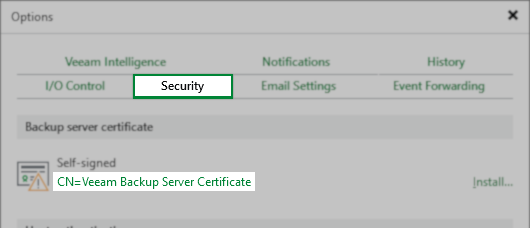
You can view the current Backup server certificate in Main Menu > Options > Security:


Resolution
Per the Veeam Backup & Replication User Guide, Backup Server Certificate section:
If you update the TLS certificate used on the backup server, you must also do the following:
- If multi-factor authentication is enabled, any Veeam Backup & Replication consoles connected to the backup server must be restarted to avoid connection issues.
- If you use Veeam Plug-In for Nutanix AHV, restart the Veeam AHV Service. For more information on restarting services, see Performing Maintenance Tasks.
- For RHV Backup proxies, pass through the Edit Red Hat Virtualization Proxy wizard. To do this, in the Backup Infrastructure view, right-click a proxy and select Properties. In the wizard, click Finish.
- For VMware clusters, pass through the I/O filter Management wizard as described in section Installing I/O Filter.
- For CDP proxies, pass through the Edit CDP Proxy wizard. To do this, in the Backup Infrastructure view, right-click a proxy and select Properties. In the wizard, click Finish.
- To avoid potential synchronization issues, make sure that Veeam Agents are synchronized with Veeam Backup & Replication before you change the existing certificate. To learn more, see Rescan Job.
- [For protection groups for pre-installed Veeam Agents] If you change the existing certificate, you must export a new package with setup files to deploy Veeam Agents on new computers that you want to add to the protection group.To learn more, see Specifying Packages.
Note: If your environment does not use the default self-signed certificate, you must ensure that the CA-signed certificate you provide to Veeam Backup & Replication contains the Basic Constraints extension, and Subject Type = CA must be set within that extension.
For deployments using the self-signed Veeam Backup Service Certificate, a new one must be generated:
- From the Main Menu, click Options

- In the Options dialog box, select the Security tab.
- On the Security tab, click "Install..." in the "Backup server certificate" section.
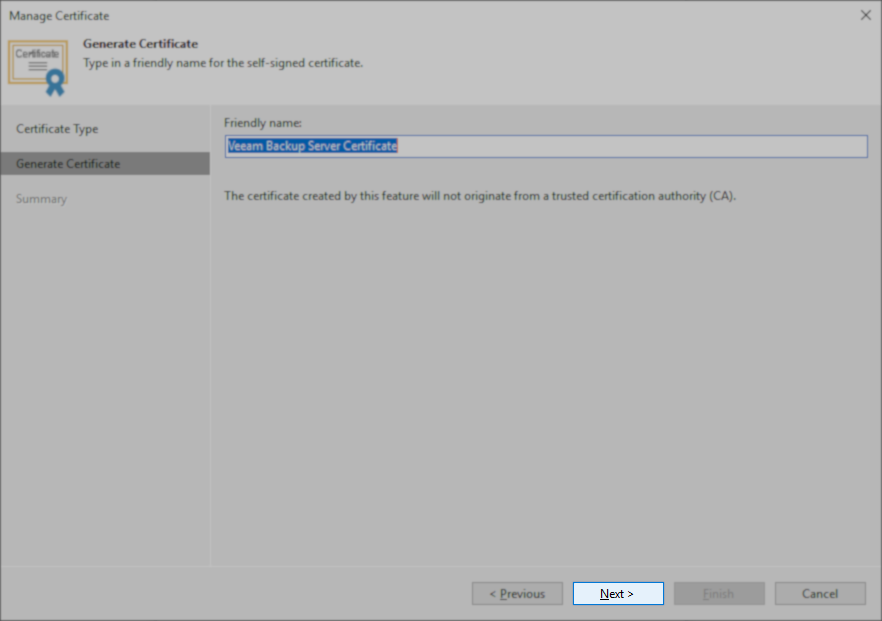
- In the Certificate creation wizard, select the option for Generate a new certificate, and click Next.

- On the Generate Certificate step, leave the friendly name as Veeam Backup Server Certificate, and click Next.
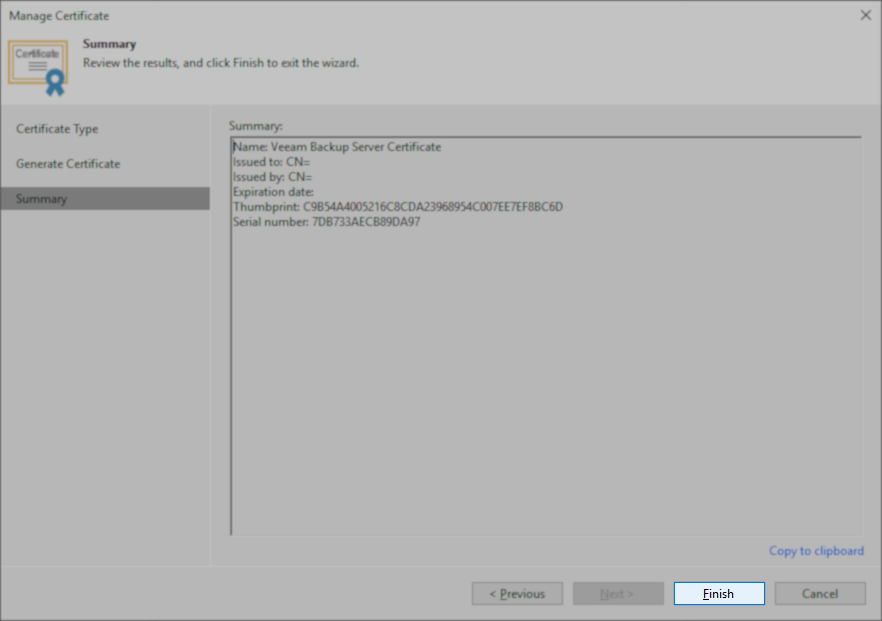
- On the Summary steps, click Finish.
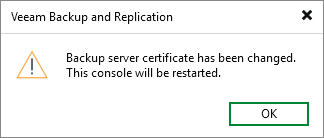
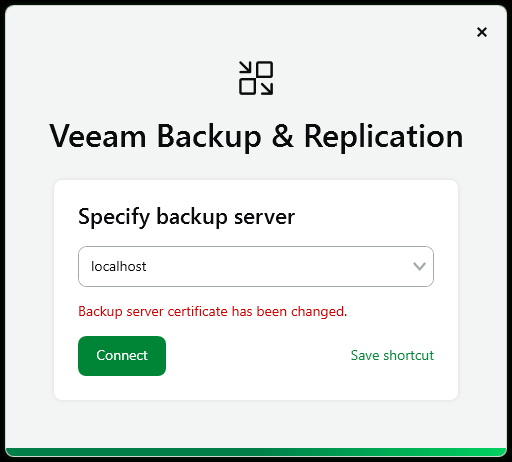
- After the Certificate wizard closes, you'll be returned to the Veeam Backup & Replication Console where a dialog box will appear stating:
Backup server certifcate has been changed.
This console will be restarted.
Click OK.
- Restart the Veeam Backup Server.
The Veeam Backup Server must be restarted to cause all services to restart and reinitiate communication. - After the reboot, allow the Veeam-related services time to start. They are set to Automatic (Delayed Start) and may take up to 10 minutes after the machine boots to start fully.
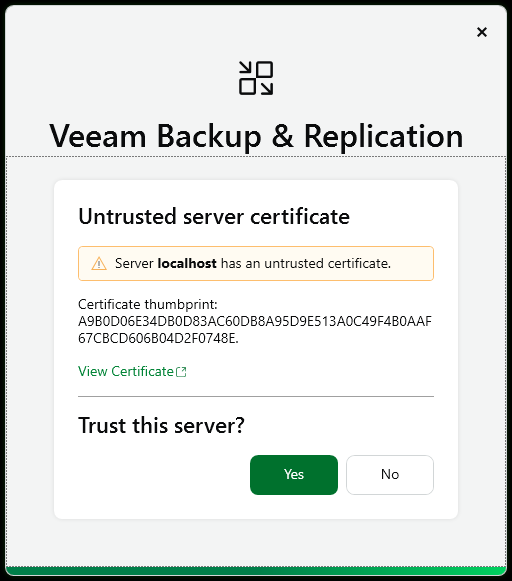
- Once all the Veeam-related services are started, launch the Veeam Backup & Replication console and accept the new server certificate.
- The options to interact with Virtualization Platforms that are added to Veeam Backup & Replication via a Plug-In module (i.e., Nutanix AHV, Red Hat Virtualization, and Oracle Linux Virtualization Manager), should have returned to full functionality.
Issue 3: PlatformDbProvider Service Using Wrong Port
- Related Log Files and Examples:
- C:\ProgramData\Veeam\Backup\Plugins\PVE\Veeam.PVE.PlatformSvc.log
ERROR | [PlatformService]: Failed to start PlatformService: System.Net.Http.HttpRequestException: No connection could be made because the target machine actively refused it. (localhost:6172)
ERROR | [PlatformService]:  ---> System.Net.Sockets.SocketException (10061): No connection could be made because the target machine actively refused it.
-
C:\ProgramData\Veeam\Backup\Plugins\RHV\Veeam.RHV.PlatformSvc.log C:\ProgramData\Veeam\Backup\Plugins\AHV\Veeam.AHV.PlatformSvc.log
ERROR | [StorageClient]:  ==> Response "Get" "https://localhost:6172/api", "status: Error", duration: "2 sec 32 msec", body: """"
ERROR | [StorageClient]: Exception accrued during connection attempt: No connection could be made because the target machine actively refused it. (localhost:6172)
- C:\ProgramData\Veeam\Backup\Plugins\PVE\Veeam.PVE.PlatformSvc.log
If this KB article did not resolve your issue or you need further assistance with Veeam software, please create a Veeam Support Case.
To submit feedback regarding this article, please click this link: Send Article Feedback
To report a typo on this page, highlight the typo with your mouse and press CTRL + Enter.
Spelling error in text
KB Feedback/Suggestion
This form is only for KB Feedback/Suggestions, if you need help with the software open a support case