1. Introduction
This article is based on Veeam KB1905 and written for advanced administrators of Veeam Backup & Replication who have a basic knowledge of Veeam PowerShell commands.
We’ll dive into a disaster scenario in which a Veeam repository server cannot be recovered, but the block storage, used for storing the backups, is still intact and consistent. As an example, a classic situation would be a physical server with hardware that is defective, but the disc shelves or fibre-channel sub-storage system is not affected by the hardware failure.
By the end of this article, you should have successfully added the repository disk storage to a new Windows or Linux server and be able to continue running backups and recovery tasks without any larger impact.
Before doing any critical changes or migration in your production environment, always have a backup copy ready. Please see this article about the 3-2-1 Rule, a concept for optimizing data protection.
2. Requirements
2.1. Windows to Windows migration
Compared to the failed source server, the new server should have the same or a newer version of Windows installed. It is advised to install all available updates on the new server. Please see the system requirements for Repository Server in the Veeam Help Center.
The new server needs to have a different name then the original server.
2.2. Linux to Linux migration
Compared to the failed source server, the new server should have the same or a newer version of the Linux distribution installed. It is advised to install all available updates on the new server. Please see the system requirements for Repository Server in the Veeam Help Center.
The new server needs to have a different name then the original server.
2.3. Status of the failed source server
The original failed server must be powered off and the repository must be permanently disconnected, even if it is powered on in the future. If both servers can access the storage at the same time, you might experience heavy data corruption or loss.
2.4. Status of the new target server
The new server needs to be set up and running. This includes:
- Network access (can be same or a new IP address).
- DNS configured for the new server’s name.
- The repository volumes are presented and mapped to the new server.
- The required Firewall ports are open.
- The required permissions are configured. The repository is run by a Veeam Data Mover service, so please see the related Helpcenter page.
- The new target server is not added as a Managed Server in Veeam Backup & Replication!
3. Preparation
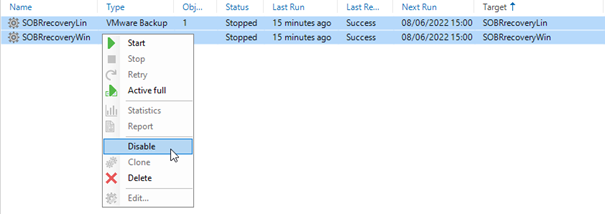
The first thing to do is disable all the scheduled backup jobs targeting the failed repository server.
The easiest way would be to sort the job list by Target, mark all the dependent jobs and select “Disable”:
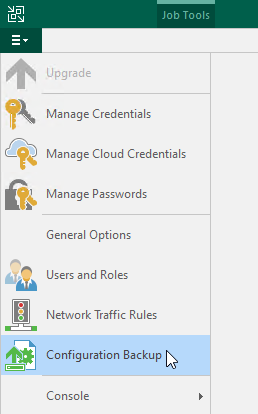
The second step is to create a Veeam Backup & Replication Config Backup and a backup of the SQL Database. This can be done from the general menu by selecting “Configuration Backup.”
Depending on migrating either a Linux or Windows server, continue with one of the next two sections.
4. Linux Server
Notice 1: The new target server should not be added as a Managed Server in Veeam Backup & Replication since the old server object will be renamed in a later step!
Notice 2: Depending on your environment, the path and devices will most likely be different to this example. Please fit the steps to your needs.
4.1. Mount the volume
Note the old mount path of the repository in the Veeam Backup & Replication Console. This path will be needed to mount the volume on the new server in the correct path. In this example, it is /repository/repo01:

If not already done, attach the existing disk with the repository data to the new Linux server. Here we are using Ubuntu 21.10 and you can use
to list all present disks and devices. The device we are searching for is /dev/sdb1.

Make sure the mount directory exists or create it with mkdir /repository.
Mount the device to the same path as on the old server with
and check that the files and folders are visible in the repositories subfolder:

Since you might want to have the mount being available after a reboot, check the device UUID with

and add this to the /etc/fstab file:

Depending on your storage solution, you might need additional mount attributes in the fstab file. For example, the attribute “nofail” can be necessary to correctly mount iSCSI devices during boot when the network is not ready.
Now you have added the source volume with the existing repository data to the new target server.
4.2. Additional steps for Hardened Linux Repositories
If you used the original server as a Veeam Hardened Linux Repository, please perform these additional steps on the new server. In this example, the volume mount point is /vbrrepo and the repository is found in /vbrrepo/hardened.
Create a user account with the same ID as it was on the old server. In this example, the ID is 1001:

4.3. Additional information on immutable flags
The VBM files in a repository store metadata information about the restore points, how they are linked to each other and some more data that needs to be updated on each job run. This is the reason the VBM files cannot have the immutable flag.
Check the immutable flags with

For management purpose, the time until backup files are locked for immutability is stored in .veeam.*.lock files in each repository folder.

This information might help to get a better understanding when restore points can be deleted.
If you discover any inconsistency between the files flagged for immutability and the ones listed in the .veeam.*.lock file, please open up a Veeam support case for this to be corrected.
Continue with renaming the Manged Server as described later in this article.
5. Windows Server
Note the old mount path and drive letter of the repository in the Veeam Backup & Replication Console. This path will be needed to mount the volume on the new server with the correct drive letter. In this example, it is E:\Repo01:

If not already done, attach the existing disk with the repository data to the new Windows Server and open the Disk Management console to see the offline disk:

Set the disk online:

It should come online with the mount letter from the old server:

If the drive letter is not assigned automatically, you can do this by using the “Change Drive Letter and Paths…” option:

Do not run any “Format…” option on the volume!
Check that all the backup files are visible:

Now you can continue with the next steps in the Veeam Backup & Replication console.
6. Migration within Veeam Backup & Replication
If the repository server is ready from the operating system and volume perspective, you need to perform migration steps within Veeam Backup & Replication.
6.1. Rename the Managed Server
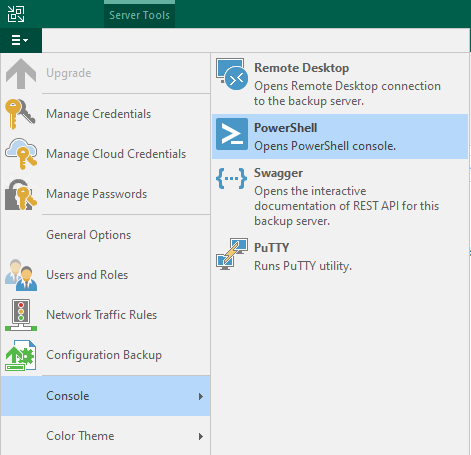
The old repository server was an object in the Managed Servers in Veeam Backup & Replication. To keep all the references and information about its repository information intact, we need to rename this new Managed Server object through PowerShell. Open the Veeam Backup & Replication PowerShell Console:
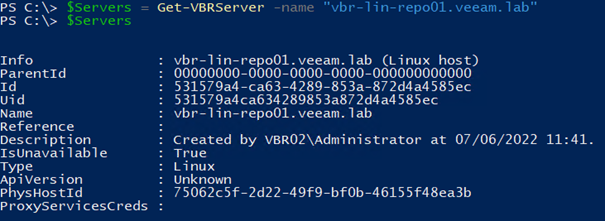
Save the old server into an object with
where “old-name” need to be the exact name as shown in the Veeam Backup & Replication Console:
Now rename this Managed Server object to the new server’s name with
where “new-name” needs to be the IP, Hostname, or FQDN of the new server:
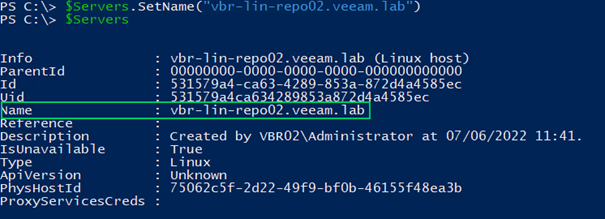
In the Veeam Backup & Replication console, you should now see the Manged Server being renamed:

6.2. Edit Linux Server
To install the Veeam services on this new server, simply open the properties and change the credentials if necessary.
For Hardened Linux Repository, you should use single-use credentials as described in the Help Center.
The Veeam Transport service is not yet installed, it will be installed when applying, even if no changes have been made in the properties:


6.3. Edit Windows Server
To install the Veeam services on this new server, simply open the properties and change the credentials if necessary.
The Veeam Transport service is not yet installed, it will be installed when applying even if no changes have been made in the properties:


6.4. Update the Repository
The last step is to open the properties of the Repository, change the name if desired and check that the repository server name has successfully been changed:

Run an incremental backup job targeting this repository and check that it completes successfully.
7. Conclusion
The described steps help in migrating an existing repository storage from a failed server to a new server by leveraging the advantage to:
- Preserve any restore points by reusing the existing storage and meet short- and long-term protection policies.
- Preserve the immutability flags and protection times (if using a hardened Linux repository) instead of starting a new timeframe with shorter protection at the beginning.
- Avoid the need to run new full backups for new backup chains, since all restore points and metadata can be kept.
- Keep all important information for the relationship between backup jobs, restore points and the repository to avoid the need of reconfiguring backup jobs or scale-out repositories.
- Avoid disruption in Veeam ONE reports since the repository target names will be automatically updated.
The listed advantages can save a dramatic amount of time and administration effort. Even if the occurrence of a failed server should be rare, it is especially important, in such situations, to have a quick and easy recovery option, to get back into a productive stage. The continuous need for data protection can be satisfied and there is little or even no impact on backup related SLAs that must be met.
If you have any doubts or need further assistance, feel free to contact the Veeam support.