- Veeam Support Knowledge Base
- Veeam Recovery Media for Linux OS, Workarounds
Veeam Recovery Media for Linux OS, Workarounds
| KB ID: | 4183 |
| Product: | Veeam Agent for Linux | 5.0 | 6.0 | 6.1 | 6.2 | 6.3 | 6.3.1 | 6.3.2 | 13 |
| Published: | 2021-06-17 |
| Last Modified: | 2024-06-06 |
Cheers for trusting us with the spot in your mailbox!
Now you’re less likely to miss what’s been brewing in our knowledge base with this weekly digest
![]()
Oops! Something went wrong.
Please, try again later.
Veeam Recovery Media fails to boot from a USB flash drive created with third-party ISO flashing software.
Challenge
A Linux machine cannot boot the Veeam Recovery Media from a USB flash drive created using a third-party tool to image the ISO onto the USB flash drive.
Cause
Third-party ISO-to-USB imaging software may alter the way the image boots when writing the ISO contents to the flash drive.
Workaround
Write the ISO image to the USB flash drive using the dd command-line program.
Example:
sudo dd bs=4M if=/path/to/veeam-recovery.iso of=/dev/sdx status=progress oflag=syncSome hardware is not recognized in the Veeam Recovery Media or you are unable to patch Veeam Recovery Media.
Challenge
Hardware is not recognized in the Veeam Recovery Media environment, and any of the following are also true:
- Using Custom Veeam Recovery Media also fails to recognize the hardware.
- Linux kernel in use was version 3.10 or older.
Workaround
- Create and boot into a Live CD of the Linux distro that is compatible with the hardware.
- Install Veeam Agent for Linux inside this Live CD environment.
Note: The veeamsnap kernel module is not required for restores, so to avoid installing kernel-headers, you may either install veeam-nosnap package or install the veeam package with broken veeamsnap dependency. - Enable recovery UI by adding the following line to
/etc/veeam/veeam.iniunder the [recoveryui] section
enableOnLiveSystem = 1- Restart the veeamservice to apply changes:
sudo service veeamservice restart- Open Recovery UI using the command:
veeamconfig recoveryuiPatched Custom Veeam Recovery ISO does not start veeamservice on boot
Challenge
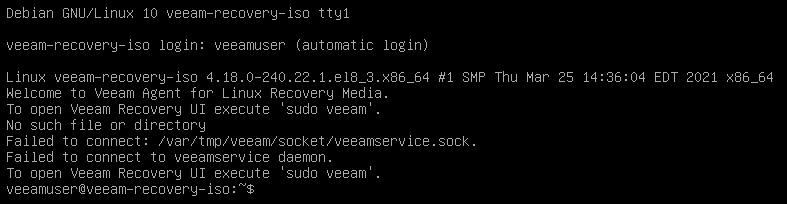
When booting from a recovery media image patched on specific Linux kernels, veeamservice does not start correctly. As a result, the recovery UI is inaccessible. The following output is displayed instead:
Linux veeam-recovery-iso 4.18.0-240.22.1.e18_3.x86_64 #1 SMP Thu Mar 25 14:36:04 EDT 2021 X86_64
Welcome to Veeam Agent for Linux Recovery Media.
To open Veeam Recovery UI execute 'sudo veeam'.
No such file or directory
Failed to connect: /var/tmp/veeam/socket/veeamservice.sock.
Failed to connect to veeamservice daemon.
To open Veeam Recovery UI execute 'sudo veeam'.
Cause
This is related to a squashfs bug 1/2/3 in Linux kernel 5.9, which appears in the Enterprise Linux distributions: RHEL 8.3 and specific versions of Oracle Linux.
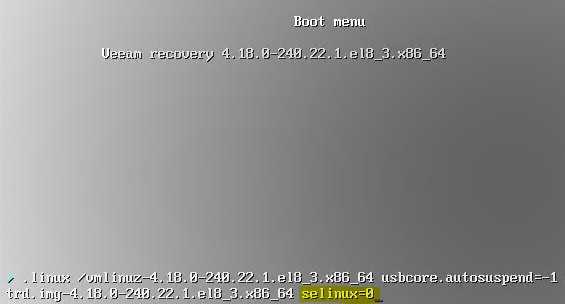
Workaround
To access the recovery UI, reboot and press TAB in the Boot menu of the Recovery Media. Add " selinux=0" to the end of the kernel command line and press Enter to finish the boot process.
Veeam Recovery Media interface doesn't fit within the screen borders.
Challenge
Veeam Recovery Media interface doesn't fit within the screen borders.
Cause
The screen has a high resolution (1920x1080 and above). Veeam Recovery Media interface screen resolution is 1024x768 by default. This is related to the default video parameter in /boot/grub/grub.cfg:
menuentry "Veeam Recovery 4.19.0-17-amd64" {
linux /vmlinuz-4.19.0-17-amd64 usbcore.autosuspend=-1 vga=773 video=1024x768 boot=veeam-live
initrd /initrd.img-4.19.0-17-amd64
}
Workaround
Reboot and press TAB in the Boot menu of the Recovery Media. Change the video parameter to the native display resolution and press Enter to finish the boot process.

If this KB article did not resolve your issue or you need further assistance with Veeam software, please create a Veeam Support Case.
To submit feedback regarding this article, please click this link: Send Article Feedback
To report a typo on this page, highlight the typo with your mouse and press CTRL + Enter.
Spelling error in text
Thank you!
Your feedback has been received and will be reviewed.
Oops! Something went wrong.
Please, try again later.
You have selected too large block!
Please try select less.
KB Feedback/Suggestion
This form is only for KB Feedback/Suggestions, if you need help with the software open a support case
Thank you!
Your feedback has been received and will be reviewed.
![]()
Oops! Something went wrong.
Please, try again later.