#1 Global Leader in Data Resilience

Granular sudo Permissions for Veeam Plug-in for Proxmox VE

KB ID: 4701
Product: Veeam Backup & Replication | 12.3 | 12.3.1 | 12.3.2 | 13
Published: 2025-02-24
Last Modified: 2025-09-18
mailbox
Get weekly article updates
By subscribing, you are agreeing to have your personal information managed in accordance with the terms of Veeam's Privacy Notice.

Cheers for trusting us with the spot in your mailbox!

Now you’re less likely to miss what’s been brewing in our knowledge base with this weekly digest

error icon

Oops! Something went wrong.

Please, try again later.

Considerations and System Requirements

Purpose

This article provides an example granular ‘sudoers’ configuration for the Linux account that will be used by Veeam Backup & Replication when managing a Proxmox VE host.

Solution

Install and Configure sudo

While the installation and configuration of third-party applications is generally considered outside the scope of Veeam Support, Veeam has elected to provide this guidance as a courtesy to help ensure a smooth implementation of granular permissions. Please note that this configuration method is just one of many possible ways to use sudo to achieve the desired result. We recommend consulting with your Proxmox administration or security team to determine whether your organization has a preferred methodology for configuring sudo.

The following steps should be performed on the Proxmox host while logged in as the root user.

  1. Use the following command to check whether sudo is installed and, if so, which version is installed.
    Veeam Plug-in for Proxmox VE requires at least sudo version 1.9.10.
sudo --version
  1. If sudo is not already installed, use the following command to install the latest version of sudo:
apt update && apt install sudo -y
  1. Use the following command to create a dedicated user account that will be used by Veeam Backup & Replication:
    For this article, the account name used is veeamdep.
adduser veeamdep
  1. Create the granular sudoers file using the following command:
visudo -f /etc/sudoers.d/veeamdep
The file /etc/sudoers.d/veeamdep should contain the following:
For Veeam Backup & Replication 13
# the account used by Veeam must have PASSWD set; do _not_ use NOPASSWD.
veeamdep ALL=(root) PASSWD: /usr/sbin/dmidecode -s system-uuid
veeamdep ALL=(root) PASSWD: /usr/bin/kvm -S *,!/usr/bin/kvm -S *-netdev*,!/usr/bin/kvm -S *-fsdev*,!/usr/bin/kvm -S *netdev=*,!/usr/bin/kvm -S *fsdev=*,!/usr/bin/kvm -S *-net*,!/usr/bin/kvm -S *net=*
veeamdep ALL=(root) PASSWD: /usr/bin/qemu-img info *
veeamdep ALL=(root) PASSWD: /usr/bin/qemu-img create *
veeamdep ALL=(root) PASSWD: /usr/sbin/qm create *,!/usr/sbin/qm create * --hookscript*
veeamdep ALL=(root) PASSWD: /usr/sbin/qm ^showcmd [0-9]+ --pretty$
veeamdep ALL=(root) PASSWD: /usr/sbin/qm ^unlock [0-9]+$
veeamdep ALL=(root) PASSWD: /usr/bin/socat ^TCP-LISTEN:[0-9]+,bind=127\.0\.0\.1 UNIX-CONNECT:/[a-zA-Z0-9_./-]+$
veeamdep ALL=(root) PASSWD: /usr/bin/mkdir -p /var/lib/vz/snippets/
veeamdep ALL=(root) PASSWD: /usr/bin/pvenode cert info --output-format json
veeamdep ALL=(root) PASSWD: /usr/bin/pvesh ^get storage/([a-zA-Z0-9_-]+) --output json$
veeamdep ALL=(root) PASSWD: /usr/bin/pvesh ^set /nodes/([a-zA-Z0-9_-]+)/qemu/([0-9]+)/config --lock ([a-zA-Z]+)$
veeamdep ALL=(root) PASSWD: /usr/bin/pkill -9 -e -f -x socat *
veeamdep ALL=(root) PASSWD: /usr/sbin/lvchange -ay *
veeamdep ALL=(root) PASSWD: /usr/sbin/lvchange -an *
veeamdep ALL=(root) PASSWD: /usr/bin/rbd device map *
veeamdep ALL=(root) PASSWD: /usr/bin/mv ^-n /tmp/([a-zA-Z0-9_-]+\.config) /var/lib/vz/snippets/([a-zA-Z0-9_-]+\.config)$
veeamdep ALL=(root) PASSWD: /usr/bin/rm ^(/[a-zA-Z0-9_/-]/VeeamTmp[a-zA-Z0-9_.-]\s*)+$
veeamdep ALL=(root) PASSWD: /usr/bin/rm ^-f /[a-zA-Z0-9_/-]+/VeeamTmp[a-zA-Z0-9_.-]+$
veeamdep ALL=(root) PASSWD: /usr/bin/rm ^-f /var/lib/vz/snippets/[a-zA-Z0-9_-]+\.config$
veeamdep ALL=(root) PASSWD: /usr/bin/rm ^-f /var/lib/vz/template/iso/[a-zA-Z0-9_.-]+\.img$
For Veeam Backup & Replication 12.x
# the account used by Veeam must have PASSWD set; do _not_ use NOPASSWD.
veeamdep ALL=(root) PASSWD: /usr/sbin/dmidecode -s system-uuid
veeamdep ALL=(root) PASSWD: /usr/bin/kvm -S *
veeamdep ALL=(root) PASSWD: /usr/bin/qemu-img info *
veeamdep ALL=(root) PASSWD: /usr/bin/qemu-img create *
veeamdep ALL=(root) PASSWD: /usr/sbin/qm create *
veeamdep ALL=(root) PASSWD: /usr/sbin/qm ^showcmd [0-9]+ --pretty$
veeamdep ALL=(root) PASSWD: /usr/sbin/qm ^unlock [0-9]+$
veeamdep ALL=(root) PASSWD: /usr/bin/socat ^TCP-LISTEN:[0-9]+,bind=127\.0\.0\.1 UNIX-CONNECT:/[a-zA-Z0-9_./-]+$
veeamdep ALL=(root) PASSWD: /usr/bin/mkdir -p /var/lib/vz/snippets/
veeamdep ALL=(root) PASSWD: /usr/bin/pvenode cert info --output-format json
veeamdep ALL=(root) PASSWD: /usr/bin/pvesh ^get storage/([a-zA-Z0-9_-]+) --output json$
veeamdep ALL=(root) PASSWD: /usr/bin/pvesh ^set /nodes/([a-zA-Z0-9_-]+)/qemu/([0-9]+)/config --lock ([a-zA-Z]+)$
veeamdep ALL=(root) PASSWD: /usr/bin/pkill -9 -e -f -x socat *
veeamdep ALL=(root) PASSWD: /usr/sbin/lvchange -ay *
veeamdep ALL=(root) PASSWD: /usr/sbin/lvchange -an *
veeamdep ALL=(root) PASSWD: /usr/bin/rbd device map *
veeamdep ALL=(root) PASSWD: /usr/bin/mv ^-n /tmp/([a-zA-Z0-9_-]+\.config) /var/lib/vz/snippets/([a-zA-Z0-9_-]+\.config)$
veeamdep ALL=(root) PASSWD: /usr/bin/rm ^(/[a-zA-Z0-9_/-]/VeeamTmp[a-zA-Z0-9_.-]\s*)+$
veeamdep ALL=(root) PASSWD: /usr/bin/rm ^-f /[a-zA-Z0-9_/-]+/VeeamTmp[a-zA-Z0-9_.-]+$
veeamdep ALL=(root) PASSWD: /usr/bin/rm ^-f /var/lib/vz/snippets/[a-zA-Z0-9_-]+\.config$
veeamdep ALL=(root) PASSWD: /usr/bin/rm ^-f /var/lib/vz/template/iso/[a-zA-Z0-9_.-]+\.img$
  1. Review the primary sudoers configuration file and ensure the following line is uncommented:
    includedir /etc/sudoers.d
    
    Use the following command to edit the /etc/sudoers file:
visudo
  1. Run the following command to ensure that the dmidecode package is installed:
apt update && apt install dmidecode -y

Create a Dedicated Proxmox User for Veeam

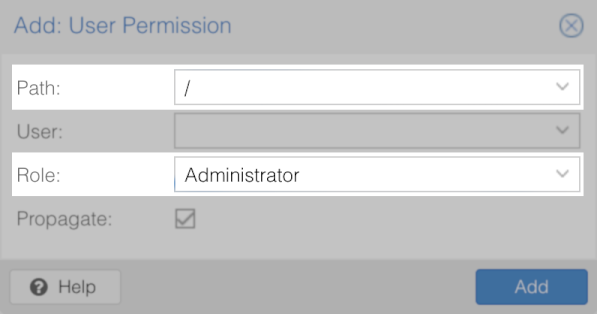
  1. Within the Proxmox configuration, add the same user name from Step 3 to the Datacenter.
    Datacenter > Permissions > Users > Add
  2. Add the Administrator role for the root path ( Path: / ) to that user.
    Datacenter > Permissions > Add > User Permission
User Perms

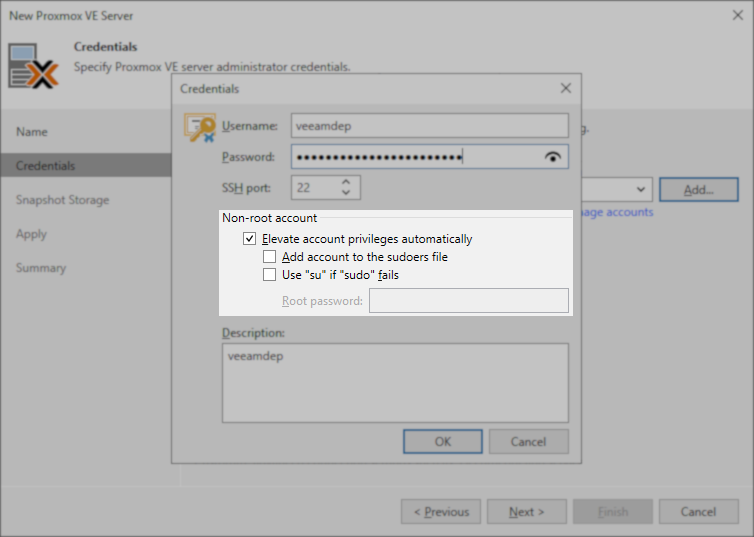
Configure Proxmox Credentials within Veeam Backup & Replication 

Note: When using granular sudo permissions, ensure that the following options are not selected:

  • Add account to the sudoers file — Enabling this option would cause the Veeam software to add the account to the sudoers file with broader permissions than those specified in the granular sudoers example.
  • Use "su" if "sudo" fails — Enabling this option would cause Veeam Backup & Replication to switch to using the root account if any of the sudo commands fail due to a command not being included in the granular sudoers file. This could potentially mask a needed update to the granular sudoers file.
Screenshot shows the credentials window with the option to add the account to the sudoers file and use su if sudo fails both unchecked.

Common Errors

  • The following error may appear if dmidecode is not installed (Step 6 above):
    Make sure the specified user has sufficient permissions to execute dmidecode on the Proxmox VE server
    
  • The following error may appear if the user is not configured in Proxmox (Step 7 above):
    The provided credentials are invalid
    
Double Check Configuration

Several recent cases where customers configured granular permissions and faced issues with connecting to the Proxmox VE environment were caused by either incorrectly configured sudo permissions (e.g., wrong username specified in the sudoers file) or missing or incorrect sudo configuration on the Proxmox VE host.

Please create a support case if issues persist after double-checking the sudoers file and sudo configuration.

To submit feedback regarding this article, please click this link: Send Article Feedback
To report a typo on this page, highlight the typo with your mouse and press CTRL + Enter.

Spelling error in text

Thank you!

Thank you!

Your feedback has been received and will be reviewed.

Oops! Something went wrong.

Please, try again later.

You have selected too large block!

Please try select less.

KB Feedback/Suggestion

This form is only for KB Feedback/Suggestions, if you need help with the software open a support case

Veeam Backup & Replication
Veeam Data Cloud for Microsoft 365
Veeam Data Cloud for Microsoft Entra ID
Veeam Data Cloud for Salesforce
Veeam Data Cloud for Microsoft Azure
Veeam Data Cloud Vault
Veeam Backup for Microsoft 365
Veeam Backup for Microsoft Entra ID
Veeam Backup for Salesforce
Veeam ONE
Veeam Service Provider Console
Veeam Agent for Microsoft Windows
Veeam Agent for Linux
Veeam Backup for Nutanix AHV
Veeam Backup for AWS
Veeam Backup for Microsoft Azure
Veeam Backup for Google Cloud
Veeam Backup for Oracle Linux Virtualization Manager and Red Hat Virtualization
Veeam Management Pack for Microsoft System Center
Veeam Recovery Orchestrator
Veeam Agent for Mac
Veeam Agent for IBM AIX
Veeam Agent for Oracle Solaris
Veeam Cloud Connect
Veeam Kasten for Kubernetes
By submitting, you are agreeing to have your personal information managed in accordance with the terms of Veeam's Privacy Notice.
Verify your email to continue your product download
We've sent a verification code to:
  • Incorrect verification code. Please try again.
An email with a verification code was just sent to
Didn't receive the code? Click to resend in sec
Didn't receive the code? Click to resend
Thank you!

Thank you!

Your feedback has been received and will be reviewed.

error icon

Oops! Something went wrong.

Please, try again later.