How to Change Where Logs are Stored on the Veeam Appliances

KB ID: 4777
Product: Veeam Backup & Replication | 13
Published: 2026-02-10
Last Modified: 2026-02-10
mailbox
Get weekly article updates
By subscribing, you are agreeing to have your personal information managed in accordance with the terms of Veeam's Privacy Notice.

Cheers for trusting us with the spot in your mailbox!

Now you’re less likely to miss what’s been brewing in our knowledge base with this weekly digest

error icon

Oops! Something went wrong.

Please, try again later.

Changing Log Location Will Break Automated Log Collection

The automated log collection tools built into both the Veeam Backup & Replication Web UI of the Veeam Software Appliance and the "Create support bundle" function within the Host Management Console collect logs only from the default log location, /var/log/VeeamBackup/ .

Diagnostic logging stored in a different folder, as documented in this KB, will not be collected automatically and must be collected manually. Log files must be collected manually by first enabling SSH on the appliance from which logs are needed, then using SFTP to download the new log folder from within /var/lib/veeam/.

If you relocate the log storage location using the information in this KB, please ensure that you notify Veeam Support during case creation.

Note: This limitation will be addressed in a future release.

Purpose

This article documents how to change the location where Veeam Appliances store their log files on the Linux filesystem.

This article covers:

  • Veeam Software Appliance
  • Veeam Infrastructure Appliance (JeOS Deployed Proxies and Repositories)
  • Veeam Hardened Repositories (deployed using the JeOS ISO)


Use Case

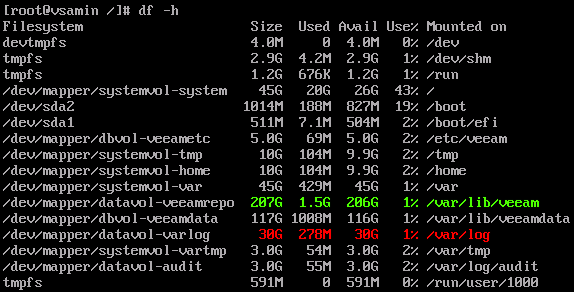
Changing where the log files are stored may be necessary in larger environments when the recommended sizing in the user guide was not appropriately considered. When disks are undersized for the number of workloads being processed, the default log folder (/var/log/VeeamBackup/) may run out of space, leading to system instability.

For example, on a Veeam Software Appliance using the minimum size disks, the /var/log/ path is mounted with only 30GB, whereas the /var/lib/veeam/ folder, where this KB will guide you to configure the logs, is 207GB.

A root shell terminal window shows the output of the "df -h" command, listing disk usage for mounted filesystems. Several mount points are shown, including /var/lib/veeam (206G available), /var/log (30G available), and others. The storage space for those two mount points are highlighted.
The following table documents the expected sizes of the mount points based on the disk size.
Mount Point Percent
of Disk
Max Size 240GB
(Min)
512GB
(Small)
1024GB
(Medium)
2048GB
(Large)
/var/lib/veeam/ 87% —  209.06GB 446GB 892GB 1824GB
/var/log/ 12% 200G 28.13GB 60GB 120GB 200GB
Swipe to show more of the table

Solution

Adjusting Log Location for Veeam Software Appliance

Procedure Notes

  • Changing log directory settings requires changing configuration files via the Veeam Host Management Console.
  • If the Security Officer role is enabled, each configuration file import must be approved by the Security Officer.
  • The default log path is: /var/log/VeeamBackup/
  • The new log location must be a subfolder of: /var/lib/veeam/
  • For the Veeam Software Appliance, the new log folder must be created using the Files view in the Windows-based Veeam Backup & Replication Console displays the contents of the folder /var/lib/veeam/ when expanding the "This server" object.

Creating a New Log Folder on the Veeam Software Appliance

  1. Open the Windows-based Veeam Backup & Replication Console and connect to the Veeam Software Appliance.
  2. Within the Veeam Backup & Replication Console, switch to the Files view.

    Note: If the Files view option is not available, it must be enabled using the triple-dot menu.
The "Tabs View Settings" window is open. Several tab options are listed with checkboxes, including "Home," "Inventory," "Backup Infrastructure," "Files" (checked), and "History." On the right are options for tab view: "Icons with labels" (selected), "Icons only (top)," and "Icons only (bottom)." The "Apply" button is highlighted at the bottom right.
  1. Under the Linux node, right-click on the entry named "This server," and in the context menu select New Folder.
In the Veeam Backup & Replication interface the "Files" section is displayed. The "This server" node is selected in the Linux file tree. A context menu is open with the "New Folder" option highlighted, allowing the user to create a new folder on the server.
A new folder is being created under "This server" in the Linux file tree. The folder name is being entered as "logs" in an editable text field.
Folder Name Path

The full path for use in the next section is:

/var/lib/veeam/{foldername}/

For example, in the screenshot above, the created folder is named "logs," therefore, the path that will be used in the configuration files will be:

/var/lib/veeam/logs/

Update Configuration Files

  1. Ensure all jobs and tasks have reached a stopped state. The final step of this procedure is a reboot of the Veeam Software Appliance, which will interrupt any active operations.
  2. Log in to the Veeam Host Management Console Web UI.
  3. From the left-side navigation panel, select Logs and Services.
  4. Within the Logs and Services section, select the Host Configuration tab.
  5. Review the list below. For each conf file, do the following:
    1. Paste the filename into the Configuration File search box.
    2. Select the configuration file.
    3. Click Export.
    4. Open the exported conf file in a text editor and add the log folder setting shown for that configuration file.
      If the configuration file contains multiple sections, the setting always goes in the [root] section.

      Note:
      If the export option is not available, you must create a new plaintext (UTF-8) file in a text editor and add the setting from the table, including the folder path, to that file.
    5. Save the modified configuration file.
    6. Ensure the correct configuration file is still selected, then click the Import button to import the modified/new configuration file.

      Note: If the Security Officer role is enabled, you'll get a message warning that an SO must approve the configuration file import, "Once approved by Security Officer the imported settings will be applied automatically." You can export, modify, and import all the configuration files first, then have the Security Officer approve the import operations all at the same time.
Filename Setting Name and Value
*Replace {foldername} with the
folder you created earlier.
/etc/veeam/veeam_backup_and_replication.conf LogDirectory=/var/lib/veeam/{foldername}/
/etc/veeam/veeam_backup_catalog.conf LogDirectory=/var/lib/veeam/{foldername}/
/etc/veeam/veeam_cdpproxy_service.conf LogDirectory=/var/lib/veeam/{foldername}/
/etc/veeam/veeam_mount_service.conf LogDirectory=/var/lib/veeam/{foldername}/
/etc/veeam/veeamdeployment.conf BaseLogPath=/var/lib/veeam/{foldername}/
/etc/veeam/veeamenvironment.conf LogPath=/var/lib/veeam/{foldername}/
/etc/veeam/veeamguestinteraction.conf LogDirectory=/var/lib/veeam/{foldername}/
/etc/veeam/veeamimmurepo.conf BaseLogDirectory=/var/lib/veeam/{foldername}/
/etc/veeam/veeamtransport.conf BaseLogDirectory=/var/lib/veeam/{foldername}/
Swipe to show more of the table
  1. Once all configuration files have been modified and imported (and approved by the Security Officer if enabled), either:
Adjusting Log Location for Veeam Infrastructure Appliance

Procedure Notes

  • Changing log directory settings requires changing configuration files via the Veeam Host Management Console.
  • If the Security Officer role is enabled, each configuration file import must be approved by the Security Officer.
  • The default log path is: /var/log/VeeamBackup/
  • The new log location must be a subfolder of: /var/lib/veeam/
  • For the Veeam Infrastructure Appliance, the new log folder must be created using the Files view in the Windows-based Veeam Backup & Replication Console displays the contents of the folder /var/lib/veeam/ when expanding the entry for the appliance .

Creating a New Log Folder on the Veeam Infrastructure Appliance

  1. Open the Windows-based Veeam Backup & Replication Console and connect to the Veeam Software Appliance.
  2. Within the Veeam Backup & Replication Console, switch to the Files view.

    Note: If the Files view option is not available, it must be enabled using the triple-dot menu.
The "Tabs View Settings" window is open. Several tab options are listed with checkboxes, including "Home," "Inventory," "Backup Infrastructure," "Files" (checked), and "History." On the right are options for tab view: "Icons with labels" (selected), "Icons only (top)," and "Icons only (bottom)." The "Apply" button is highlighted at the bottom right.
  1. Under the Linux node, right-click on the entry named named after the Veeam Infrastructure Appliance and in the context menu select New Folder.
In the Veeam Backup & Replication interface the "Files" section is displayed. A node named "VIA" is selected in the Linux file tree. A context menu is open with the "New Folder" option highlighted, allowing the user to create a new folder on the server.
A new folder is being created under "VIA" in the Linux file tree. The folder name is being entered as "logs" in an editable text field.
Folder Name Path

The full path for use in the next section is:

/var/lib/veeam/{foldername}/

For example, in the screenshot above, the created folder is named "logs," therefore, the path that will be used in the configuration files will be:

/var/lib/veeam/logs/

Update Configuration Files

  1. Ensure all jobs and tasks have reached a stopped state. The final step of this procedure is a reboot of the Veeam Infrastructure Appliance, which will interrupt any active operations.
  2. Log in to the Veeam Host Management Console Web UI.
  3. From the left-side navigation panel, select Logs and Services.
  4. Within the Logs and Services section, select the Host Configuration tab.
  5. Review the list below. For each conf file, do the following:
    1. Paste the filename into the Configuration File search box.
    2. Select the configuration file.
    3. Click Export.
    4. Open the exported conf file in a text editor and add the log folder setting shown for that configuration file.
      If the configuration file contains multiple sections, the setting always goes in the [root] section.

      Note:
      If the export option is not available, you must create a new plaintext (UTF-8) file in a text editor and add the setting from the table, including the folder path, to that file.
    5. Save the modified configuration file.
    6. Ensure the correct configuration file is still selected, then click the Import button to import the modified/new configuration file.

      Note: If the Security Officer role is enabled, you'll get a message warning that an SO must approve the configuration file import, "Once approved by Security Officer the imported settings will be applied automatically." You can export, modify, and import all the configuration files first, then have the Security Officer approve the import operations all at the same time.
Filename Setting Name and Value
*Replace {foldername} with the
folder you created earlier.
/etc/veeam/veeam_cdpproxy_service.conf LogDirectory=/var/lib/veeam/{foldername}/
/etc/veeam/veeam_mount_service.conf LogDirectory=/var/lib/veeam/{foldername}/
/etc/veeam/veeamdeployment.conf BaseLogPath=/var/lib/veeam/{foldername}/
/etc/veeam/veeamenvironment.conf LogPath=/var/lib/veeam/{foldername}/
/etc/veeam/veeamguestinteraction.conf LogDirectory=/var/lib/veeam/{foldername}/
/etc/veeam/veeamimmurepo.conf BaseLogDirectory=/var/lib/veeam/{foldername}/
/etc/veeam/veeamtransport.conf BaseLogDirectory=/var/lib/veeam/{foldername}/
Swipe to show more of the table
  1. Once all configuration files have been modified and imported (and approved by the Security Officer if enabled), either:
Adjusting Log Location for Veeam Hardened Repository

Procedure Notes

  • Changing log directory settings requires changing configuration files via the Veeam Host Management Console.
  • By default, the Host Management Console for the Veeam Hardened Repository is disabled. You must first log in to the Terminal UI to enable the Host Management Web UI.

    Note: You must connect to the server where the backup infrastructure component is installed through a physical console or a virtual remote console. You cannot log in to the Veeam Host Management TUI through SSH.
  • If the Security Officer role is enabled, each configuration file import must be approved by the Security Officer.
  • The default log path is: /var/log/VeeamBackup/
  • The new log location must be a subfolder of: /var/lib/veeam/
  • The services on the Veeam Hardened Repository will create the log folder specified in the configuration files during startup.
Folder Name Path

The full path for use in the next section is:

/var/lib/veeam/{foldername}/

For example, this guide uses the folder name "logs", resulting in the following path:

/var/lib/veeam/logs/

Update Configuration Files

  1. Ensure all jobs and tasks have reached a stopped state. The final step of this procedure is a reboot of the Veeam Hardened Repository, which will interrupt any active operations.
  2. Log in to the Veeam Host Management Console Web UI.

    Reminder: By default, the Host Management Console Web UI for the Veeam Hardened Repository is disabled. You must first log in to the Terminal UI to enable the Host Management Web UI.
  3. From the left-side navigation panel, select Logs and Services.
  4. Within the Logs and Services section, select the Host Configuration tab.
  5. Review the list below. For each conf file, do the following:
    1. Paste the filename into the Configuration File search box.
    2. Select the configuration file.
    3. Click Export.
    4. Open the exported conf file in a text editor and add the log folder setting shown for that configuration file.
      If the configuration file contains multiple sections, the setting always goes in the [root] section.

      Note:
      If the export option is not available, you must create a new plaintext (UTF-8) file in a text editor and add the setting from the table, including the folder path, to that file.
    5. Save the modified configuration file.
    6. Ensure the correct configuration file is selected, then click the Import button to import the modified/new configuration file.

      Note: If the Security Officer role is enabled, you'll get a message warning that an SO must approve the configuration file import, "Once approved by Security Officer the imported settings will be applied automatically." You can export, modify, and import all the configuration files first, then have the Security Officer approve the import operations all at the same time.
Filename Setting Name and Value
*Replace {foldername} with the
folder you created earlier.
/etc/veeam/veeamdeployment.conf BaseLogPath=/var/lib/veeam/{foldername}/
/etc/veeam/veeamenvironment.conf LogPath=/var/lib/veeam/{foldername}/
/etc/veeam/veeamimmurepo.conf BaseLogDirectory=/var/lib/veeam/{foldername}/
/etc/veeam/veeamtransport.conf BaseLogDirectory=/var/lib/veeam/{foldername}/
Swipe to show more of the table
  1. Once all configuration files have been modified and imported (and approved by the Security Officer if enabled), either:

If this KB article did not resolve your issue or you need further assistance with Veeam software, please create a Veeam Support Case.

To submit feedback regarding this article, please click this link: Send Article Feedback
To report a typo on this page, highlight the typo with your mouse and press CTRL + Enter.

Spelling error in text

Thank you!

Thank you!

Your feedback has been received and will be reviewed.

Oops! Something went wrong.

Please, try again later.

You have selected too large block!

Please try select less.

KB Feedback/Suggestion

This form is only for KB Feedback/Suggestions, if you need help with the software open a support case

By submitting, you are agreeing to have your personal information managed in accordance with the terms of Veeam's Privacy Notice.
Verify your email to continue your product download
We've sent a verification code to:
  • Incorrect verification code. Please try again.
An email with a verification code was just sent to
Didn't receive the code? Click to resend in sec
Didn't receive the code? Click to resend
Thank you!

Thank you!

Your feedback has been received and will be reviewed.

error icon

Oops! Something went wrong.

Please, try again later.