- Veeam Support Knowledge Base
- How to Add RHEL 8/9 Using NIST 800-171 or DISA STIG Security Profile to Veeam Backup & Replication
How to Add RHEL 8/9 Using NIST 800-171 or DISA STIG Security Profile to Veeam Backup & Replication
| KB ID: | 4250 |
| Product: | Veeam Backup & Replication | 12 | 12.1 |
| Published: | 2021-12-10 |
| Last Modified: | 2024-06-14 |
Cheers for trusting us with the spot in your mailbox!
Now you’re less likely to miss what’s been brewing in our knowledge base with this weekly digest
![]()
Oops! Something went wrong.
Please, try again later.
Purpose
This article documents the additional procedures required to add a Linux machine to Veeam Backup & Replication when that machine is using either the NIST 800-171 or DISA STIG security profile. Specifically, this article was developed using Red Hat Enteprise Linux (RHEL).
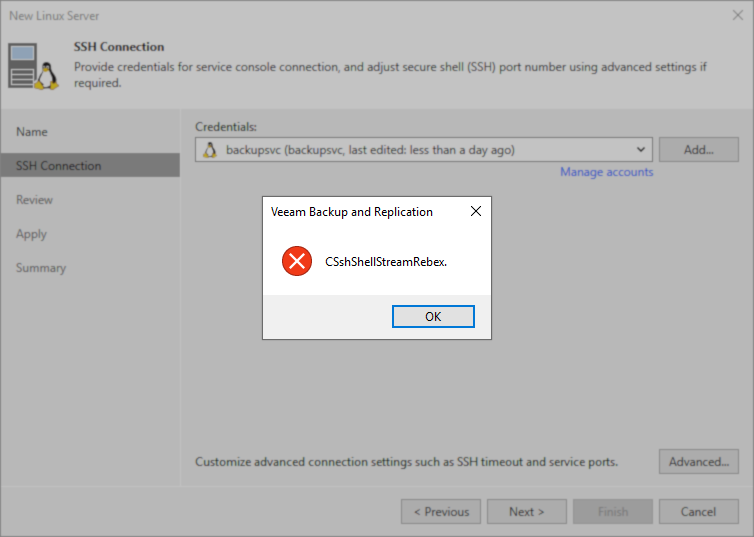
The initial error one will experience when attempting this without following the procedures in the article is:
-
CSshShellStreamRebex
Solution
Resolution Summary
To add a Linux server using these security profiles, two things must be done to allow them to be added to Veeam Backup & Replication:
- tmux must not automatically be launched when the account Veeam Backup & Replication uses connects. This Veeam Backup & Replication limitation is documented in KB4466: Impact of tmux on Veeam Interactions With Linux OS.
- fapolicyd must be updated during the step when the "New Linux Server" wizard is attempting to install the Veeam services.
Part 1: Disable tmux automatic startup when logging in on the system.
Review KB4466:Impact of tmux on Veeam Interactions With Linux OS for more information.
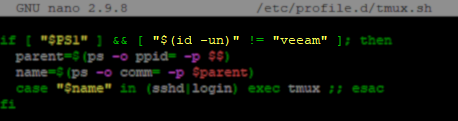
The NIST 800-171 and DISA STIG security profile on Red Hat Enterprise Linux enables automatically running tmux when a user connects. For Veeam Backup & Replication to successfully deploy the Veeam services on the system, tmux must not automatically launch for the user it connects as.
An entry either directly within /etc/bashrc or a second script called by bashrc will control the automatic launching of a tmux session at user login. For example, in RHEL 8.9, the /etc/bashrc does not directly contain the 'exec tmux' entry; instead, tmux.sh is called using an entry in bashrc that calls for all scripts within /etc/profile.d/*.sh to be executed at login.
Once you identify how tmux is being executed at login, there are two options:
- Option 1: Comment out the entire line containing 'exec tmux' to disable tmux at login system-wide.
(This change can be reverted after the machine has been successfully added to Veeam Backup & Replication.

- Option 2: Modify the if statement to add a qualifier that if the user account matches the specified one, tmux should not be started when that user logs in.
&& [ "$(id -un)" != "veeam" ]
(This change can be reverted after the machine has been successfully added to Veeam Backup & Replication.
Part 2: Updating fapolicyd while adding the Linux server
To make this process as simple as possible, the legacy method of having the reader run specific fapolicy-cli commands at specific stages of services deployment has been replaced with a script that will automate the entire process. This script will watch for the specific service files to be uploaded, and then add them to the faploicy trusted list automatically.
Prepare Script on the Linux Server
- SSH to the Linux server you will be adding to Veeam Backup & Replication.
- Create the folder path /opt/veeam/ using the following command:
The /opt/veeam/ path is used because the DISA STIG security profile sets /home/ to be mounted with the option 'noexec'.
sudo mkdir -p /opt/veeam/- Create /opt/veeam/vbr_fapolicyd_updater.sh with the following content:
#!/bin/bash

FILES=(
    "/opt/veeam/deployment/veeamdeploymentsvc"
    "/opt/veeam/transport/veeamtransport"
    "/opt/veeam/transport/veeamimmureposvc"
    "/opt/veeam/transport/veeamagent"
)

COMMANDS=(
    "fapolicyd-cli --file add /opt/veeam/deployment/veeamdeploymentsvc --trust-file veeamdeploymentsvc"
    "fapolicyd-cli --file add /opt/veeam/transport/veeamtransport --trust-file veeamtransport"
    "fapolicyd-cli --file add /opt/veeam/transport/veeamimmureposvc --trust-file veeamimmureposvc"
    "fapolicyd-cli --file add /opt/veeam/transport/veeamagent --trust-file veeamagent"
)

for ((i=0; i<${#FILES[@]}; i++)); do
    FILE_PATH="${FILES[i]}"
    COMMAND="${COMMANDS[i]}"

    while [ ! -f "$FILE_PATH" ]; do
        echo "File $FILE_PATH not found. Waiting..."
        sleep 3
    done

    echo "File $FILE_PATH found. Running the command: $COMMAND"

    $COMMAND
    # Check if the command succeeded
    if [ $? -eq 0 ]; then
        echo "Command executed successfully."
    else
        echo "Command failed to execute."
    fi
# Update FAPolicyd configuration
fapolicyd-cli --update
done
- Modify the attributes of the shell script to make it executable:
sudo chmod +x /opt/veeam/vbr_fapolicyd_updater.sh- Before you begin adding the Linux server to Veeam Backup & Replication, run the script. The script will wait for the files to be uploaded to the Linux server, and as it detects them, it will add them to the trusted list within the fapolicy framework.
sudo /opt/veeam/vbr_fapolicyd_updater.shAdd Linux Server to Veeam Backup & Replication
Before you begin this section, ensure that the vbr_fapolicyd_updater.sh script is running.
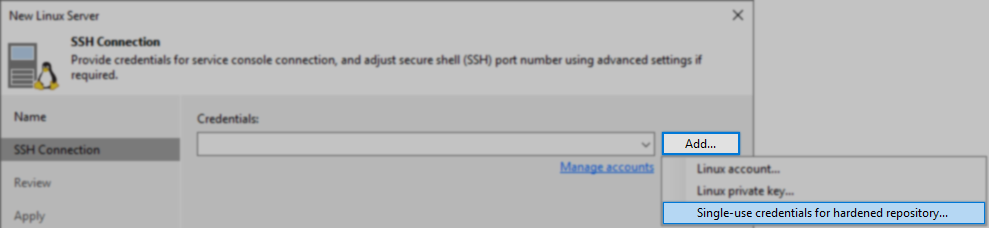
- Add the Linux server to Veeam Backup & Replication.
Remember: If this Linux server will be used as a Hardened Linux Repository, you must add the credentials using the "Single-use credentials for hardened repository" option.
- Proceed through the rest of the wizard steps.
As long as the vbr_fapolicyd_updater.sh script is running on that Linux server, the script will find the service files as they are uploaded and add them to the fapolicy trusted list before Veeam Backup & Replication attempts to start the services and communicate with them.
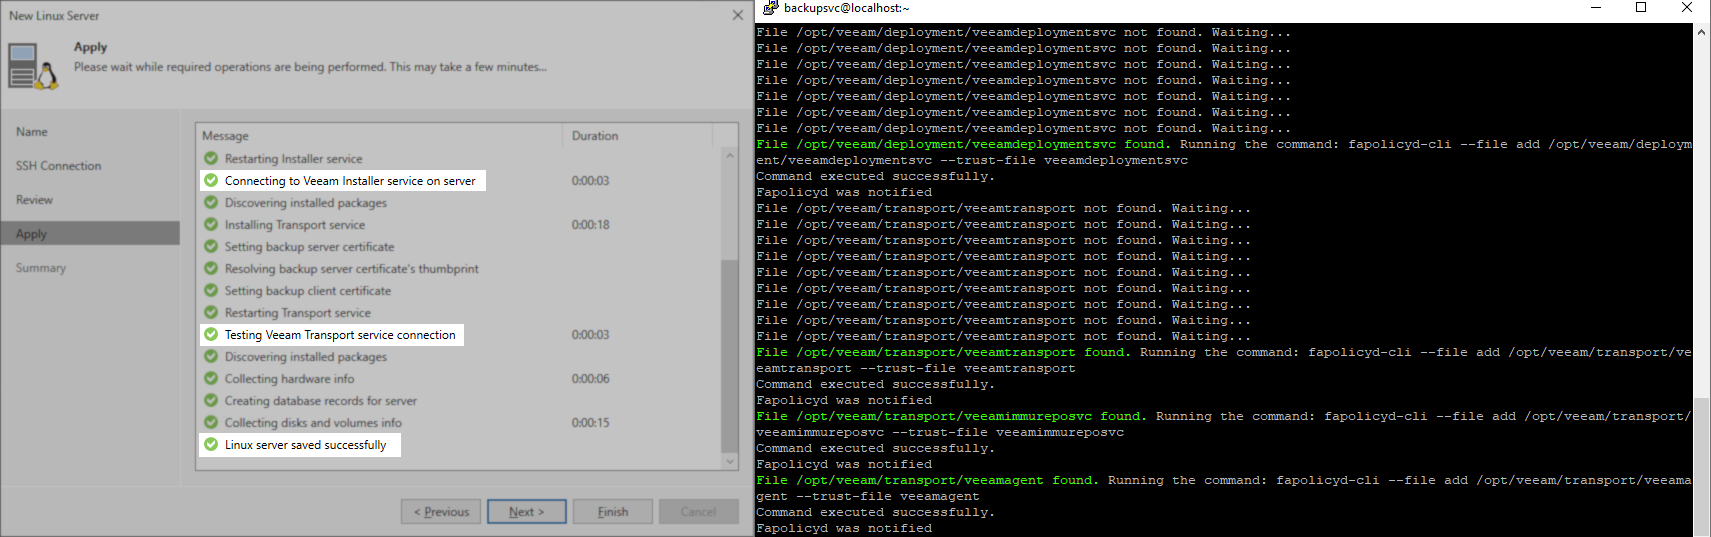
- Click [Finish] to complete adding the Linux Server.
After successfully adding the Linux server to Veeam Backup and Replication, you can undo the changes that were made to disable tmux. The Veeam Data Mover service binaries must remain trusted by fapolicyd.
Note: The fapolicyd system records the hash of the files it trusts, so if the service files are updated in the future, the script will have to be rerun to re-add the new processes to the trusted list.
More Information
Additional fapolicyd-cli Commands
If the Linux server will be used as a VMware Backup Proxy, execute the following commands to allow it to be able to use Network (NBD) transport mode:
sudo fapolicyd-cli --file add /opt/veeam/transport/vddk_7_0/lib64/libcares.so.2 --trust-file libcares.so.2
sudo fapolicyd-cli --file add /opt/veeam/transport/vddk_7_0/lib64/libcrypto.so.1.0.2 --trust-file libcrypto.so.1.0.2
sudo fapolicyd-cli --file add /opt/veeam/transport/vddk_7_0/lib64/libcurl.so.4 --trust-file libcurl.so.4
sudo fapolicyd-cli --file add /opt/veeam/transport/vddk_7_0/lib64/libdiskLibPlugin.so --trust-file libdiskLibPlugin.so
sudo fapolicyd-cli --file add /opt/veeam/transport/vddk_7_0/lib64/libexpat.so --trust-file libexpat.so
sudo fapolicyd-cli --file add /opt/veeam/transport/vddk_7_0/lib64/libgcc_s.so.1 --trust-file libgcc_s.so.1
sudo fapolicyd-cli --file add /opt/veeam/transport/vddk_7_0/lib64/liblookup-types.so --trust-file liblookup-types.so
sudo fapolicyd-cli --file add /opt/veeam/transport/vddk_7_0/lib64/libsqlite3.so.0.8.6 --trust-file libsqlite3.so.0.8.6
sudo fapolicyd-cli --file add /opt/veeam/transport/vddk_7_0/lib64/libssl.so.1.0.2 --trust-file libssl.so.1.0.2
sudo fapolicyd-cli --file add /opt/veeam/transport/vddk_7_0/lib64/libssoclient.so --trust-file libssoclient.so
sudo fapolicyd-cli --file add /opt/veeam/transport/vddk_7_0/lib64/libstdc++.so.6 --trust-file libstdc++.so.6
sudo fapolicyd-cli --file add /opt/veeam/transport/vddk_7_0/lib64/libvddkVimAccess.so.7.0.3 --trust-file libvddkVimAccess.so.7.0.3
sudo fapolicyd-cli --file add /opt/veeam/transport/vddk_7_0/lib64/libvim-types.so --trust-file libvim-types.so
sudo fapolicyd-cli --file add /opt/veeam/transport/vddk_7_0/lib64/libvixDiskLib.so.7.0.3 --trust-file libvixDiskLib.so.7.0.3
sudo fapolicyd-cli --file add /opt/veeam/transport/vddk_7_0/lib64/libvixMntapi.so.1.1.0 --trust-file libvixMntapi.so.1.1.0
sudo fapolicyd-cli --file add /opt/veeam/transport/vddk_7_0/lib64/libvmacore.so --trust-file libvmacore.so
sudo fapolicyd-cli --file add /opt/veeam/transport/vddk_7_0/lib64/libvmomi.so --trust-file libvmomi.so
sudo fapolicyd-cli --file add /opt/veeam/transport/vddk_7_0/lib64/libz.so.1 --trust-file libz.so.1
sudo fapolicyd-cli --updatesudo fapolicyd-cli --file add /opt/veeam/transport/libRansomwareStats.so --trust-file libRansomwareStats.so
sudo fapolicyd-cli --updateIf this KB article did not resolve your issue or you need further assistance with Veeam software, please create a Veeam Support Case.
To submit feedback regarding this article, please click this link: Send Article Feedback
To report a typo on this page, highlight the typo with your mouse and press CTRL + Enter.
Spelling error in text
Thank you!
Your feedback has been received and will be reviewed.
Oops! Something went wrong.
Please, try again later.
You have selected too large block!
Please try select less.
KB Feedback/Suggestion
This form is only for KB Feedback/Suggestions, if you need help with the software open a support case
Thank you!
Your feedback has been received and will be reviewed.
![]()
Oops! Something went wrong.
Please, try again later.