#1 Global Leader in Data Resilience

Backup of Powered-Off VM in Proxmox Fails When HA Status is Stopped

KB ID: 4715
Product: Veeam Backup & Replication | 12.3 | 12.3.1 | 12.3.2 | 13
Veeam Plug-In for Proxmox VE
Published: 2025-01-30
Last Modified: 2025-09-24
mailbox
Get weekly article updates
By subscribing, you are agreeing to have your personal information managed in accordance with the terms of Veeam's Privacy Notice.

Cheers for trusting us with the spot in your mailbox!

Now you’re less likely to miss what’s been brewing in our knowledge base with this weekly digest

error icon

Oops! Something went wrong.

Please, try again later.

Challenge

The backup of a powered-off VM within a Proxmox environment where High Availability (HA) is enabled but the HA status is Stopped, fails with the error:

Failed to perform backup: Failed to connect the NBD server to the hypervisor host.

Cause

The job fails because the High Availability (HA) status is set to "stopped." As documented in the Proxmox documentation, in the stopped state, "The CRM tries to keep the resource in stopped state, but it still tries to relocate the resources on node failures." This configuration prevents backups of powered-off virtual machines, resulting in errors.

Solution

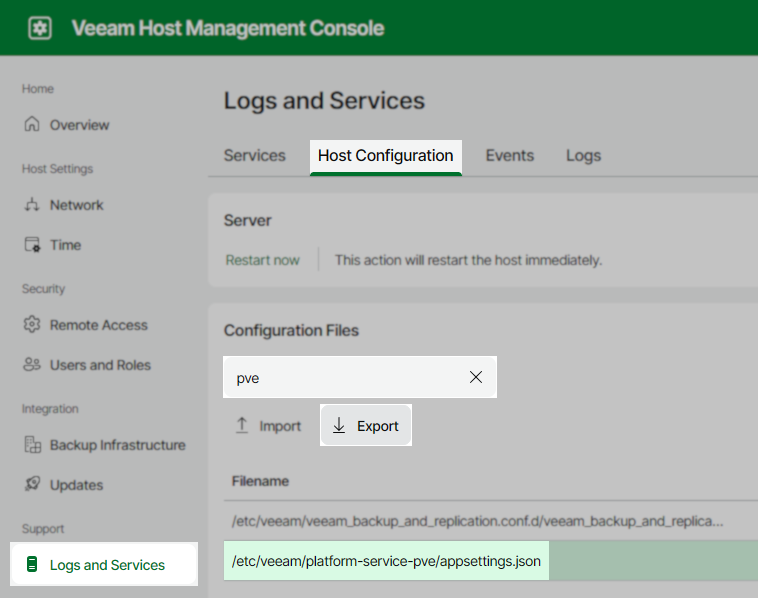
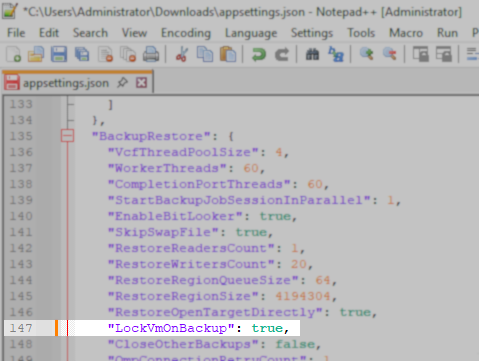
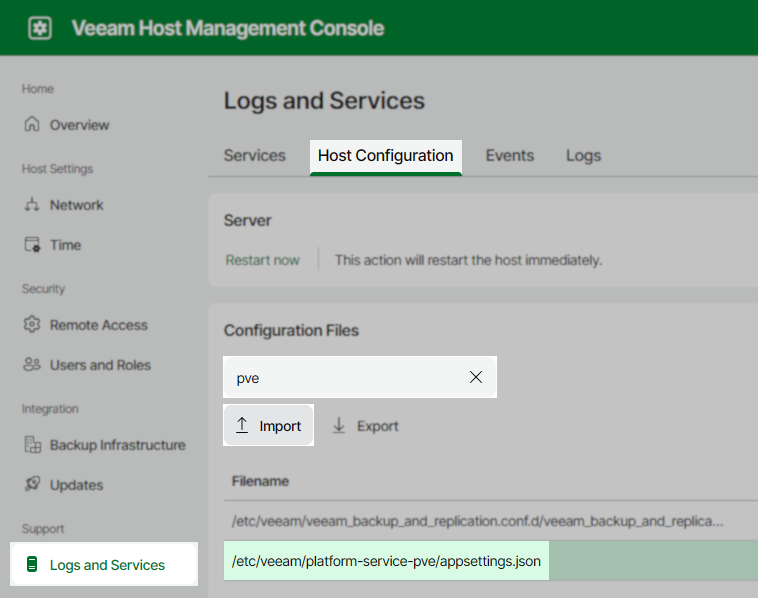
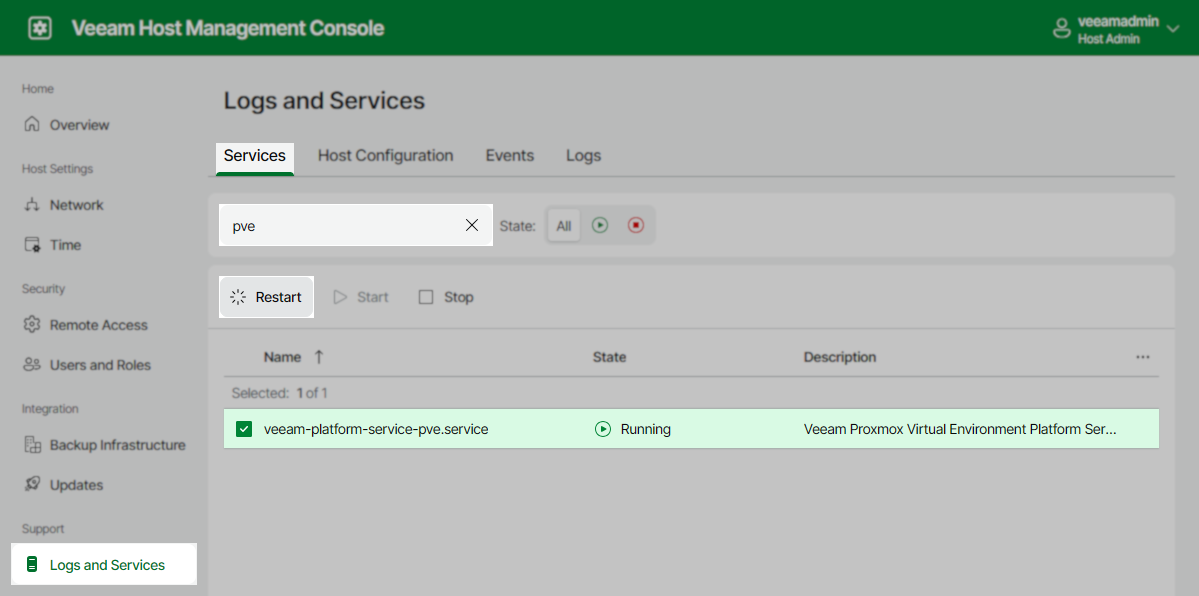
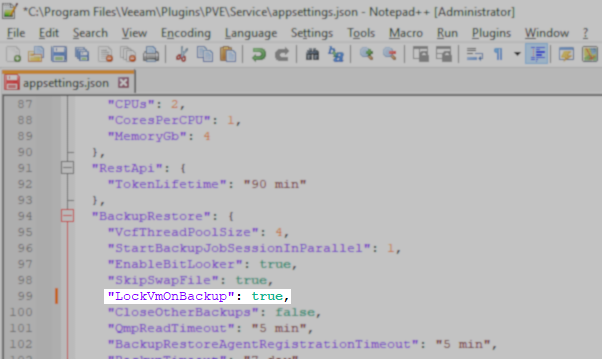
To resolve this issue and allow the job to complete for powered-off VMs, reconfigure the Veeam Plugin for Proxmox to lock VMs during backup, informing the CRM not to trigger a stop operation.
Instructions for Veeam Backup & Replication 13 Veeam Software Appliance
  1. Log in to the Veeam Host Management Console.
  2. Export the following configuration file using the Host Configuration section found under Logs and Services.
    /etc/veeam/platform-service-pve/appsettings.json
    
Veeam Host Management Console showing the "Logs and Services" section under "Host Configuration," with the "pve" configuration file selected and the "Export" button highlighted. The file path "/etc/veeam/platform-service-pve/appsettings.json" is shown.
  1. Open the downloaded json file using a text editor.
  2. Find the line containing "LockVmOnBackup": false and change it to true, and save the file.
Notepad++ window displaying part of an appsettings.json file. The line '"LockVmOnBackup": true,' is highlighted within the "BackupRestore" settings section.
  1. Ensure there are no active Proxmox backup or restore tasks.
  2. Disable all scheduled Proxmox jobs.
  3. Log in to the Veeam Host Management Console.
  4. Import the following configuration file using the Host Configuration section found under Logs and Services.
Veeam Host Management Console in "Logs and Services" under "Host Configuration," with "pve" configuration file selected and the "Import" button highlighted. The file path "/etc/veeam/platform-service-pve/appsettings.json" is shown.
Security Officer Approval Needed

After clicking Import, a message may appear stating that the change has been staged and requires the Security Officer to approve the setting import operation.

Please reference Performing Security Officer Tasks for more information.

  1. Switch to the Services tab, search for the veeam-platform-service-pve.service service, select it and click Restart.
Veeam Host Management Console in "Logs and Services" under "Services," showing "veeam-platform-service-pve.service" selected and running, with the "Restart" button highlighted.
  1. Enable all disabled jobs from Step 6.
Instructions for Veeam Backup & Replication 12.3.x on Windows
  1. On the Veeam Backup Server, open the AppSettings File:
    C:\Program Files\Veeam\Plugins\PVE\Service\appsettings.json
    
  2. Find the line containing "LockVmOnBackup": false and change it to true.
Example
  1. Save the file.
  2. Ensure there are no active Proxmox backup or restore tasks.
  3. Disable all scheduled Proxmox jobs.
  4. Restart the Veeam PVE Service service.
  5. Enable all disabled jobs from Step 5.
Note
In the event of any failures during the backup, the VM may remain locked. To resolve this issue, please follow the instructions provided here: How to unlock a VM if it doesn’t start.

If this KB article did not resolve your issue or you need further assistance with Veeam software, please create a Veeam Support Case.

To submit feedback regarding this article, please click this link: Send Article Feedback
To report a typo on this page, highlight the typo with your mouse and press CTRL + Enter.

Spelling error in text

Thank you!

Thank you!

Your feedback has been received and will be reviewed.

Oops! Something went wrong.

Please, try again later.

You have selected too large block!

Please try select less.

KB Feedback/Suggestion

This form is only for KB Feedback/Suggestions, if you need help with the software open a support case

By submitting, you are agreeing to have your personal information managed in accordance with the terms of Veeam's Privacy Notice.
Verify your email to continue your product download
We've sent a verification code to:
  • Incorrect verification code. Please try again.
An email with a verification code was just sent to
Didn't receive the code? Click to resend in sec
Didn't receive the code? Click to resend
Thank you!

Thank you!

Your feedback has been received and will be reviewed.

error icon

Oops! Something went wrong.

Please, try again later.